Table of Contents
- Introduction
- Shipping Rate Calculation
- WooCommerce Shipping Methods Overview
- Shipping Settings in WooCommerce
- Shipping Classes in WooCommerce
- Common Shipping Scenarios
- Shipping Process Automation
- Creating Custom WooCommerce Shipping Method
Introduction
You are all set with your online store on the WordPress/WooCommerce platform, you’ve set up the product catalog, secured your WordPress website, and configured the payment modes. Now is the time for you to configure how to handle the shipment of orders and set up a few order fulfillment services.
WooCommerce offers different shipping options and tax settings. An online store owner can calculate shipping costs by using various shipping methods and shipping classes in WooCommerce.
As you may have seen, WooCommerce comes complete with several basic core shipping methods for offering Flat Rates, Local Pickup, and Free Shipping. If you require more flexibility for your shipping, you may choose from many free or premium shipping plugins available.
[vc_cta h2=”Shipping Plugins for Real-time Rates & Label Printing”]
There are plugins available for integrating your store with various Shipping companies. These plugins will help you to charge accurate shipping rates during the checkout process. The plugins are even capable of printing shipping labels & tracking the packages from your WooCommerce dashboard.
- WooCommerce DHL Express / Paket Shipping plugin
- WooCommerce USPS Shipping plugin
- WooCommerce Stamps.com USPS Shipping plugin
- WooCommerce Australia Shipping plugin
- EasyPost (UPS, USPS & FedEx) Shipping plugin
- WooCommerce UPS Shipping Plugin
- WooCommerce FedEx Shipping Plugin
- WooCommerce Canada Post Shipping Plugin
- WooCommerce Royal Mail Shipping Plugin with Tracking
- WooCommerce Table Rate Shipping Pro Plugin
- WooCommerce Shipment Tracking Pro Plugin
- WooCommerce Estimated Delivery Date Plugin
- WooCommerce Multi-Carrier Shipping Plugin
[/vc_cta]
With the right extensions, you can charge a more accurate shipping fee and also automate your shipping process completely.
– By configuring a commercial WooCommerce Shipment Tracking Plugin, your customers can track their orders and get status updates about the delivery of their purchased items.
– Address Validation & Google Address Autocomplete Plugin will save you from wasted shipping costs by delivering to incorrectly entered shipping addresses.

This guide will provide you with instructions as to how to configure the shipping features available in WooCommerce on your eCommerce store. Besides, an overview will be provided as to how you can extend your shipping functionalities so as to make your shipping more robust and efficient.
Shipping Rate Calculation
It has been ascertained from various studies that one of the primary reasons for Cart abandoning his Cart. One of the major features of the WooCommerce shipping module is the calculation of shipping rates. In WooCommerce parlance, this is commonly referred to as a WooCommerce Shipping method.
WooCommerce Shipping Methods Overview
There are various shipping methods that help you control the shipping rates offered. They are divided into different categories based on their functionality. The two broad categories of shipping methods are:
- Standard shipping methods
- Premium shipping methods
Online store owners can choose the appropriate shipping method that best suits their online store’s requirements. Now we will discuss both these categories of shipping methods in detail.
Standard Shipping Methods
WooCommerce offers the following core or basic shipping methods:
Flat Rate
Flat rate is a fixed rate that you charge for a particular zone. Certain mathematical calculations are used in arriving at this rate. For example, you can charge customers based on the number of items in the cart or charge 10% of the total order cost for shipping.
Free Shipping
As the term denotes, Free Shipping does not charge customers any fee for shipping the products they have ordered from the eCommerce store. It can be triggered by a coupon, a minimum order amount or both. The store owner can use this as a sales tactic to encourage customers to spend more. For instance, he/she can offer free shipping on orders over $100. However, since this shipping method involves a trade-off that the store owner has to make between his/her profitability and enhancing customer satisfaction, it has to be employed very prudently.
There are common scenarios which seller want to conditionally apply free shipping. For example, allow free shipping only for those customers purchasing from specific WooCommerce Shipping Zones. In such cases, you may even want to hide other eligible woocommerce shipping methods when free shipping is available. There are plugins available to conditionally hide woocommerce shipping methods.
Local Pickup
This option can be utilized by customers to pick up the items they have ordered online, directly from the local pickup store, if the online store has such a facility. You can charge an optional cost for this if you feel it is needed.
There are many free and commercial shipping method extensions in WooCommerce, besides these standard methods. They help you to perform some simple as well as complicated shipping calculations. These plugins can be downloaded from the WordPress plugin repository or from commercial plugin developers. These plugins help you to fix a shipping rate for your products based on various parameters. These include product weight, dimensions, shipping destination, and order quantity and other parameters like the type of product. This is in case the product requires special care while shipping, like for breakable, perishable, corrosive or antique products.
Premium Shipping Methods
If you require more flexibility to your shipping, you can opt for one of the premium shipping methods. Some of the important premium shipping extensions are listed below:
API based shipping method
This shipping method provides real-time or live shipping quotes. Here, rates are obtained from a third party Application Programming Interface (API), for shipping carriers like USPS, DHL, UPS, Canada Post, Australia Post, and FedEx. Most of these carriers support box packing or providing rate quotes per product. They can be customized to show multiple rates or the cheapest rate. You can also provide these shipping rates in multiple currencies with a WooCommerce Currency Switcher plugin.
A few SaaS-based solutions like StorePep comes with a completely automated mechanism that shows real-time rates, generate labels, request pickups and generate manifests. StorePep, in particular, can handle multiple vendors as well as multiple carriers from a single location and provide support for:
- WooCommerce FedEx Shipping
- WooCommerce DHL Shipping
- WooCommerce UPS Shipping
- WooCommerce USPS Shipping
Its WooCommerce Shipping calculator plugin that provides rates from all the above carriers from a single module right into your WooCommerce checkout.
User-defined shipping methods
These are shipping methods where you can control the shipping rates you offer. Hence, they are the most flexible among all the shipping methods. The user-defined shipping methods offered by WooCommerce are:
1. Table Rate Shipping
This method allows you to create shipping zones for different countries, states or postcodes. You can then create different tables of rates within each zone. You have the option of calculating the rate on a per-order basis or based on the sum of the rates for the different items in the order. Rates can be fixed based on the following parameters:
- Shipping class
- Weight
- Dimensions
- Item count
- Cost
You can also fix a maximum and minimum value for the shipping rates in this method. Shipping rates can be given on the following basis:
- Per line
- Per item
- As a percentage of the item cost
- Based on weight
2. Flat Rate Box Shipping
In this shipping method, you can create different zones for countries, states, and postcodes. Subsequently, you can create multiple tables of rates, within each zone. Within each zone, you can define shipping package boxes with length*breadth*height dimensions and weight limits. You can have a fixed rate, percentage rates and rates based on the weight of the contents of the order. Items to be shipped are then packed in boxes, based on their volume.
3. Per Product Shipping
This shipping method allows you to define shipping rates at product and variation level. Rates can be defined as fixed or a percentage of costs based on the following parameters:
- Per line
- Per item
- Based on country codes or post/zip codes
The rates can be offered as a standalone shipping rate (in case of per product shipping) or added to other shipping method rates. There is a list of products with a fixed shipping cost while for the remaining it varies depending on the product.
4. Local Pickup Plus
In this shipping method, you can define locations where you will offer local pickup at optional costs.
Custom Shipping Method
Developers can create their own shipping methods using extensions for WooCommerce shipping method API. Such customized shipping methods can be used by individual store owners according to the requirements of their online store. Let us discuss an example of a customized shipping method. A customized shipping method can be developed which will calculate the shipping cost and where the product is to be shipped. The cost will be calculated based on the weight of the order and the zone it is to be shipped.
Shipping Settings in WooCommerce
This section will enable you to set up the basic shipping configuration for your eCommerce store.
To use shipping, you will have to enable it on the General tab of your store’s WooCommerce settings. To do so, go to: WooCommerce > Settings > General
General Options

There are various general settings associated with shipping, which you can configure here. They include:
- Base Location: Select the location from where you are shipping your orders. In the example above, we have selected the United States (US) – Indiana.
- Selling Location(s): Select the locations to which you wish to sell your products. You can select any one of the options given below from the drop-down:
- Sell to All Countries
- Sell to All Countries, Except For…
- Sell to Specific Countries
- Shipping Location(s): Select the locations to which you wish to ship your products. You can select any one of the following options from the drop-down:
- Ship to all countries you sell to
- Ship to all countries
- Ship to specific countries only
- Disable shipping and shipping calculations
- Default Customer Location: This is the customer location that you set as default on your online store. This will enable you to determine tax and shipping costs before the customer enters the address information. Besides, there are the following options as well in the drop-down menu that you can choose as the default customer location:
- No location by default: Here, the store owner does not set any default location, and hence no taxes are calculated.
- Shop base address: In this option, you can set the base location of your store as the default customer location.
- Geolocate: Selecting this option enables you to determine the customer’s default location based on the IP address through which the customer logs in.
- Geolocate (with the page caching support): As in the previous option, here also, you can determine the customer’s default location based on the IP address through which the customer logs in. The only difference is that you have to select this option only if your store has a page caching support.
After configuring the settings mentioned, you can Save Changes.
After this, you can navigate to WooCommerce > Settings > Shipping as shown below:

There are three sections under the Shipping tab namely Shipping Zones, Shipping Options, and Shipping Classes.
Shipping Zones
Shipping Zones can be selected based on where you want your products to be shipped. There are various steps in this process that include the following:
Zone Name
The shipping zone(s) can be selected based on where the store owner wants his/her products to be shipped. Multiple zones can be added based on the location. Naming the shipping zone(s) can be done based on the store owner’s preference.
Region(s)
After selecting the zone, you can select the regions within that zone where you wish your products to be shipped. For example, for the zone USA, you can select particular states or postcodes in the USA where you want your products shipped. Alternatively, you can select United States for shipping your products across the USA.
After selecting the shipping zone and shipping regions of your choice, click on Save Changes. This will enable you to select the shipping methods which are applicable to that particular zone and region.
Select the shipping method(s)
Once you have added a Shipping Zone, you can select the Shipping method(s) which are relevant to that shipping zone.
From the drop-down, you can choose any of these three shipping methods listed below:
- Flat Rate
- Free Shipping and
- Local Pickup.
The shipping methods you select from a shipping zone will be applicable only to customer’s addresses within that particular shipping zone.
Shipping Options
In this sub-menu of Shipping, you can set general configurations which deal with enabling the shipping rate calculations and choosing the shipping destination.

WooCommerce Shipping Options
1. Shipping Calculations
This section allows you to enable or disable the checkbox for shipping rate calculations. Accordingly, the manner in which the shipping rate calculations are displayed will vary. There are two options in this section:
-
Enable the shipping calculator on the cart page
In this option, the customer is able to view the shipping rate calculation on the cart page for each individual item he/she adds to the cart or for all the items added to the cart
-
Hide shipping costs until an address is entered
In this option, the customer is able to view the shipping rate of his/her order only after he/she enters his address while checking out.
2. Shipping Destination
This section allows you to choose the customer’s address to which the order will be delivered. The options available in this section are:
-
Default to customer shipping address
In this option, WooCommerce selects the customer’s shipping address by default. This by default will be the address the customer enters while registering to the site. Alternatively, if he/she has not registered to the site, WooCommerce will ask for the shipping address while he/she is checking out. By setting this option, the Checkout page looks like below:

Shipping address as default
-
Default to customer billing address
In this option, WooCommerce selects the customer’s default billing address. This is the address he enters while registering to the site. However, he has the option to change it to another address of his preference. By selecting this option, the Checkout page looks like below:

Default billing address
-
Force shipping to the customer billing address
In this case, only the customer’s billing address is asked for, and this is, by default, taken as the customer’s shipping address, with no option to change it.
Flat Rate
In this section, WooCommerce allows store owners to set a Flat Rate for shipping. This a fixed rate that is charged based on various parameters like:
- The type of product
- The destination shipping location
- The weight of the product
- The dimensions of the product
- Based on whether it is a special product (bulky, breakable, perishable, corrosive, antique etc)
A screenshot for the settings for Flat Rate are as shown below:

Flat Rate
You will be taken to the Flat Rate settings page when you click on the link Flat Rate that you have set in Shipping Zones under Shipping Method. Here, you can set the Flat Rate you want to set for each zone that you have chosen. There are various text boxes in this page like:
- Method Title: This will, by default, appear as Flat Rate. Otherwise, you can enter Flat Rate in the corresponding box. This will reflect in the Cart/Checkout page of your store under Shipping Options.
- Tax Status: Here, you can select whether the Flat Rate for shipping that you have chosen is taxable or not. There are two options here:
- Taxable: This option specifies that the flat rate shipping for that particular zone is taxable. Taxes include Sales tax, Value Added Taxes etc. which you can set in the Tax tab under WooCommerce > Settings
- None: This option specifies that you have not included taxes in your shipping costs
- Cost: Here, you can enter the cost you wish to set for normal products that you are shipping to that particular shipping zone, excluding taxes. Alternatively, you can enter the sum of the costs for different items together. There are three placeholders which you can alternately enter here:
- [qty] for the number of items
- [cost] for the total cost of items
- [fee percent = “10” min_fee = “20” max_fee = “”] for percentage based fees
Shipping Class Costs
These costs can optionally be added based on the costs you wish to specify for the different product shipping classes you have created. This section will appear only if you have configured different product shipping classes in the store. Here, you have the provision to set specific shipping costs based on the Shipping Classes you have added. The shipping costs set for the shipping classes you have added will be added to the flat rate you have already defined. Given below is a screenshot of an example of different shipping costs set for different shipping classes created:

As can be seen above, we have set a flat rate of $20, excluding taxes, for the USA shipping zone we created. Besides, we have set different shipping class costs for the different shipping classes we have created. When the shipping rate is calculated for each of these classes, the flat rate will be added to the shipping class cost of each shipping class to arrive at the actual shipping rate. If the product being shipped belongs to a class that has not been defined, then you can set a shipping rate that has not been entered under any shipping class. This cost is set in the No Shipping Class Cost. Setting shipping class costs can be done based on the preference of the store owner.
Calculation Type: In this option of setting the shipping class cost, there is a drop box where you can decide how you want the shipping cost calculated. The screenshot of this is given below:
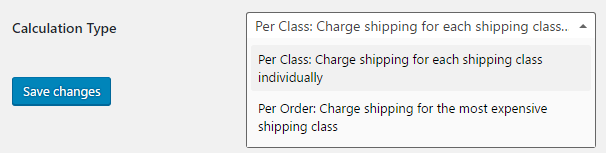
There are two options here:
- Per Class: Charge shipping for each shipping class individually: In this option, the shipping cost will be calculated individually for each shipping class and its cost. The total shipping cost will be the sum of each individual shipping class cost according to the items in the order.
- Per Order: Charge shipping for the most expensive shipping class: In this option, the most expensive shipping class will be used for calculating the shipping costs.
Free Shipping
Free Shipping is a special shipping method which can be triggered with coupons and minimum spends. It can generally be offered if the order is being shipped to a destination which is close to the store or a local pickup center. You will be taken to the Free Shipping settings page when you click on the link Free Shipping that you have set in Shipping Zones under Shipping Method. The settings for this are as below:
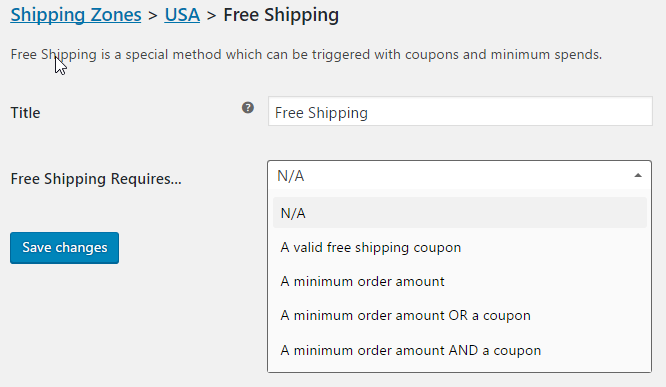
Free Shipping
There are two fields in this section:
- Title: This will by default appear as Free Shipping. Otherwise, you can enter the title Free Shipping. This will reflect in the Cart/Checkout page of your store under Shipping Options.
- Free Shipping Requires: Here, you have to enter the criteria or condition for availing free shipping from the drop-down menu. The different options in this field are:
- N/A: This option denotes that there is no condition or criteria required for Free shipping
- A valid free shipping coupon: In this option, customers have to provide a free shipping coupon to avail of the free shipping service. Free shipping coupons are generally provided by WooCommerce store owners as part of a marketing strategy.
- A minimum order amount: In this option, the order should meet the criteria of a Minimum order amount for the customer to avail of free shipping.
- A minimum order amount OR a coupon: In this option, the customer has to meet the criteria of either a minimum order amount or a free coupon to avail of free shipping.
- A minimum order amount AND a coupon: In this option, the customer has to meet the criteria of both a minimum order amount as well as a free coupon.
- Minimum Order Amount: If you select any of the latter three options, an extra field appears which requires you to enter a minimum amount for availing free shipping.
You can now click on Save Changes, to save the settings made.
Local Pickup
In this shipping method, customers have the option to come and pick their order directly from the local pickup store. By default, when using this method, local base store pickup prices will apply, regardless of the customer’s address. Alternatively, you can provide local pickup, free of cost. You will be taken to the Local Pickup settings page when you click on the link Local Pickup that you have set in Shipping Zones under Shipping Method. The settings for this method is given below:

Local Pickup
There are three fields in this section:
- Title: This will by default appear as Local Pickup. Otherwise, you can enter the title Local Pickup. This will reflect in the Cart/Checkout page of your store under Shipping Options.
- Tax Status: If the store owner wants to apply a tax rate for local pickup, he can set it up here. There are two options here:
- Taxable: Here store base tax rates will apply regardless of the customer’s shipping address
- None: This option can be selected if the store owner wishes to waive taxes on local pickup or local pickup charges altogether
- Cost: This is an optional cost that the store owner can set for local pickup
You can now click on Save Changes to save the settings made.
Shipping Classes
A Shipping Class is a group of similar products to which you can add a separate shipping cost. In the same way, you can create multiple shipping classes and add shipping costs for each shipping class. Any change you make in the shipping cost of that class will reflect in the shipping rate of all products in that class. Shipping rate methods such as Flat Rate Shipping and Table Rate Shipping will enable you to set shipping costs for products in a particular shipping class.
Creating Shipping Classes in WooCommerce
Here, you will be taken through a step-by-step process of creating Shipping Classes and adding shipping costs to these shipping classes. To navigate to Shipping Class, follow the steps given below:
WooCommerce > Settings > Shipping > Shipping Classes
The settings for this is given below:

Creating Shipping Classes
The steps to be followed for adding Shipping Classes are given below:
1. You can click on the tab Add Shipping Class to add a new Shipping Class.
2. Then, add the Shipping Class name under the Shipping Class column.
3. Add a Slug, which you can name as the shipping class name itself or something similar.
4. Under Description, you can enter something about the nature of the Shipping Class.
5. The Product Count denotes the number of products under a particular shipping class. In the example above, we have created a shipping class called Antiques for which the product count is 7, as seen in the screenshot above. There is another shipping class called Groceries with a product count of 8.
Adding Shipping Classes to Products in WooCommerce
You can add a shipping class to a product while adding it or editing it. To add Shipping Class to a Product, you can follow the procedure given below:
Consider the case of a product already added. Then, you can navigate to:
- Product > select a product already added (let us select ‘Antique jewelry’ here) > Edit
- Now go to the Product Data section
- Click on the Shipping tab on the left
- Select Antiques from the Shipping Class drop-down
- Click on Update
The settings for this is given below:

Example: Setting Flat Rate shipping method for a Simple product which belongs to Gift Class
The Flat Rate settings for a simple product belonging to the Gift class is as shown below:

Suppose a customer adds some gift products to his cart, the flat shipping rate that will appear in his cart will be as below:

Cart showing Flat Rate for Gift class
Here, Flat Rate is given as $50, which is the default Flat Rate Shipping Cost of $20 plus the “Gift” Shipping Class Cost of $30.
Suppose the customer adds a product that does not belong to any shipping class (for example, Lawn Mower), then the Cart would look as given below:

Cart for “No Shipping Class” product
The Flat Rate settings for a simple product belonging to No Shipping Class is given below:

Flat Rate settings for No Shipping Class
Here, Flat Rate is $30 which is the sum of Cost ($20) and No Shipping Class Cost ($10)
Example: Setting Flat Rate shipping method for a variable product which belongs to T-Shirt Class
– Assign the Class T-shirt to Parent Product as shown below:

Select the Class T-shirt from the drop-down list and click Update.
– Now, assign the same class to variation product as shown below:

Under Variation tab, you get all the variations of the variable product. For Blue variation, you get the Shipping Class options as shown below:

Here, select the required shipping class for your product and update it.
– The Flat Rate Settings are as shown below:

Flat Rate setting
– Suppose, the customer adds Blue T-Shirt product (assigned the T-Shirt class) to Cart, then the cart will look like :

Here, Flat rate is $28.00 which is the addition of Cost ($20.00) and T-Shirt Shipping Class Cost ($8.00).
Common Shipping Scenarios
Am I charging my customers too much or too little for shipping? Should I offer Free Shipping? These are some of the typical questions most eCommerce shop owners ask themselves while formulating their shipping strategy.
Getting your product into the hands of your customer in a way that delivers a truly exceptional customer experience, while keeping you profitable, is very important to business success.
Here, we will try to list most popular shipping scenarios and guide you about how you can set this up in WooCommerce.
Offer Free Shipping
To remain competitive in today’s marketplace, you may be forced to offer Free shipping. Free Shipping has a very positive effect on conversion rates, is easy to explain to customers and also aligns with customer expectations.
It can be a good selling tactic to offer Free Shipping. But you should keep in mind that, Free Shipping may be free to your customers but not to you! Understanding this, some businesses offer Free Shipping, but they slightly increase the prices to cover the shipping cost.
But if you choose to offer free shipping in its true sense, it is very important to understand its impact on your business’ bottom line. You will still need to pay the carrier and make sure you’re making enough on each order to cover the associated shipping costs.
The most effective approach to Free Shipping is to only offer it for orders where you know you’re making enough on the sale to cover shipping and still make a profit. You could try offering Free Shipping with a minimum order amount or a minimum number of items that makes sense for your business and, maybe try excluding products that are too heavy or bulky for you to offer Free Shipping. A common rationale for offering Free Shipping is that it will help boost sales, leading to more orders and more profits. Free Shipping can also lead to larger orders, particularly when minimum thresholds are applicable. This should drive up your average order value and help you have more margin to apply the shipping cost against.
Free Shipping based on order amount or country can be set up using the standard WooCommerce shipping method, Free Shipping.
But if you need to offer Free Shipping to specific products, based on a number of products in the cart etc., you may need to use plugins that allow more complex shipping rules. A very commonly used plugin is Table Rate Shipping plugin.
Examples of Free Shipping cases are:
- Free shipping on all items.
- Free shipping on selected items for orders of $100 or more.
- Free shipping on more than 10 items.
- Free shipping within the USA
- Free Shipping on books and Flat rate on other products.
Charge a Flat Rate
Another option to consider, while deciding on your shipping strategy, is to offer a Flat Rate for every package. Flat rate shipping works best for businesses that sell products that are fairly small and not too heavy or products that are similar. This eCommerce shipping strategy is as popular as Free Shipping, as it keeps things simple for customers and it’s easier to set up on the website.
Flat Rate method of charging for shipping requires you to figure out your average cost of shipping a package. This is anyway a best practice that you should be don’t drastically undercharge or overcharge your customers. When you charge a flat rate, you’ll probably be slightly overcharging or undercharging your customers than the actual shipping cost. This means you’ll lose money on roughly half of your shipments and make money on the other half. But it all evens out in the end.
Flat Rate Example Scenarios:
- Flat rate (say $5 ) on all products, regardless of order value
- Free Shipping on some products and a flat rate for others
- Charge $3 to all locations in the United States
- Flat rates for orders up to $100 and Free Shipping above orders of $100
Weight-based Shipping Rate
If you have products that vary significantly in weight, it might be a better idea to go for Weight Based Shipping. For example, if you sell shoes, jackets, and dresses, a one size fit all Flat Rate shipping option may not work as there is a large weight (and price difference) in shipping a pair of shoes compared to a light summer dress. Charging different shipping rates based on weight slabs is common in such scenarios. Beyond the defined range, you can define shipping rate per weight unit.
To figure out your shipping costs you need to actually calculate them by measuring their weight, dimensions, and other factors that affect how much it costs to ship them. Round these numbers up to the nearest whole number. Calculated shipping is the most exact method to make sure products are priced correctly.
A typical weight based shipping rate slabs may look like this example:
– Cart weight 8lbs or less costs $5
– Cart weight 9-15lbs costs $8
– Cart weight 16-30lbs costs $15
– Cart weight more than 30lbs costs $20
In some cases, it is not that simple. You may want to add one more parameter along with weight, for eg. regions. If you want shipping prices to be different based on weight and country or region, then you may try Table Rate Shipping.
Cart-based (Order Quantity/Order Total)
A common requirement is to set shipping cost based on the order quantity or order total. For example, you are selling shoes weighing roughly 1 kg, and usually, charge $3 each for shipping. You could offer a shipping discount of say 25% for orders of 3 or more shoes up to a maximum 6. This means that if someone buys 4 shoes, the total shipping cost would be $9 instead of the original $12.
This is an example of setting shipping cost based on the Cart or Order Quantity which is ideal if you sell multiple items with identical weights or prices. You could similarly set shipping cost as a percentage of the total amount in the cart.
It is also a common strategy to offer Free Shipping if the cart subtotal is above a certain amount. For example, you can offer Free Shipping for any order value of $100 or above.
These kinds of complex shipping rules are not available in standard WooCommerce. You need to install separate WooCommerce add-ons for implementing such rules.
With Advanced Shipping extensions for WooCommerce such as WooCommerce Table Rate Shipping plugin, you can set up shipping rates based on a variety of conditions based on the Cart.
Shipping Rates for Product Category or Class
WooCommerce product shipping classes or product categories can be used as a way of setting shipping cost for a group of products.
For example, products in category Books can have a different shipping rate than those in category Furniture.
Similarly, products associated with the shipping class small may fit into an envelope and those associated with shipping class large may require a parcel shipping. You may define different shipping calculation methods for these classes. You may use the WooCommerce Flat Rate shipping method to associate a flat rate to the shipping class small and use Table Rate Shipping method to set a weight and region based rates for products with shipping class large.
Per Product Shipping Rate
The one-size-fits-all solution may not be suitable for all types of products. If your store is selling one-off, heavy or large products that require additional shipping, unlike the rest of your catalog, general pricing, based on weight or order amount may not be practical.
For example, a shop owner who is selling antique items may need to take special care and do specialized packaging and want this reflected in the shipping price.
In such cases, you may need the option to set up a separate price for each item in your catalog. The WooCommerce system then adds the per-product shipping fees together to provide a total at checkout. Apart from including cost per product, you also have the facility of defining costs per variation of the product.
Learn more about WooCommerce Per-Product Shipping.
Local Pickup/In-store Pickup
If you have a physical store, you can let your customers order products online and choose to pick up at your store to avoid shipping costs. You can still charge customers a handling fee if you wish to.
Local Pickup option is available out of the box in WooCommerce and allows you to configure a local store in any destination you wish, from which customers can pick up the products they have ordered. This sets the geographical perimeter for which customers can pick up their order.
However, for some businesses, local pickup requirements could be a bit more complex than just setting the pickup zone and handling fee. Again, there are plugins, such as WooThemes Local Pickup Plus, that could meet most of the complex requirements.
Charge Real Time Carrier Rates
Charging what you get charged by your shipping courier is another great eCommerce shipping strategy if you prefer to offer the best possible shipping rate to your customer while still covering your shipping costs.
There are WooCommerce add-ons that let you get live rates in real-time directly from carriers such as UPS, USPS, FedEx, Australia Post, Canada Post or DHL. Once a customer gets to the Checkout page and selects where he/she wants the order shipped, the calculator pulls the available services and corresponding real-time shipping quotes from the shipping service provider by calling the right API.
Using a real-time calculator can help you win the trust of customers. It shows that you are not inflating your shipping charges. Customers may also choose the best shipping service that matches their budget and delivery speed requirements.
With the right plugin installed, the store owner, can also pay postage online and print shipping label without leaving the WooCommerce admin interface. This could save a lot of time and effort in shipping your package.

Table Rate Shipping
At times, you will have complex shipping requirements which need a combination of calculation methods.
For example, you provide Free Shipping in your home state but charge Flat Rate for other states in the country. For shipping to international destinations, you charge weight based shipping rates. You have assigned a shipping class for certain items for which you want to charge a Flat Rate. There could be more requirements in real life scenarios.
If you have complex and advanced shipping calculation requirements, you may rely on the WooCommerce Table Rate Shipping method for WooCommerce. Table Rate Shipping method gives you great flexibility for nearly every scenario.
WooCommerce Table Rate Shipping method is arguably the most powerful and flexible shipping method available for WooCommerce. This lets you define rules and set the corresponding shipping rate for a combination of conditions. You can define shipping rates based on the shipping destination, have multiple rates per zone, and add multiple rules based on product weight, cart subtotal, the number of items, shipping class, price and so much more. If the user’s cart matches the rule, the shipping cost you defined for that rule is applied.
Learn more about WooCommerce Table Rate Shipping.
Bundle Rate/Combo Offer
Bundle Rate shipping rate is commonly used in shops where customers buy multiple products of similar type. For example, you have set a flat rate for Per Product Shipping but wants the Cart to automatically charge the same flat rate per multiples of 5 of the product. So, for instance, if the customer orders 1–5 items, the cost will be $1.00, but if the order is 6–10 products, the shipping will be $2.00 and so on… so it will add an additional shipping fee for every 5 items ordered.
This kind of special bundle shipping rates can be configured using WooCommerce Bundle Rate Shipping plugin. Another similar requirement is to offer free shipping for one product when purchased along with another.
Shipping Process Automation
Whether you’re a big or small eCommerce shop, shipping is a chance to impress or disappoint your customers. Processing orders in a fast and efficient manner are very crucial for an eCommerce business.
As you grow, there are a variety of shipping plugins and tools that can further help you streamline your shipping processes. This includes simple plugins which will help you to print invoices, labels, receipts and packing slips or track orders. You can use plugins which will integrate with many of the most popular courier companies so that you can print more than just shipping labels but the postage as well, which will be directly charged to your account.
Label/Invoice/Packing List printing
It is generally a good practice to include an invoice and packing list when you are shipping a package. It serves as a confirmation of what the package contains along with your contact information and the details of the purchase. It also establishes an extra line of communication between you and the customer and adds a human touch.
Furthermore, when you sell internationally, many countries require an invoice to be included. An invoice should contain all the required order details (such as name and address of your company, billing address of your customer, a list of all order items including taxes and totals).
If you don’t include one, there is a possibility that their customs officials may assess a value to the items in the package which in some cases is higher than what the customer has paid. This means the customer has to pay higher import fees and you’ll end up having a very frustrated customer.

WooCommerce Shipping Invoice
You may also want to print the address label with or without postage. If you have a business account with a shipping service provider, you can integrate your store with this account and pay the postage and print the label without logging into their online system. This helps to avoid copying and pasting the order and address details.
WooCommerce, by default, do this from your WooCommerce admin area.
[vc_cta h2=”The Plugins which allow you to Print Labels from WooCommerce Admin:”]
- ELEX WooCommerce DHL Express / Paket Shipping plugin
- ELEX WooCommerce USPS Shipping plugin
- ELEX WooCommerce Stamps.com USPS Shipping plugin
- ELEX WooCommerce Australia Post Shipping plugin
- ELEX EasyPost (UPS, USPS & FedEx) Shipping plugin
- WooCommerce UPS Shipping Plugin
- WooCommerce Canada Post Shipping Plugin
- WooCommerce Royal Mail Shipping Plugin with Tracking
- WooCommerce Table Rate Shipping Pro Plugin
- WooCommerce Shipment Tracking Pro Plugin
- WooCommerce Estimated Delivery Date Plugin
- WooCommerce Multi-Carrier Shipping Plugin
- WooCommerce Bookings and Appointments Plugin
[/vc_cta]
Shipment/Order Tracking
Once you start shipping your orders, you will also start receiving emails and calls from customers inquiring about the status of their order. If you can reduce the number of customer emails and calls with these questions, you may save a lot of time and money!
With WooCommerce default settings, customers receive an email with order details when they initially place an order, and the order status changes. Your store’s Checkout settings determine which statuses trigger a customer order notification email. You might want to add the order tracking information in one of the emails.
There are plugins which will add shipment tracking information into order completion email. The tracking information gets added to the order details page in the customer account page in your store too. These help customers to trace their order at every stage of shipment and delivery process without making a call or sending an email to you.
Export Orders for Third-Party Fulfilment
Not handling order fulfillment yourself? You might either want to integrate WooCommerce to your fulfillment service provider or you will manually export your orders and send to them.
If you are using ShipStation, ShippingEasy, ShipWire, etc., there are free plugins available. If you are using a different fulfillment service, you might find an integration plugin in the WordPress repository or somewhere on the Internet. If you are not lucky enough, try talking to a developer.
There are Order/Customer Import Export plugins available for WooCommerce that lets you export or import individual orders or bulk orders. This will be useful if you’re using an external shipping system or other third party software. You can also set automatic export via FTP, HTTP POST, or email for any or all orders.
Creating Custom WooCommerce Shipping Method
Creating a custom shipping method is pretty straightforward. In order to create a new shipping method, you need to extend the API provided by WooCommerce.
Here is sample code for a simple shipping method plugin:
Upload the zip file of the above plugin code to your WordPress. You can find the new custom shipping method My Custom Shipping under the Shipping tab as shown below:

Once you add items in the Cart, the destination specific shipping cost gets added to the total order amount. Here are some samples (US and Canada) of the Cart.
Cart for US order

For US addresses, the shipping cost of $5 which is assigned in code gets added to the subtotal.
Cart for Canada order

For Canada addresses, the shipping cost of $7 which is assigned in the code gets added to the subtotal.
If you need any help setting up WooCommerce or need professional help with anything related to WooCommerce/WordPress then check out Fixrunner WooCommerce Support.
Consider a case where as a store owner you want to use multiple carriers like :
– UPS, FedEx, DHL, USPS, Canada Post, Australia Post, Parcelforce, etc to perform shipping.
– In addition, you are selling wines, so you precisely know how many items can go inside a particular box. But then a solution that allows you to pack a fixed number of products in a box cannot be found.
– You have a list of postcodes and want to ship on those post codes only with a fixed shipping cost for certain post code ranges.
– Certain items go with special packing as they are brittle in nature and hence you have to adjust the weight of the shipment
All these are valid questions and hence require a robust shipping solution that can seamlessly perform shipping with the above requirements kept in the background. For such scenarios, you can use the WooCommerce Shipping Calculator plugin by StorePep : https://www.storepep.com/storepep-woocommerce-shipping-calculator/