WooCommerce Shipping Pro Chapter-1: Setting Up

In this tutorial, we will show you how to set up the WooCommerce Table Rate Shipping Pro plugin. to calculate and display shipping rates on your website, based on factors like weight, quantity, price, and destination address.
This tutorial will give you an excellent launch pad to kick-start the Usage of the WooCommerce Table Rate Shipping Pro plugin. It will give you all the essential knowledge and step-by-step instructions.
Plugin Installation
After purchasing the WooCommerce Table Rate Shipping Pro, the plugin Zip file is available in MY ACCOUNT.
- Download the .zip file from MY ACCOUNT.
- Log in as the WordPress Admin of your online store.
- Navigate to Plugins > Add New to upload the downloaded PluginHive Table Rate Shipping Pro plugin.
- Activate the PluginHive Shipping Pro plugin.
For detailed information about installing PluginHive Plugins —> How to Download, Install, Activate & Update WooCommerce Plugin?
Setting up WooCommerce Table Rate Shipping Pro Plugin
After installing the plugin, a new shipping method ‘Shipping Pro’ is added to WooCommerce. Now you can configure this Shipping Pro method as per your requirement. You can navigate to the setting in two ways as given below:
- Navigate to WooCommerce > Settings > Shipping > Shipping Pro ( under the Menu tabs )OR
- Navigate to Plugins > Installed Plugins > Settings for Shipping Pro plugin
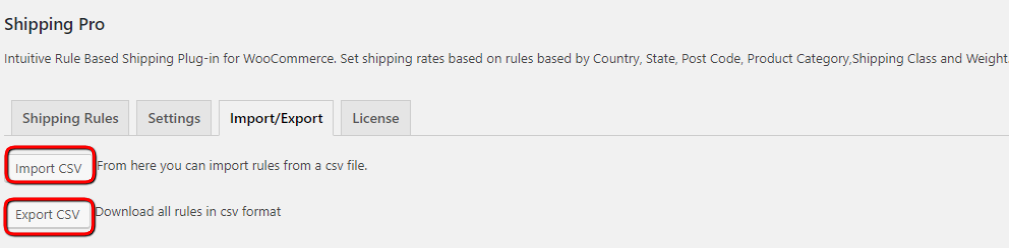
After getting to the settings page, the plugin settings are divided into the following four tabs.
- Shipping Rules: This tab contains the shipping rules that you will be configuring for your website.
- Settings: All the plugin settings will be available in this tab.
- Import/Export: This tab will have the setting for importing and exporting the shipping rules via a CSV file.
- License: Enter the API credentials that you get while purchasing the plugin, in this tab.
WooCommerce Table Rate Shipping Pro Settings
The general setting fields are as shown below:
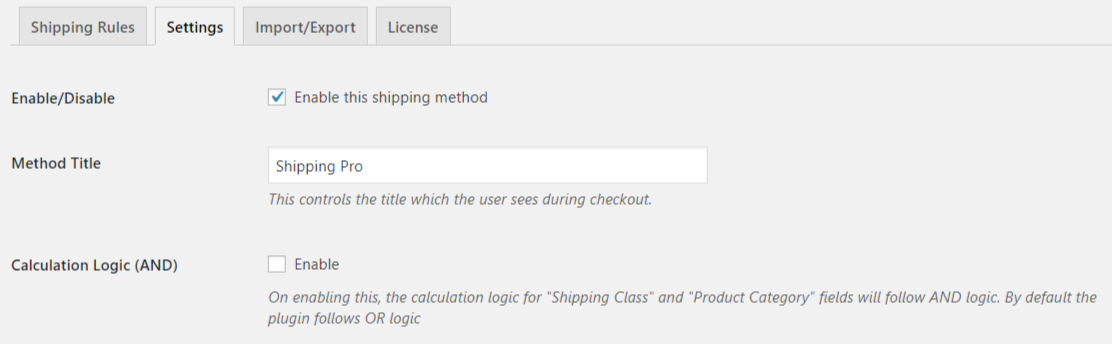
- Enable/Disable: Select Enable/Disable checkbox enables the Shipping Pro method.
- Method Title: The method Title is visible on the Cart/Checkout page under Shipping options. Specify the Method Title as required(defined by you).
- Calculation Logic AND Logic: Using this option, the plugin will consider multiple shipping classes and product categories and then calculate shipping rates if products from all the classes are present in the cart.
Simple Shipping Example
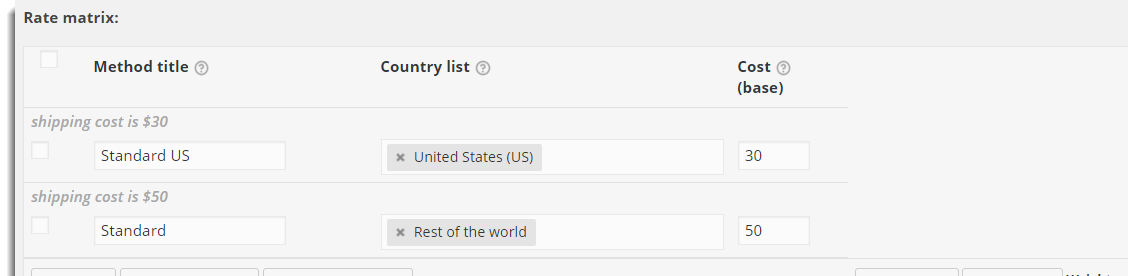
Suppose you want to charge $30 for the United States to ship a particular product and $50 for all other countries except the United States for the same product. The Rate Matrix setting is as shown below:
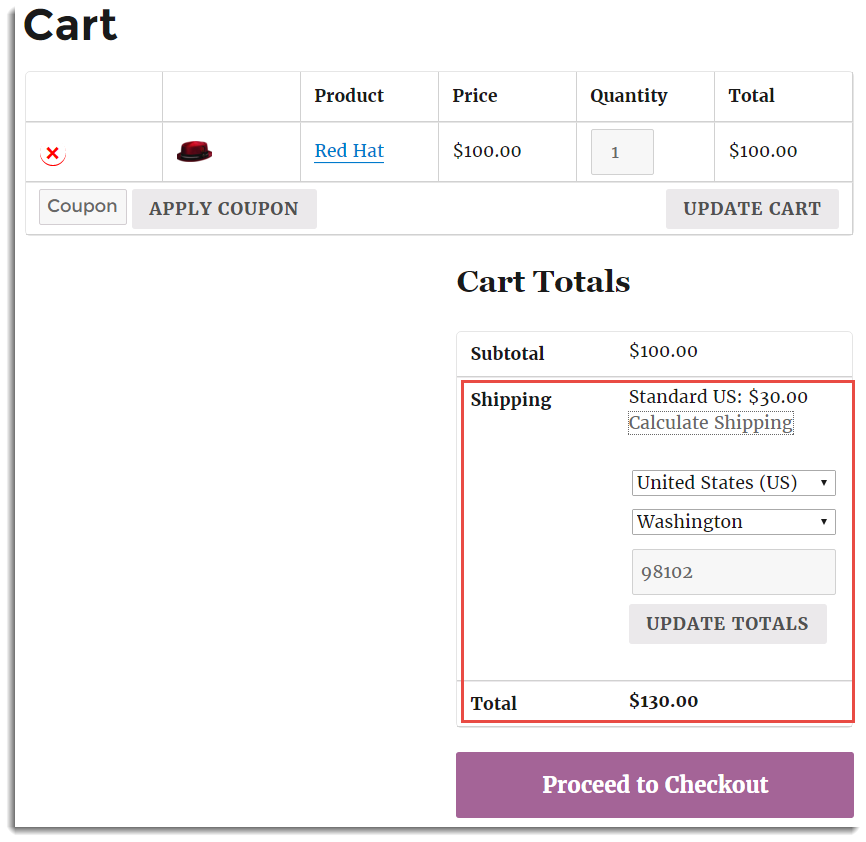
For the address of the United States, the cart is as shown below:
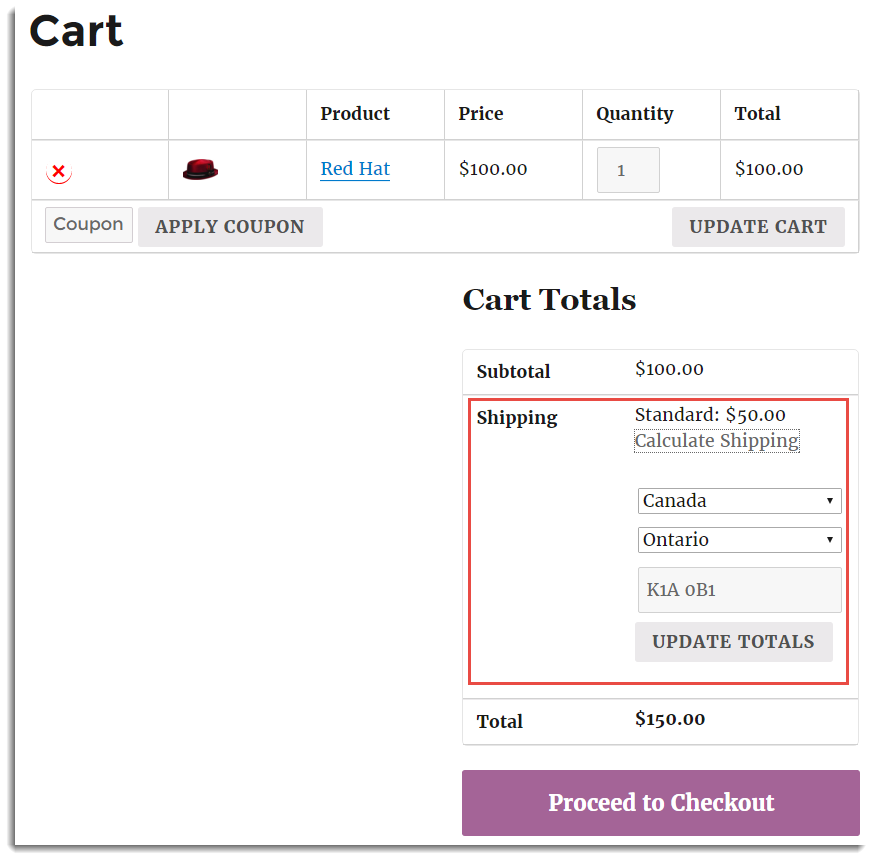
For the address of Canada which is other than the United States, the cart is as shown below:
Rate Matrix Settings
Rate Matrix gives you control over customizing and restricting the rates for shipment. It provides you the flexibility to set shipping rates that are best for your business. The plugin enables you to customize your rates according to any combination of destination(country, state, and postal code), product category, shipping class, price, the number of items, weight, and Method group by defining the rule. You can still offer multiple shipping options to customers. You can also specify the Method title which is visible in cart/checkout if the rates are calculated by using the rule under that method title.
In some business cases, you may wish to add either an additional cost to a base shipping price based on how many items are added or a surcharge based on the weight of the cart. This can be achieved by using the combination of Base cost, cost/unit, and Round fields. The Rate Matrix settings are as shown below:
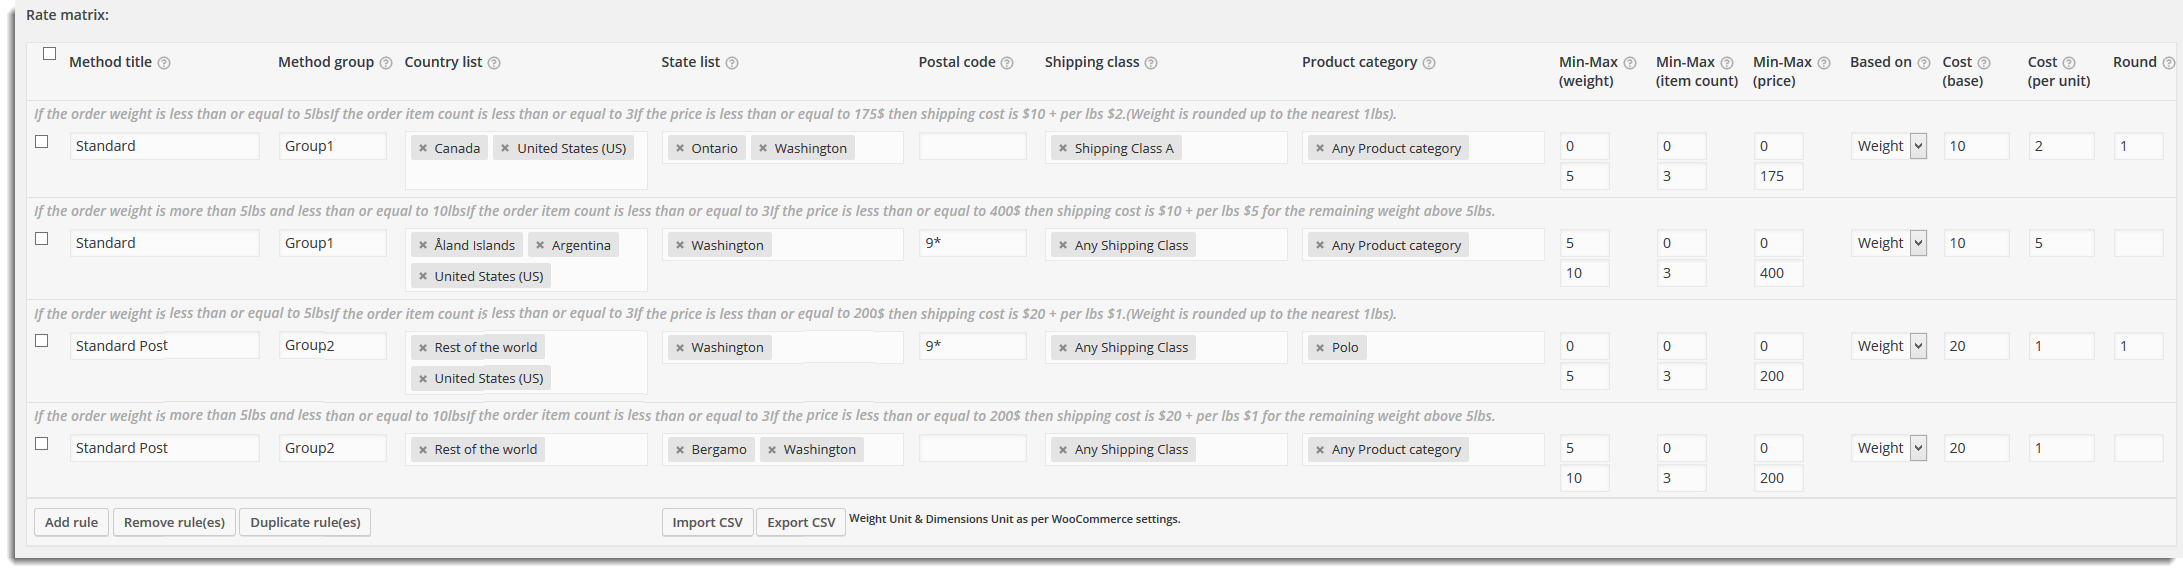
Here, you need to define the rules to get the shipping rates at cart/checkout. Shipping rate(s) depends on the rules which are defined by you. The rate matrix can include the columns like Method title, Country list, Weight, Rate Based on, Base cost, cost/unit, Round, Method Group, State list, Postal Code, Shipping class, Product Category, Item, and Price. To define your desired criteria(rule) for getting shipping rates, you can add or remove columns by using the field Display/Hide matrix columns. All these fields are described in the next section Display/Hide matrix columns setting.
You can add the rule by clicking on Add button which gets you the new row to enter your rule. Otherwise, you can import the rule CSV file by clicking on the Import CSV button. PluginHive WooCommerce Table Rate Shipping plugin also allows you to export the CSV file for rules which are present in the Rate Matrix. As per your requirement, you can also remove the undesired rule from the rate Matrix. With Duplicate Rule(s) button, you can duplicate the selected row of the matrix and do the changes as per your requirement. You can read the defined rule through the sentence (just above the rule) in plain English.
Note: Currency, Weight, and Dimension Units will be taken the same as your WooCommerce settings.
For more information on how to set the Rate matrix for different Business cases, See WooCommerce Shipping Pro documentation regarding,
- Business Cases Handled by the plugin
- Handling Bundle Rate Shipping
- Shipping Rates specific to an Area (UK)
- Shipping Rate Calculation based on Shipping Classes
- Shipping Rates Calculation based on Weight and Country
- Weight-based shipping is simplified using the plugin
Display/Hide matrix columns Setting
This setting decides which columns to show in the rate matrix for defining the rule. The setting is as shown below:

Table Rate Fields and Description
| Field Name | Description |
| Shipping Method | Specify the Method title which is visible in the cart/checkout if the rates are calculated by using the rule for that method title. |
| Group | Groups are used to get more than one shipping option on the cart/checkout page. Each Group can return Only one shipping option. |
| Zone | The Zone list specifies the Zone(s) to which the rate applies to. Multiple zones can be present in a single row. Under Method Groups, if you have a rule(s) for a few specified zones and want to have a different rule for all other zones than specified, then you can use the Rest of the World option. |
| Country | The country list specifies the country(ies) to which the rate applies. Use the Any Country option for all. Multiple countries can be present in a single row. Under Method Groups, if you have a rule(s) for a few specified countries and want to have a different rule for all other countries than specified, then you can use the Rest of the World option. |
| State | Destination State(s). Use the Any State option for all. Multiple states can be present in a single row. Under Method Groups, if you have a rule(s) for a few specified states and want to have a different rule for all other states than specified, then you can use the Rest of the Country option. |
| City | Destination City(s) name. Enter the name of the city for which you want to calculate the shipping rates. Leave it blank if you want to apply the same rule for all the cities. A single rule will have only one city name assigned to it. |
| Postal/ZIP code | Destination zips code. Use the wildcard(*) for all or set this to the character you wish the search to start from and wildcard(*). For Example, 8* can be used to include all the zip codes starting with 8 (80001, 80002, and so on). |
| Shipping class | Shipping Class of the Product. Use Any Shipping Class option for all. Multiple shipping classes can be present on a single row. Under Method Groups, if you have a rule(s) for specified shipping classes and want to have a different rule for all other shipping classes than specified, then you can use the Rest of the shipping classes option. |
| Product category | Category of the product. Use Any Product category option for all. Multiple product categories can be present in a single row. Under Method groups, if you have a rule(s) for the specified product category(ies) and want to have a different rule for all other product categories than specified, then you can use the Rest of the Product Categories option. |
| Weight | Minimum Weight is the lowest weight at which the shipping rate applies. Maximum Weight is the highest weight at which this shipping rate applies. For Example: If Min Weight=0 Kg& Max Weight=5.25 Kg, then accepted Min Weight is greater than 0 Kg and Max Weight is less than or equal to 5.25 Kg. |
| Item | The minimum quantity is the lowest number of the item(s) at which the shipping rate applies. Maximum quantity is the highest number of items at which this shipping rate applies. For Example: If the Min number of items=0 & Max number of items=25, then the accepted Min number of item(s) is greater than 0 and the Max number of items is less than or equal to 25. |
| Price | The Minimum Price is a starting Price at which the shipping rate applies. Maximum Price is an ending price at which this shipping rate applies. For Example: If Min Price= $0 & Max Price=$100, then the accepted Min Price is greater than 0 and Max Price is less than or equal to $100. |
| Rate Based on | You can calculate rates based on the weight of the cart items, the number of items in the cart, or the total price of the cart. |
| Base cost | A Fixed cost for the shipping service without the additional charges that may be added, such as handling, duty tax, etc. This is irrespective of the weight of the cart items, the number of Items in the cart, or the total price of the cart. |
| Cost Per Unit | Weight: You may wish to add an additional cost based on the weight of the cart items. This can be achieved by selecting the Weight option Based on the drop-down list. Many carriers introduce rules like this. For Example: After 5 Kg, let’s charge the 5 Kg price plus $ 1.25 for every Kg over 5 Kg. Item: In some cases, you may wish to add an additional cost to a base shipping price based on the number of items added to the cart. This can be achieved by selecting the Item option Based on the drop-down list. For Example: After 25 Item count, let’s charge the price for 25 items plus $ 10 for every item over 25.Price: In some cases, you may also wish to add an additional cost to a base shipping price based on the total price of a cart. This can be achieved by selecting the Price option Based on the drop-down list. For Example: After the $100 price, let’s charge the price $100 plus $10 for every $50 over $100. |
| Round Off | Rounds the weight or Price to the nearest fraction or whole number which depends on the value entered under this field. For Example: Let’s take an example of weight. If the value entered is 0.5 and the order weight is 4.4kg, then the shipping cost will be calculated at 4.5 kg. If the value entered is 1 and the order weight is 4.4kg, then the shipping cost will be calculated for 5 kg. If the value entered is 0 and the order weight is 4.4kg, then the shipping cost will be calculated for 4.4 kg. |
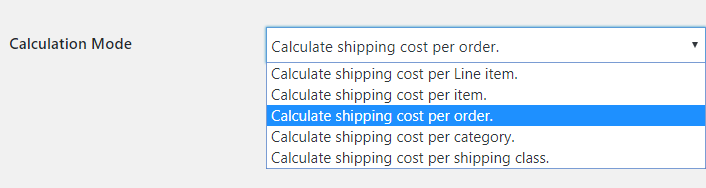
Calculation Mode & Multiple Rules Matching Criteria Setting
With this setting, you can calculate the shipping cost of the cart per Item, Order, category, or shipping class with minimum or maximum price. If you change this setting, then the total shipping cost may get affected.
The setting is as shown below:
The available options and their description are given in the below table:
| Options | Description |
| Per Line Item Cost | The total shipping cost gets calculated by first adding up the cost of shipping for every quantity of a product and then for other products, and in the end, the final cost is the cost of shipping for each product with different quantities added together. |
| Per Item Cost | The total shipping cost gets calculated by adding up the cost of the shipping for each item in the cart. |
| Per Order Cost | The shipping cost is calculated for the entire cart. |
| Per Category Cost | The total shipping cost gets calculated by adding up the cost of shipping for each category of the item (s) in the cart. |
| Per Shipping Class Cost | The total shipping cost gets calculated by adding up the cost of shipping for each Shipping Class of the item (s) in the cart. |
Define a maximum or minimum cost when multiple rules are defined
The following option lets you set up a maximum or minimum cost when you’ve defined multiple shipping rules in your plugin settings.

- Max: If multiple rules are matching for a specific item, then the highest rate gets used for calculation.
- Min: If multiple rules are matching for a specific category, then the lowest rate gets used for calculation
Why is it important to use correct weight units?
It’s crucial to use the correct weight units in your plugin settings to calculate correct shipping rates. Let’s take a real-life example.
Assume that an online store has items that will never weigh more than 1kg and the weight ranges are set as 0—500gm and 501gm—1kg.
The above range is not correct and would give an error at the Checkout. In such a case, you cannot use both weight units(gm or kg) at once. What you should do here is define the upper limit of the second range as 1000gm instead of 1 kg so the products falling in the second range use correct the weight unit.
Also, you cannot use the ‘kg’ to define your product’s weight. So the use of 0.45kg or 0.07kg would not be considered within the weight range. You should always use ‘gm’ as the weight unit for your WooCommerce products to ensure correct shipping rates at all times. So, instead of using 0.45kg, you should be using 450gm.
Tax Status Setting
When transporting goods across international borders, shipments are subject to taxes as determined by customs in the destination country. The tax Status setting is as shown below:

The available options are given below:
- None: Select this option, if the tax is not required for the shipment.
- Taxable: Select this option, if you want to add tax with shipping cost.
Remove Free text Setting
By default, WooCommerce shows the shipping option ‘(Free)’, if the shipping cost is zero. In some circumstances, you may not want to show this to your customer. To achieve this, select the Remove Free Text checkbox. The setting is as shown below:

Debug Mode
If you are not getting proper rates( lesser or higher than expected), not getting all the available shipping options, or not getting rates at all, then you enable Debug option to find the error(s) as shown below:

You can also see the warning(s) from the WooCommerce Table Rate Shipping Pro plugin. By enabling debug mode, you can trace issues using a log. You can see information about debugging at the top of the Cart and Checkout page.
After enabling debug mode, add a product to the cart. Go to the cart or checkout page to see the debugging information. Click Save Changes to set/update configuration settings.
Import/Export Shipping Rules
Now, for those of you, who require setting up a lot of shipping rules or who require setting up a shipping carrier’s shipping rules on their website, they can do so easily using the Import/Export functionality of this plugin.
- How to handle Multiple Shipping Rules using Table Rate Shipping Pro?
- Set up a bunch of shipping rules that you require and test it whether these rules are giving correct rates on the cart page or not.
- Visit the Import/Export section and click on Export CSV. You will get a CSV file with all the shipping rules that you have configured.
- Now edit and modify the CSV based on your shipping needs.
- Once the CSV is completed, click on Import CSV and import the shipping rules back to the plugin.
- Visit the Shipping Rules tab and you can see all your shipping rules there
Check out our WooCommerce Table Rate Shipping Pro Plugin.