Print UPS Shipping Labels with Thermal Printers from WooCommerce & Shopify
This guide will help you create, modify, and print UPS shipping labels from your WooCommerce and Shopify stores via thermal printers. We will explore the various label printing options offered by the WooCommerce UPS Shipping Plugin and Shopify Multi Carrier Shipping Label App.

Things to know about your UPS Shipping Labels
Shipping label, in general, provides key information to the courier agents who deliver packages to the customers. A UPS shipping label contains vital information like ‘to’ and ‘from’ addresses, shipment detail, package weight, item type, shipping service name, etc., The barcodes found on these labels contain sensitive information that is not exposed to others, for obvious reasons.
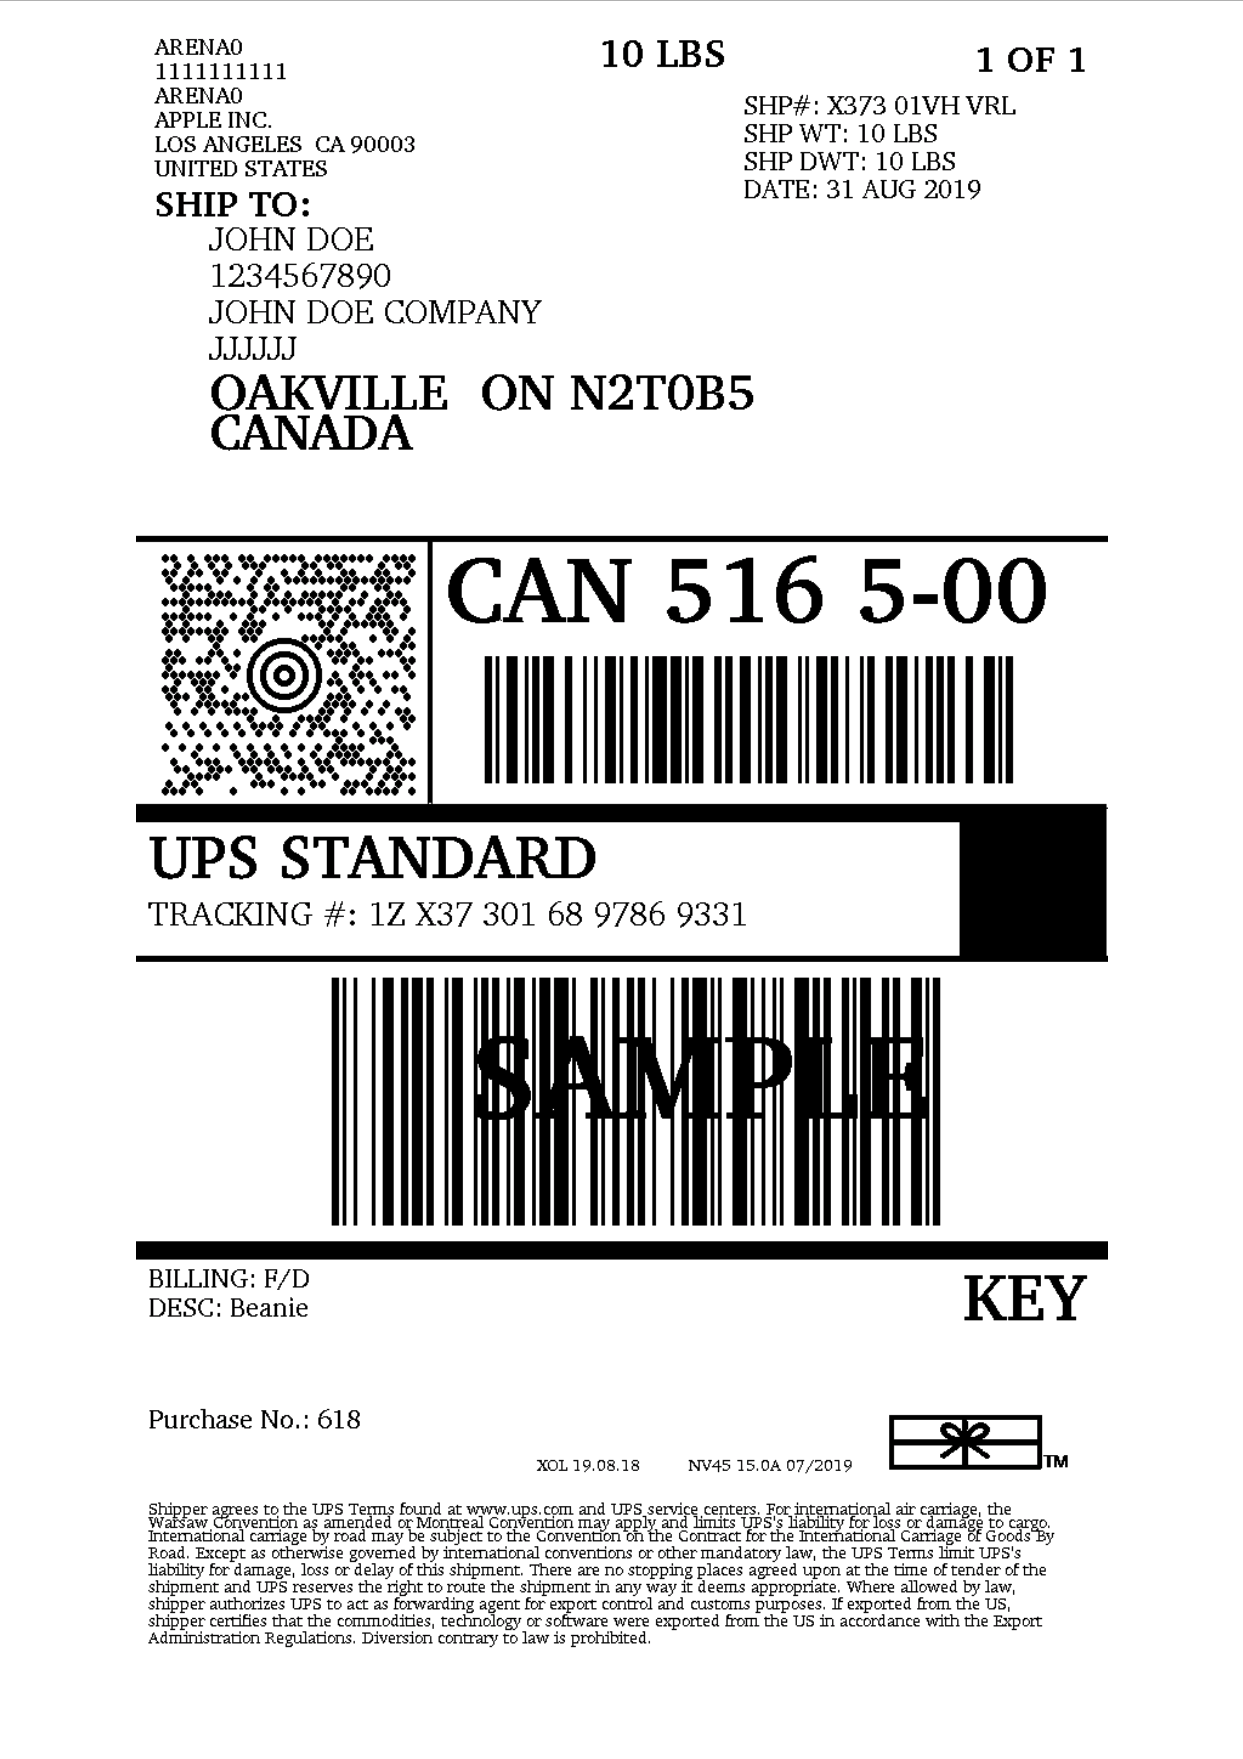
Labels are used at every checkpoint of UPS’s shipping process. Starting from the pickup point(warehouse or a UPS pickup location), UPS uses the labels to identify the packages and assign them to correct delivery vans/vehicles. To make the process simpler, they follow a strict template that can be observed in the sample label given above.
UPS design its labels in such a way that the packages are optimized with their own process, at the routing center, and at the storage warehouse. Keep in mind that these labels are designed to be read by both machines and humans. Each area of the label is being used along the way to inform specific partners of the supply chain.
Different sizes of a UPS Shipping label
With the help of the above-mentioned UPS shipping solutions, UPS labels can be printed easily no matter what paper you may be using. Here are the various supported paper/label sizes by both the plugin and App:
- US Letter
- A4
- Photo or 4×6-inch index card
- Photo or 5×7-inch index card
- 3×5
- 5×8-inch index card
- A5
- A6
- JIS B5
- CD or DVD 80 mm
- CD or DVD 120 mm
- Envelope #10
- Envelope #C5
- Envelope #C6
- Envelope #DL
- Envelope #B5
- Envelope Monarch
- Executive
- PostCard
- US Legal
- Post-Double Long Edge
- 16K
- Executive(JIS)
Types of UPS shipping label formats available
There are primarily four formats available in both the plugin and the App. You can choose the one that suits your printer the best.
- PNG
- GIF
- ZPL
- EPL
PNG file format is one of the most popular file types for label printing. A PNG file is capable of handling up to 16 million colors. Unlike PNG, GIF is the second most widely used graphics format for label printing and supports only 256 colors.
ZPL stands for Zebra Programming Language and is widely used for labeling applications. Both the WooCommerce UPS Shipping plugin and Shopify Multi Carrier Shipping Label App allow you to print UPS shipping labels in ZPL file format. EPL is another file format that is used with thermal printers and is also supported by both solutions.
What type of thermal printers should you choose?
The above two file formats allow you to print high-quality labels using a thermal printer. UPS recommends the following UPS thermal printer models.
- Bixolon SRP 770III
- Eltron 2442
- Eltron 2543
- Eltron 2844
- OKI Data LD620
- Zebra S4M
- Zebra ZP450
- Zebra ZT230
- Zebra ZT410
Please note that both PNG and GIF file formats are well-suited for normal printers as they produce accurate colors on normal paper. However, when it comes to thermal printers, you require a different image file format to print shipping labels.
Printing UPS shipping labels from your WooCommerce store
The WooCommerce UPS Shipping Plugin handles this automatically so you don’t need to explicitly configure the labels in the plugin settings. However, in some cases, you might need to choose a label size that is suitable for your printer.
Most people commonly use thermal printers to print UPS shipping labels directly from their WooCommerce store. Most thermal printers support label sizes of 4×6, 8.5×11 and PNG, GIF, ZPL, and EPL formats.
UPS shipping labels settings in the plugin
The WooCommerce UPS Shipping Plugin is the only plugin that offers so many label printing options to its users. In order to easily print the shipping labels, it’s necessary to understand the available settings and options in the plugin.
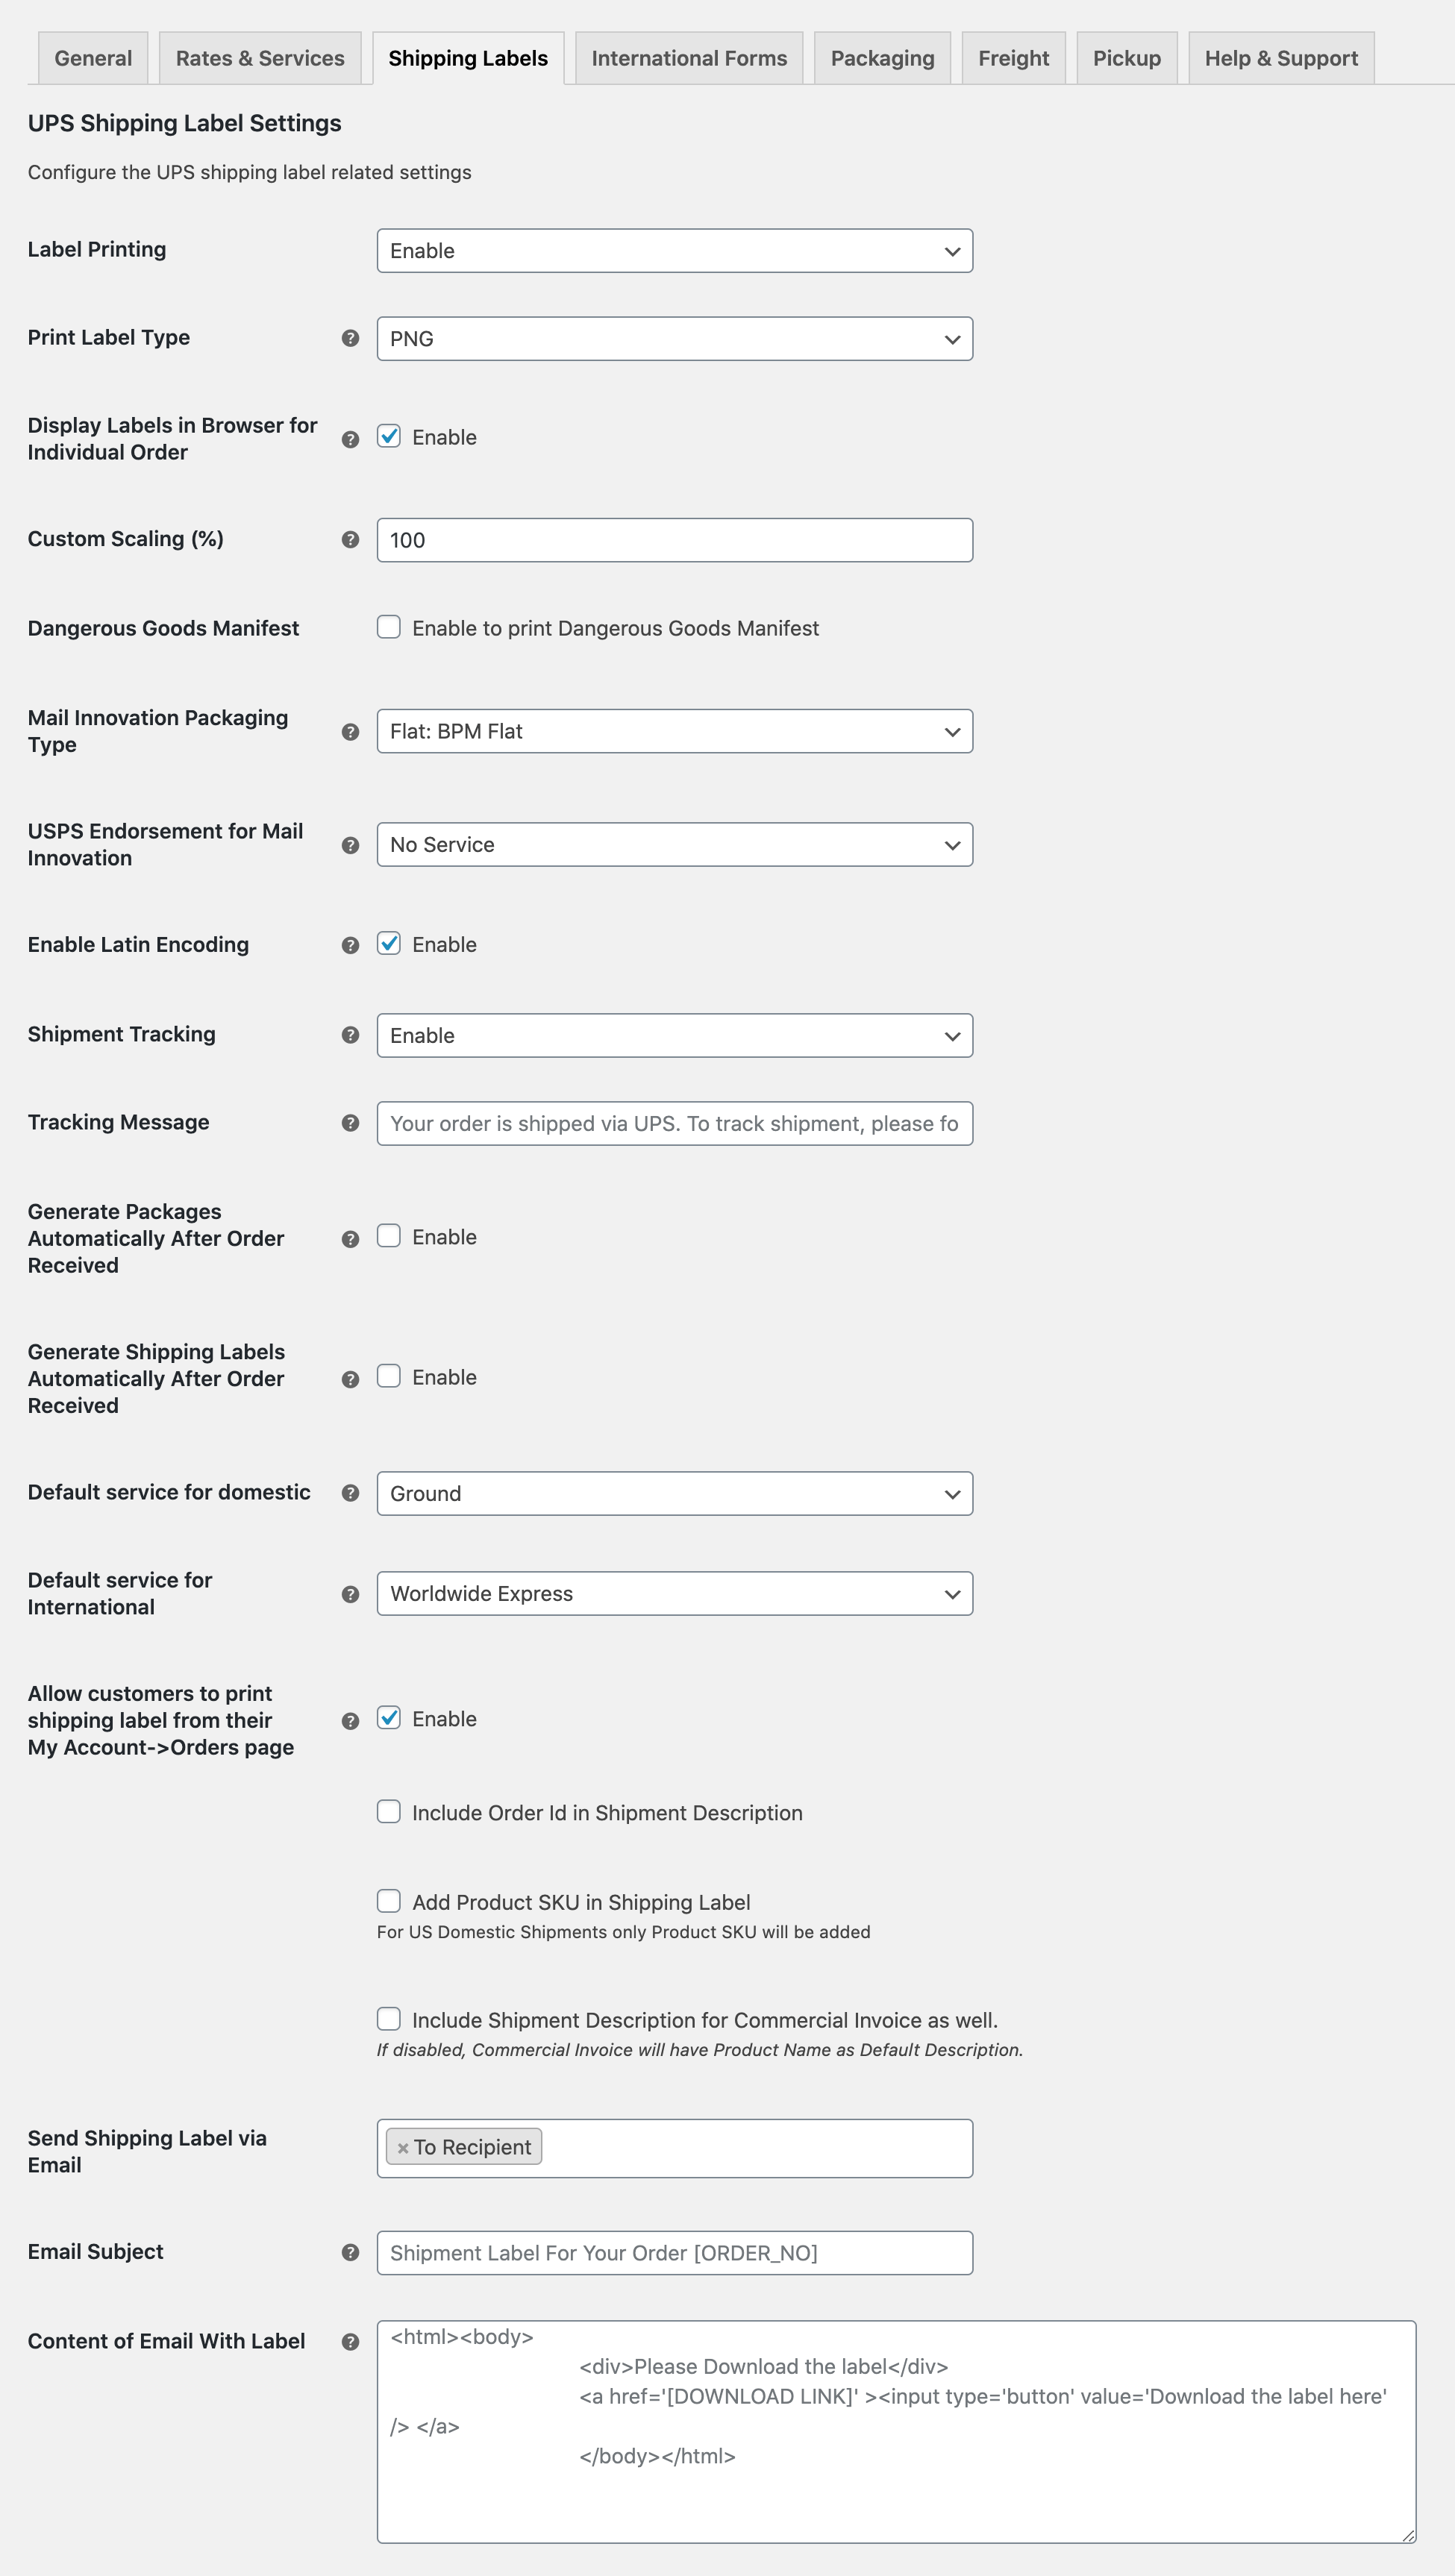
As you can see from the above image, the plugin comes with a ton of settings that enables you to print UPS shipping labels as per your need. Important settings like Print Label Type and Custom Scaling(used to adjust the label size) allow you to modify the default label format settings.
Configuring and printing UPS shipping labels
Now let’s say you want to print a UPS shipping label for a certain order. Once you click on Print Label, your browser automatically downloads the label in the pre-defined format. You can open this downloaded file and print it to generate a physical copy of it.
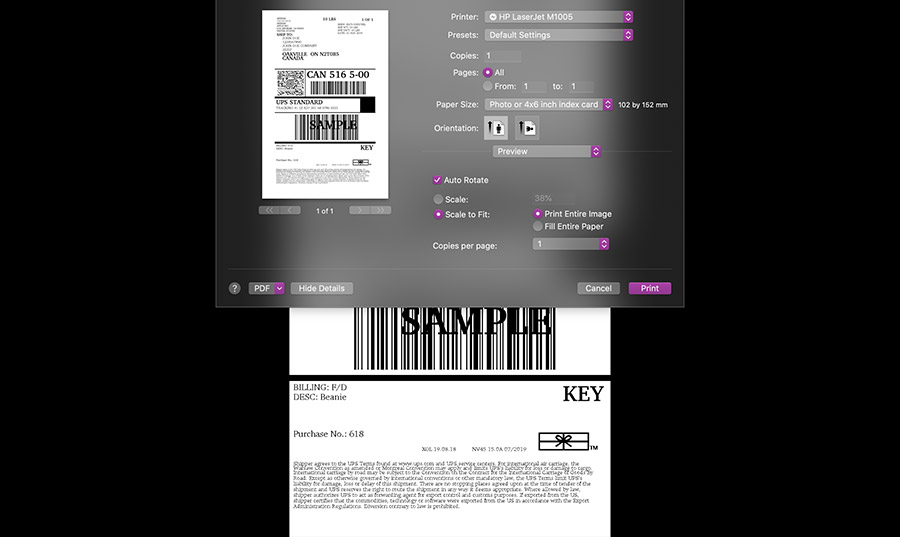
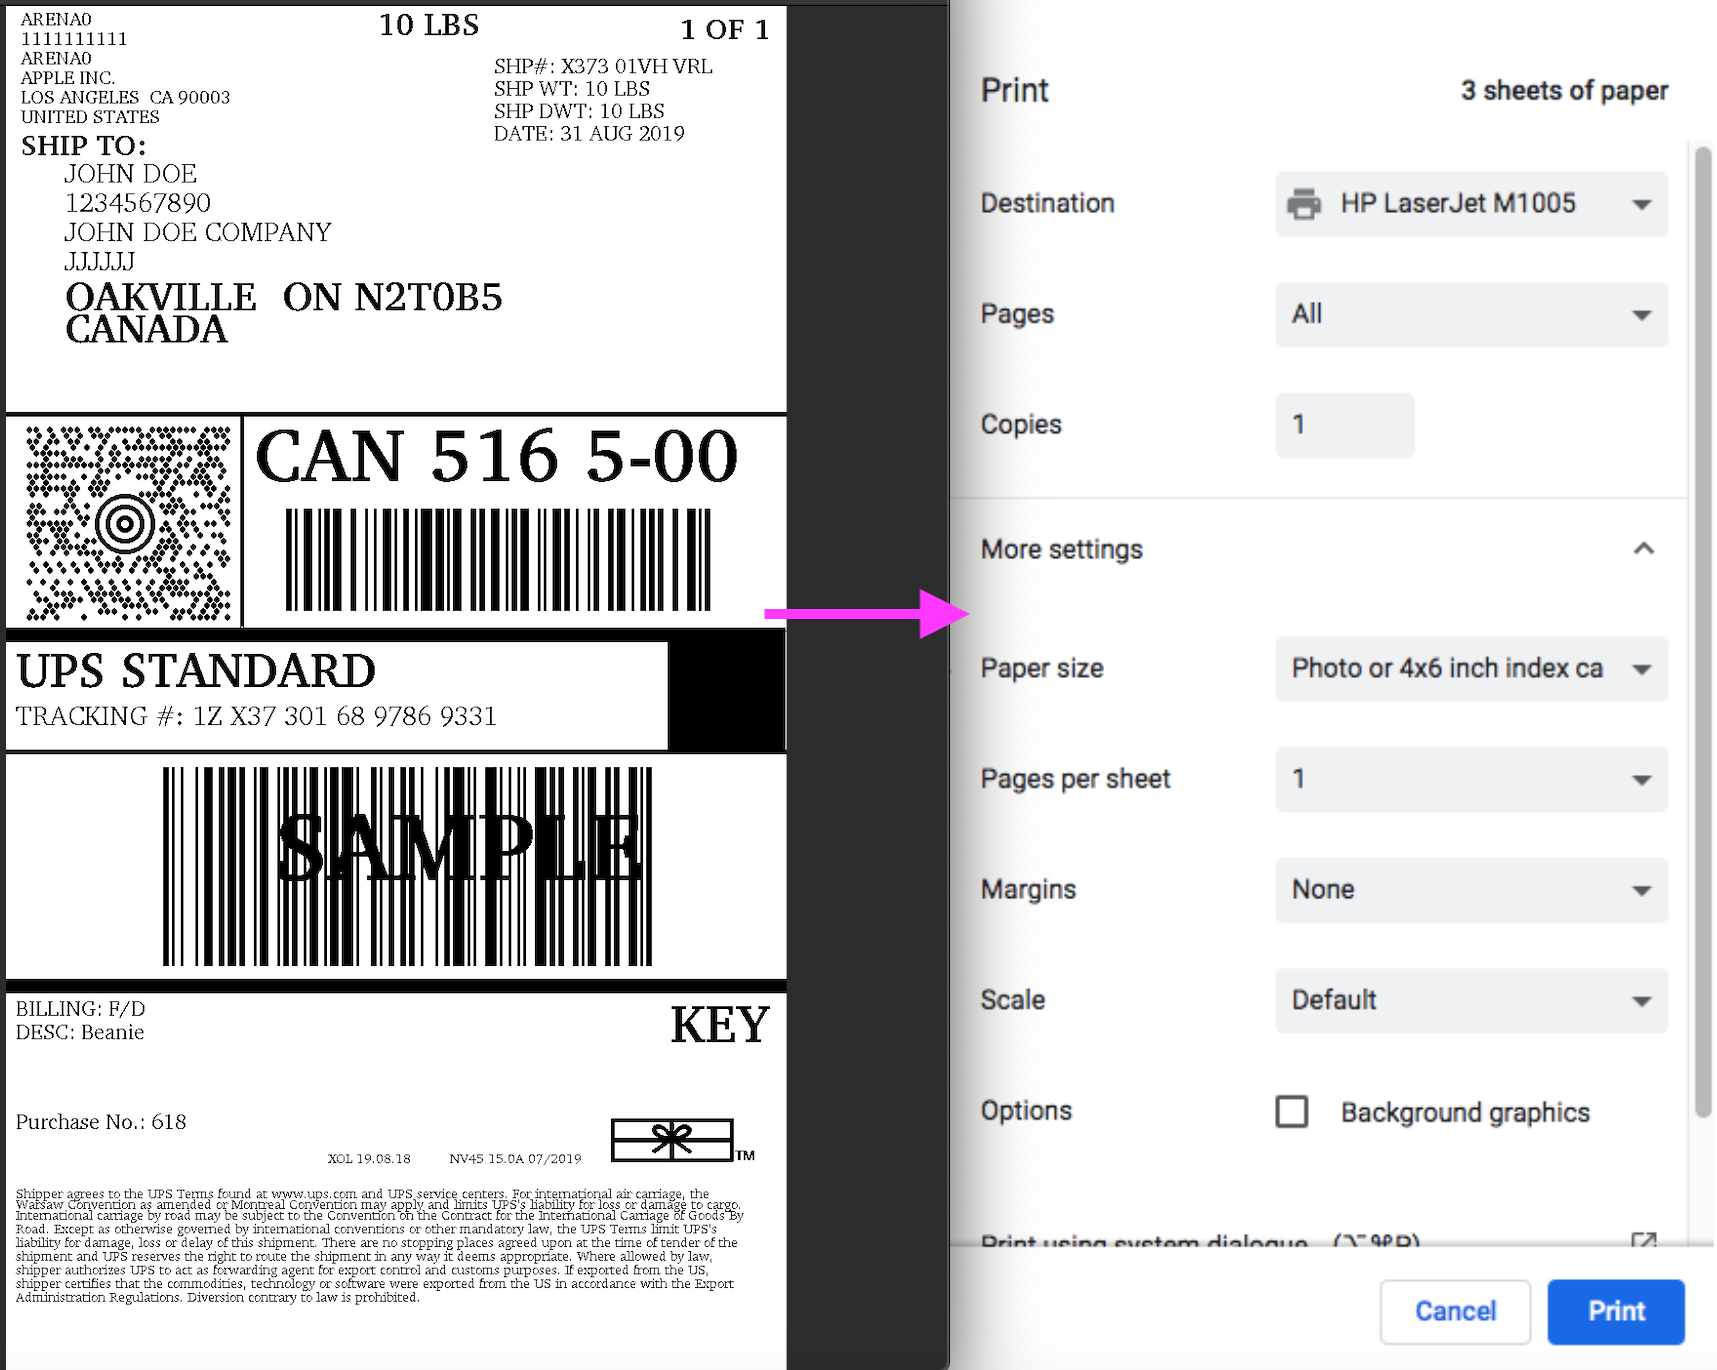
As you can see from the above image, you can make physical changes to the label before actually printing it. For instance, if we want to print the label in a 4×6 size then we need to select the ‘Photo or 4×6-inch index card’ option as indicated above. The result would be the following.
Now, let’s say you want to print a shipping label in the official US letter size, then you would have to select the US Letter option from the Paper Size drop-down menu as shown below.
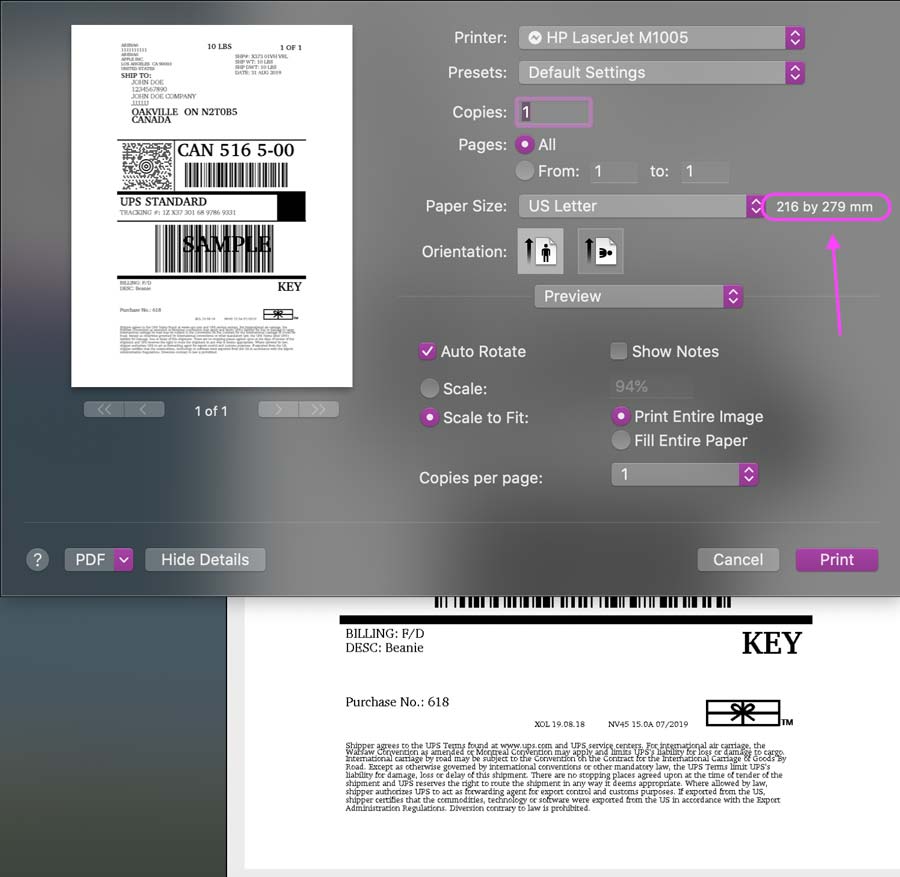
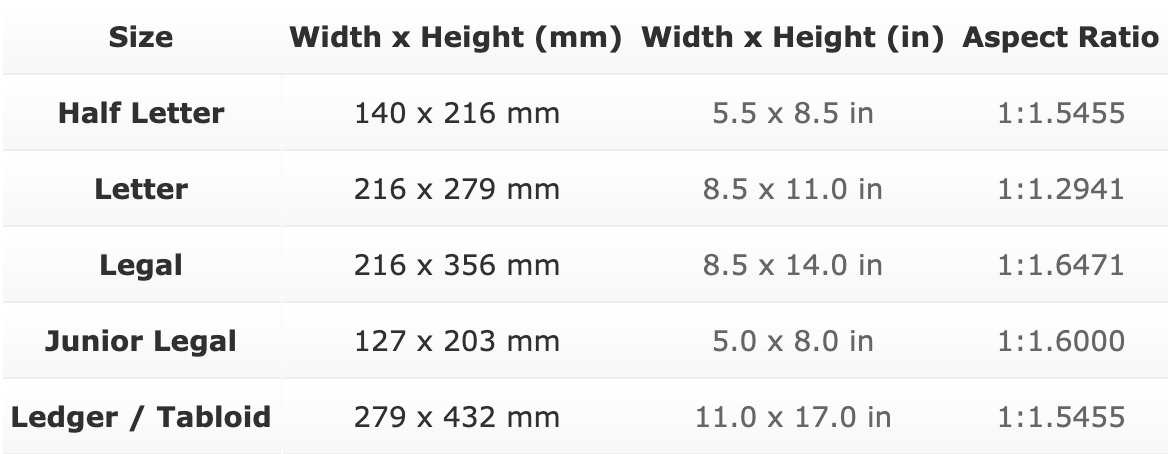
Please note that 8.5×11 translates to 216 by 279 mm. You can refer to the following table for reference.
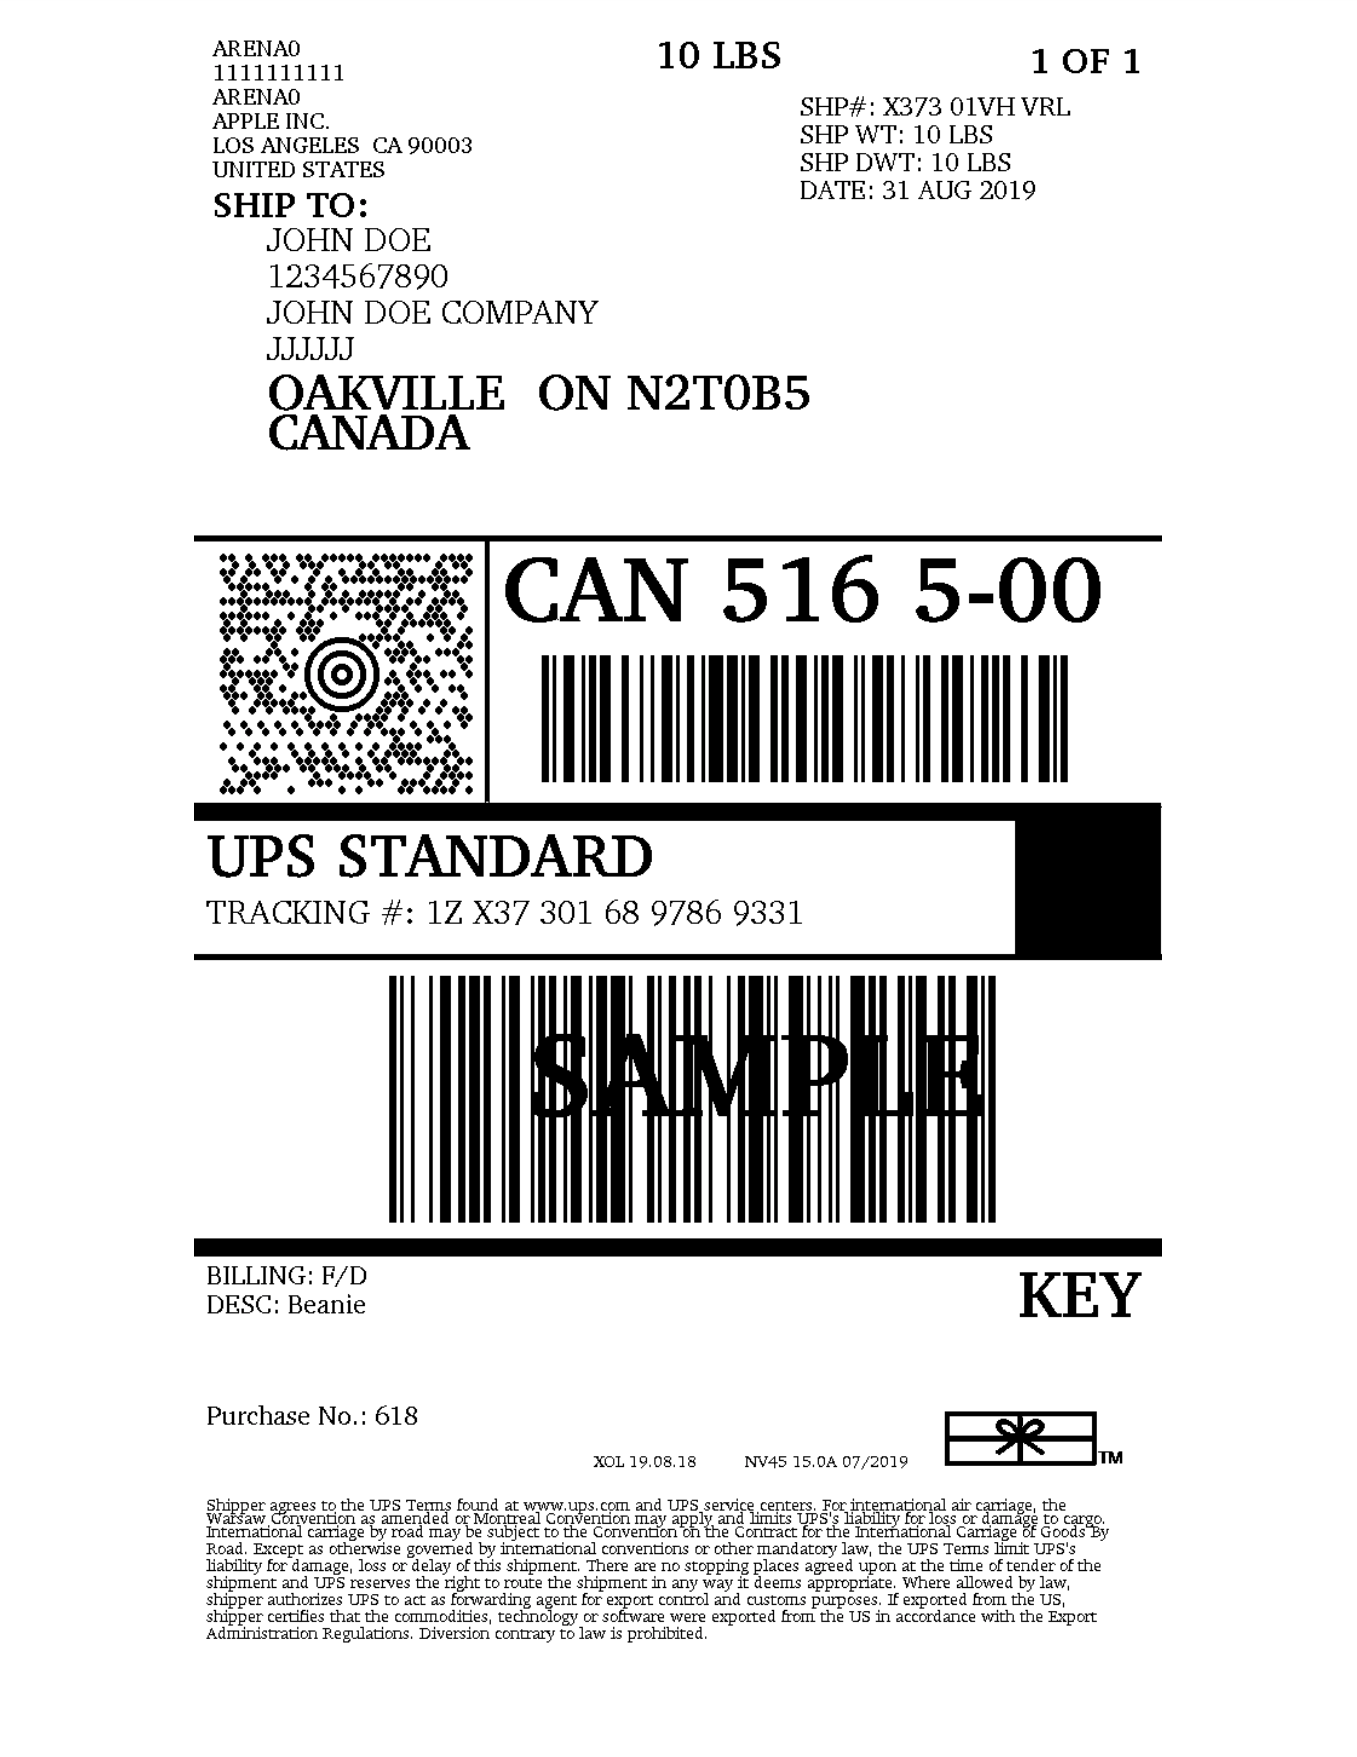
Now, once you’ve selected the US Letter option, you can click on Print to send the file to your printer for printing. Here’s how the final label would look like.
Adjusting the height and margin of the UPS shipping label
The best part is that the WooCommerce UPS Shipping plugin allows you to easily adjust the physical aspects(height and margin) of the label with its custom scaling option. You can provide a percentage value to the shipping label image based on your preference.

The above option will enable you to create decent spaced labels with clear details, which can be further pasted in the shipment box. For instance, if you need to alter a UPS shipping label by 5% from all the edges, you would have to go to the settings and enter 95 under the Custom Scaling option.
Printing UPS shipping labels from your Shopify store
The Shopify Multi Carrier Shipping Label App is a brilliant shipping solution for the Shopify store owners. This App automates almost everything, including UPS shipping label printing.
You don’t necessarily have to configure the label settings within the App. The only effort required from your end is to select the paper/label size during the printing process.
UPS shipping labels settings in the App
When you go ahead to print a shipping label, the App adjusts the label image based on your printer requirements. As seen in the above image, you can easily select the 4×6 size while choosing the printer.
Configuring and printing UPS shipping labels
The Shopify Multi Carrier Shipping Label App offers a lot of options and settings to print the shipping labels in all shapes and sizes. In the image below, you can see the various options provided by the App.
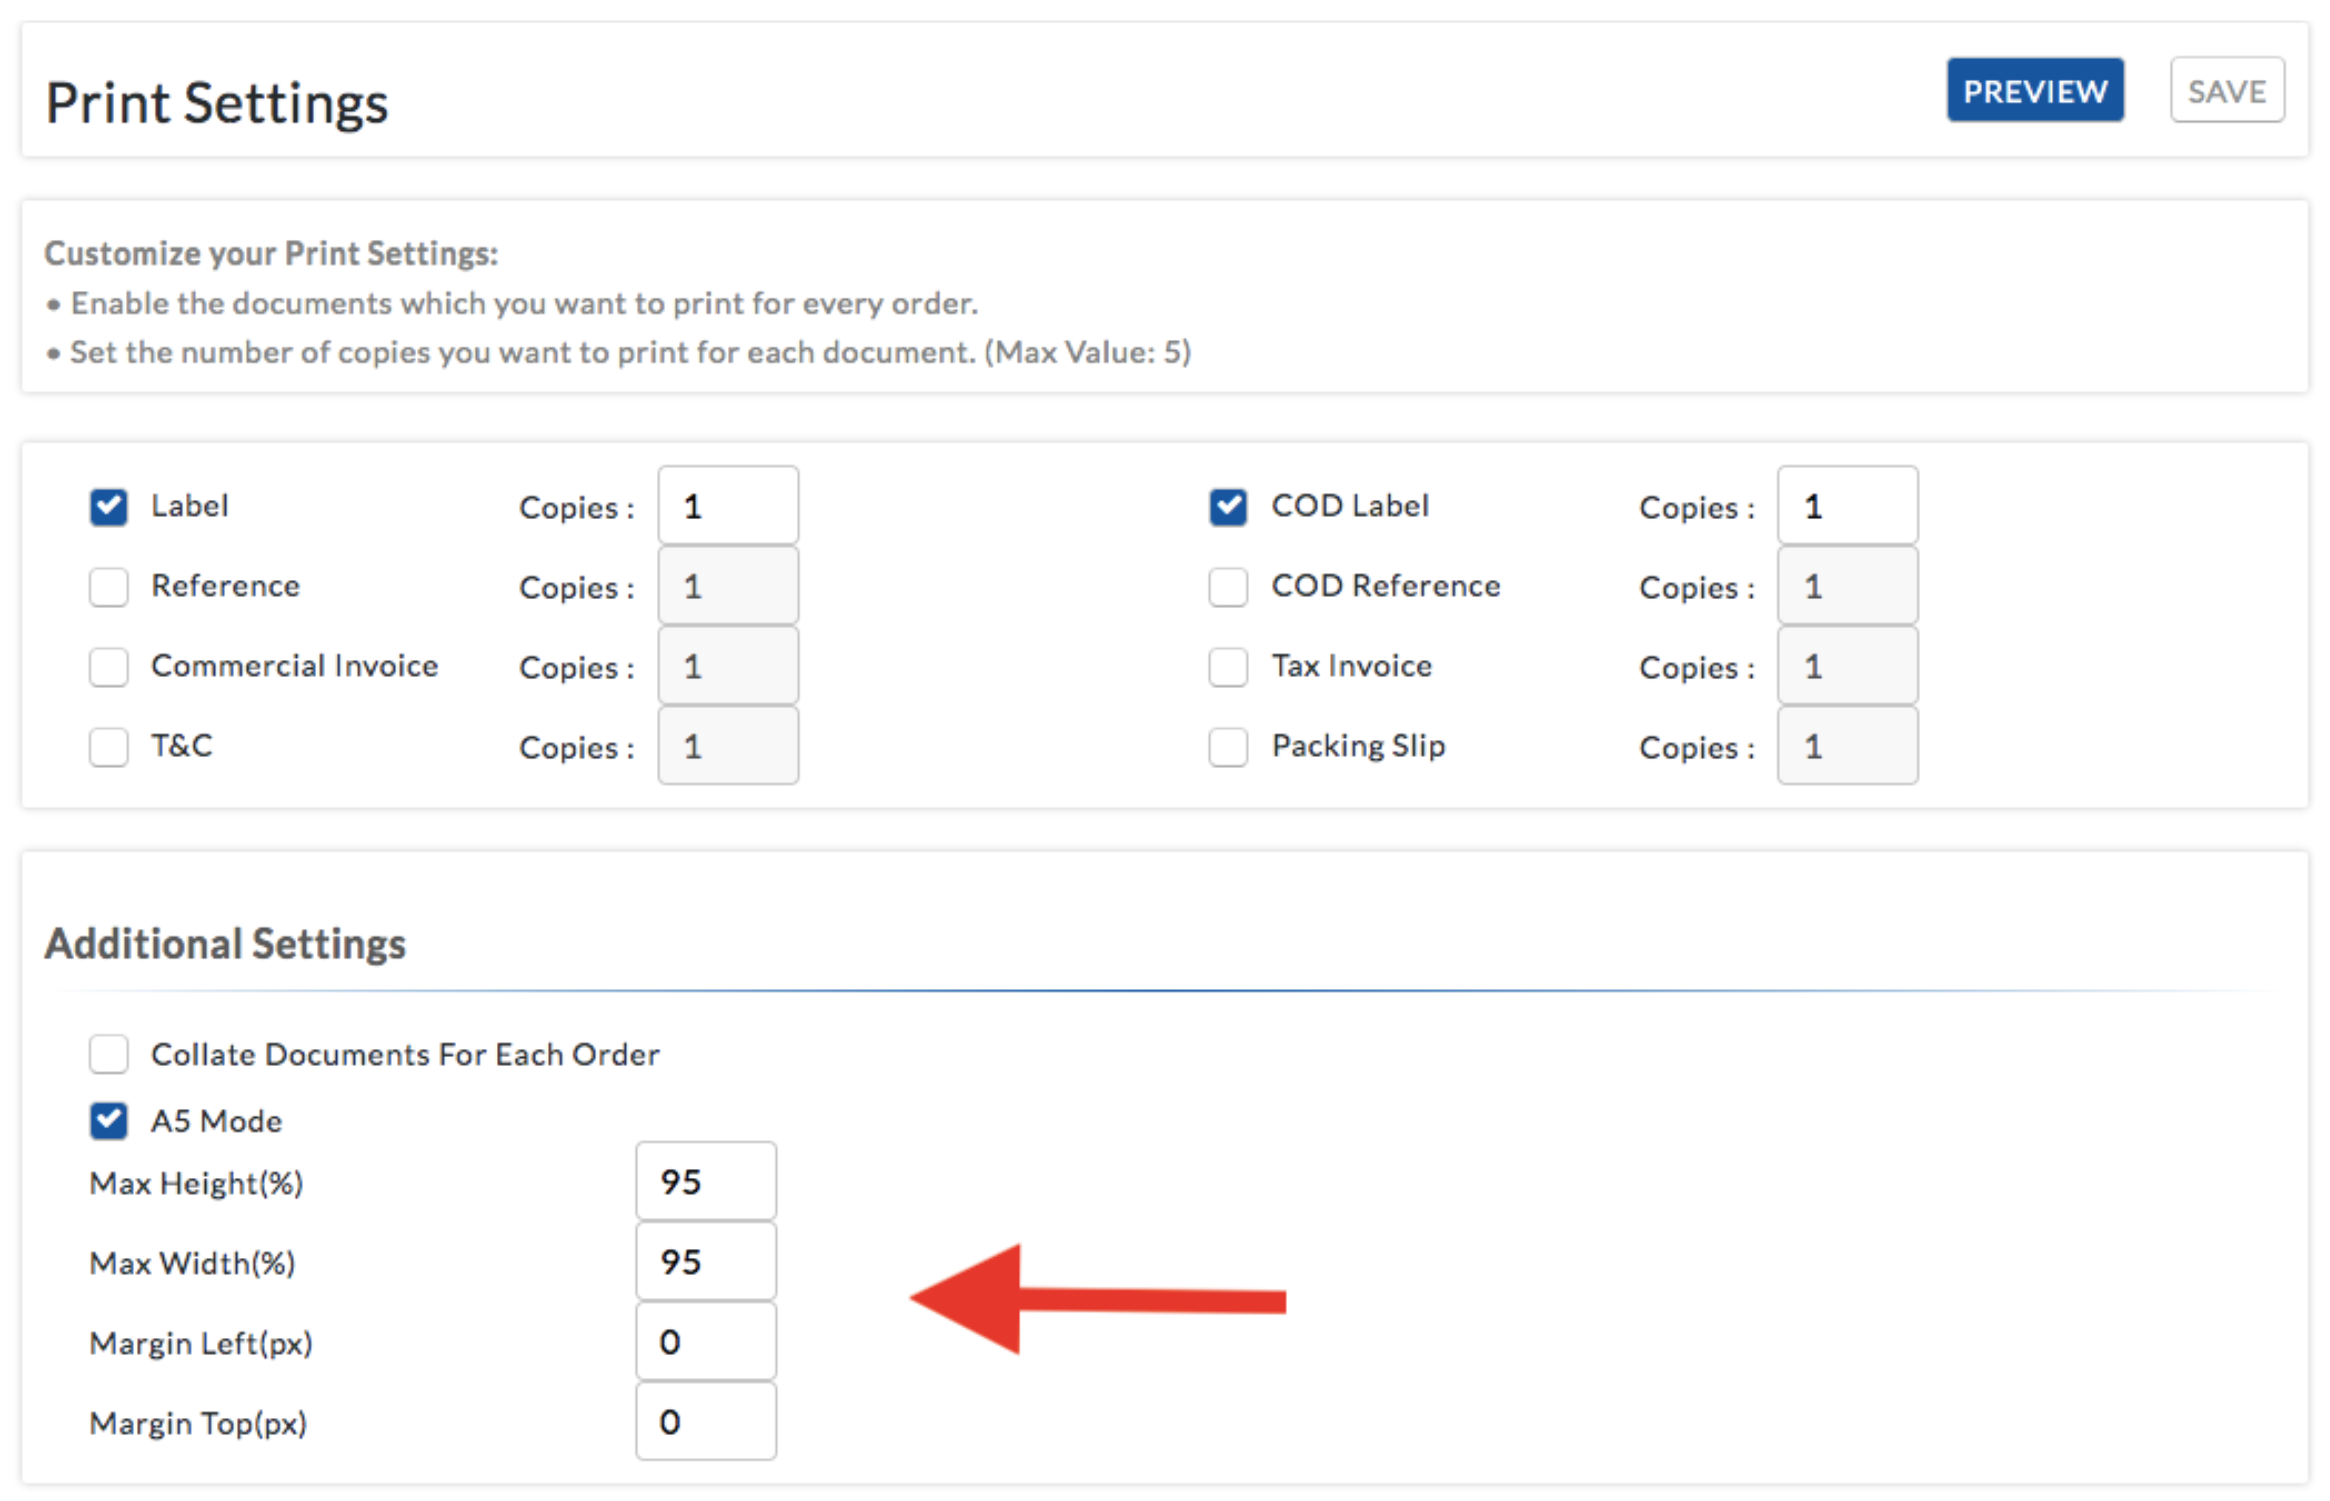
In the first section, you have options like Label, Reference, Commercial Invoice, T&C, COD Label, COD Reference, Tax Invoice, and Packing Slip. You can even choose the number of copies you require for each document.
Adjusting the height and margin of the UPS shipping label
The great part is that this App allows you to easily update the physical aspects of the label. So you can add the required space in the labels with clearly visible details. The spacing can be adjusted by navigating to Print Settings as shown in the image in the above section.
Let’s take a quick example to show how altering the margins affect the printed UPS shipping labels.
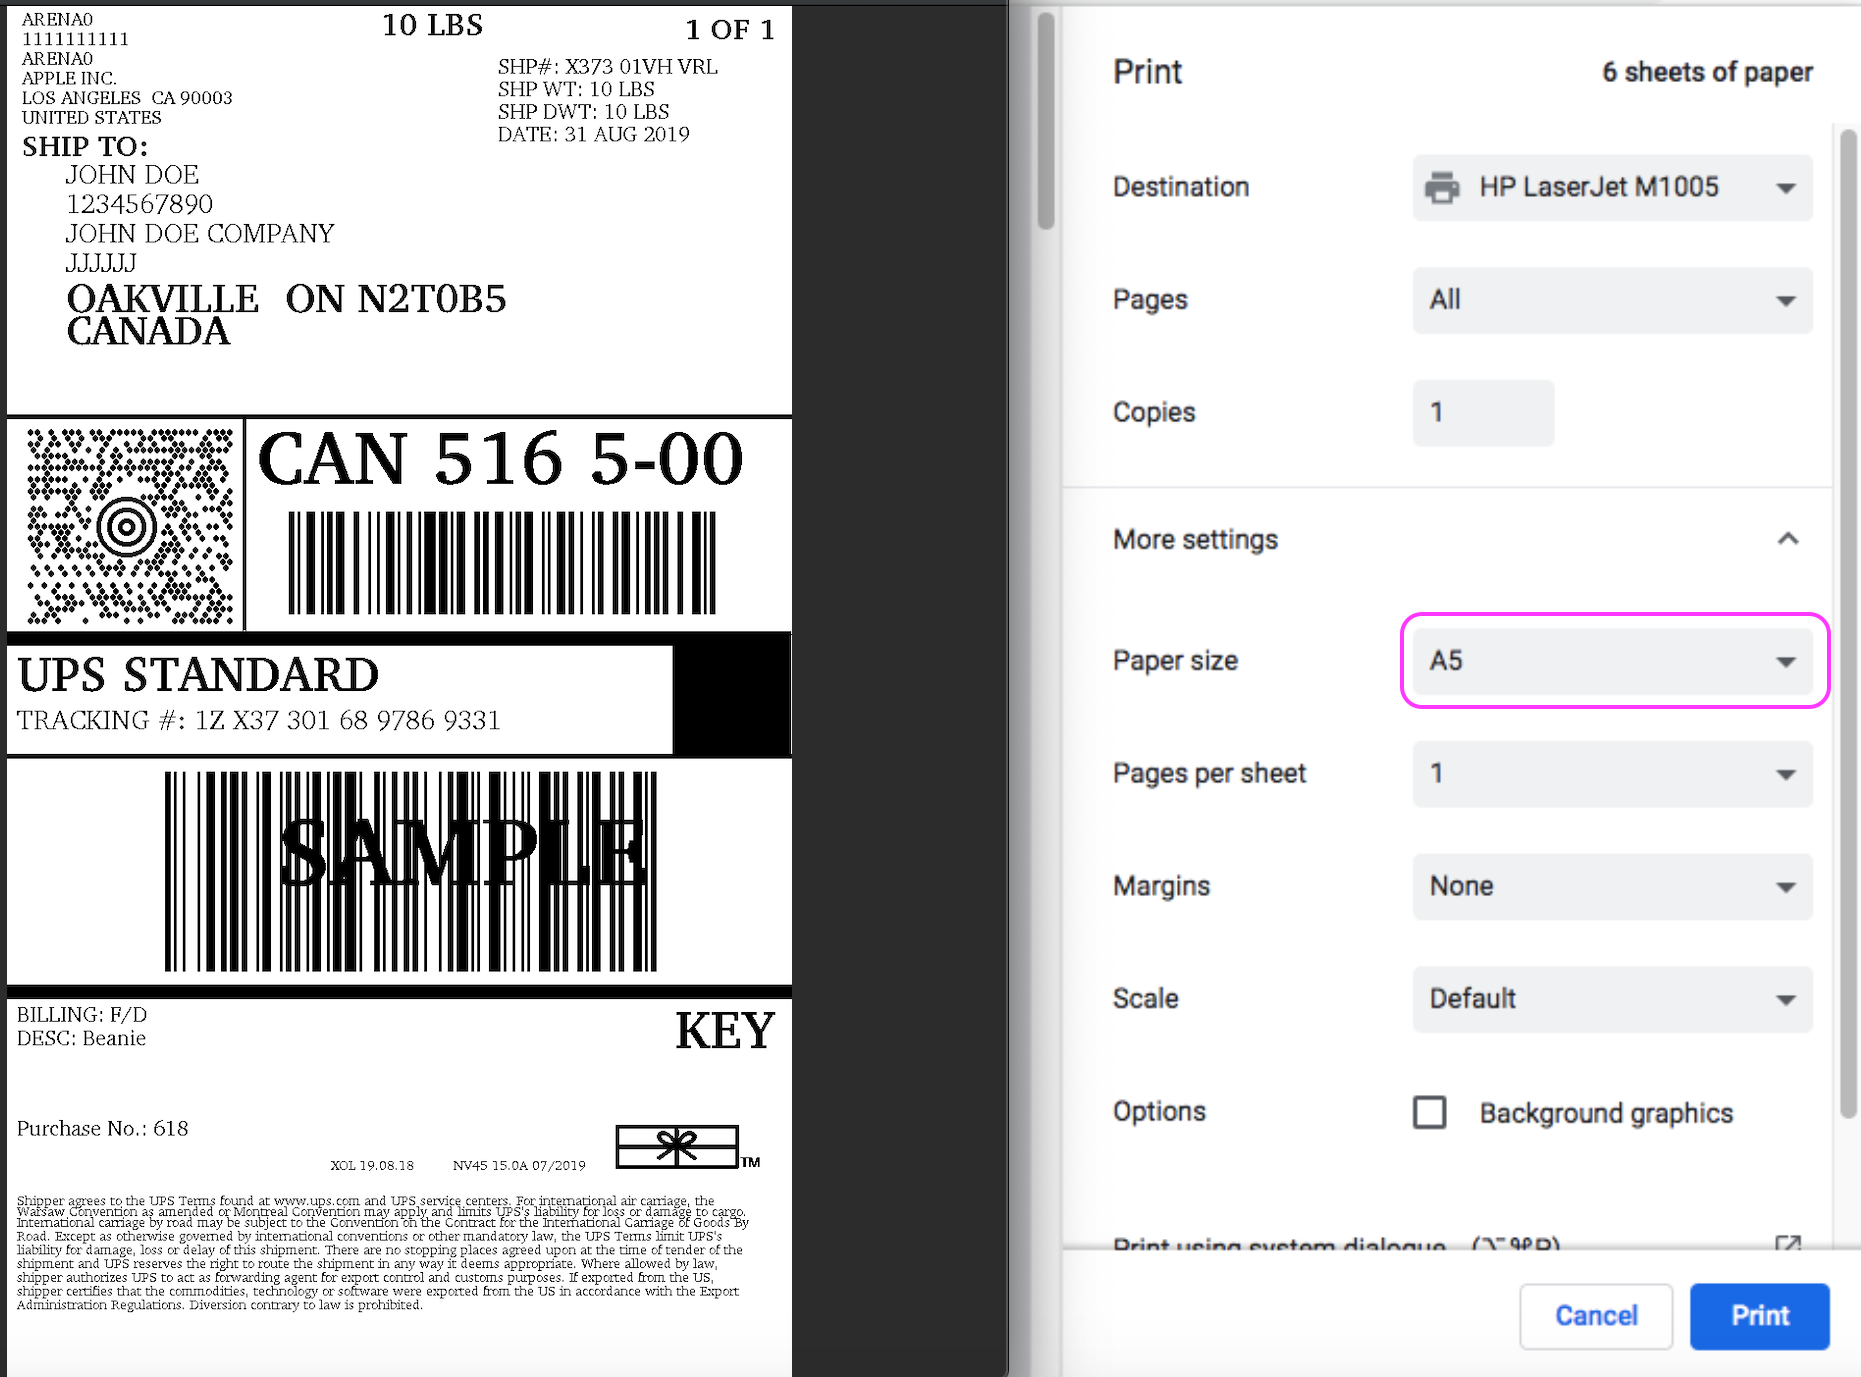
Here we have a UPS shipping label that is required to be printed in A5 size. However, as seen from the image, the margins are not quite spaced out and require altering.
In order to add margins to a shipping label, the App comes with the following set of options under the Additional Settings section.
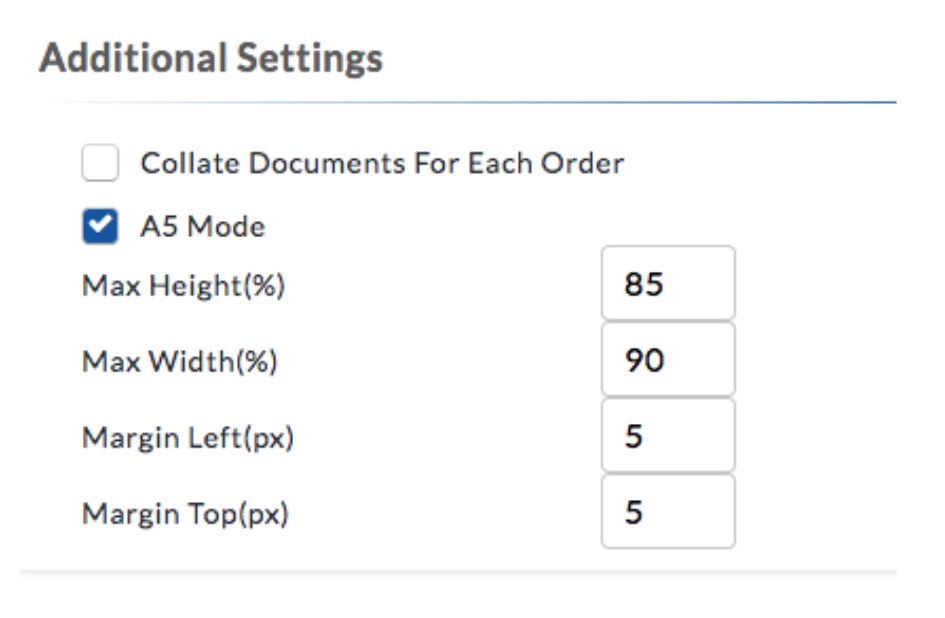
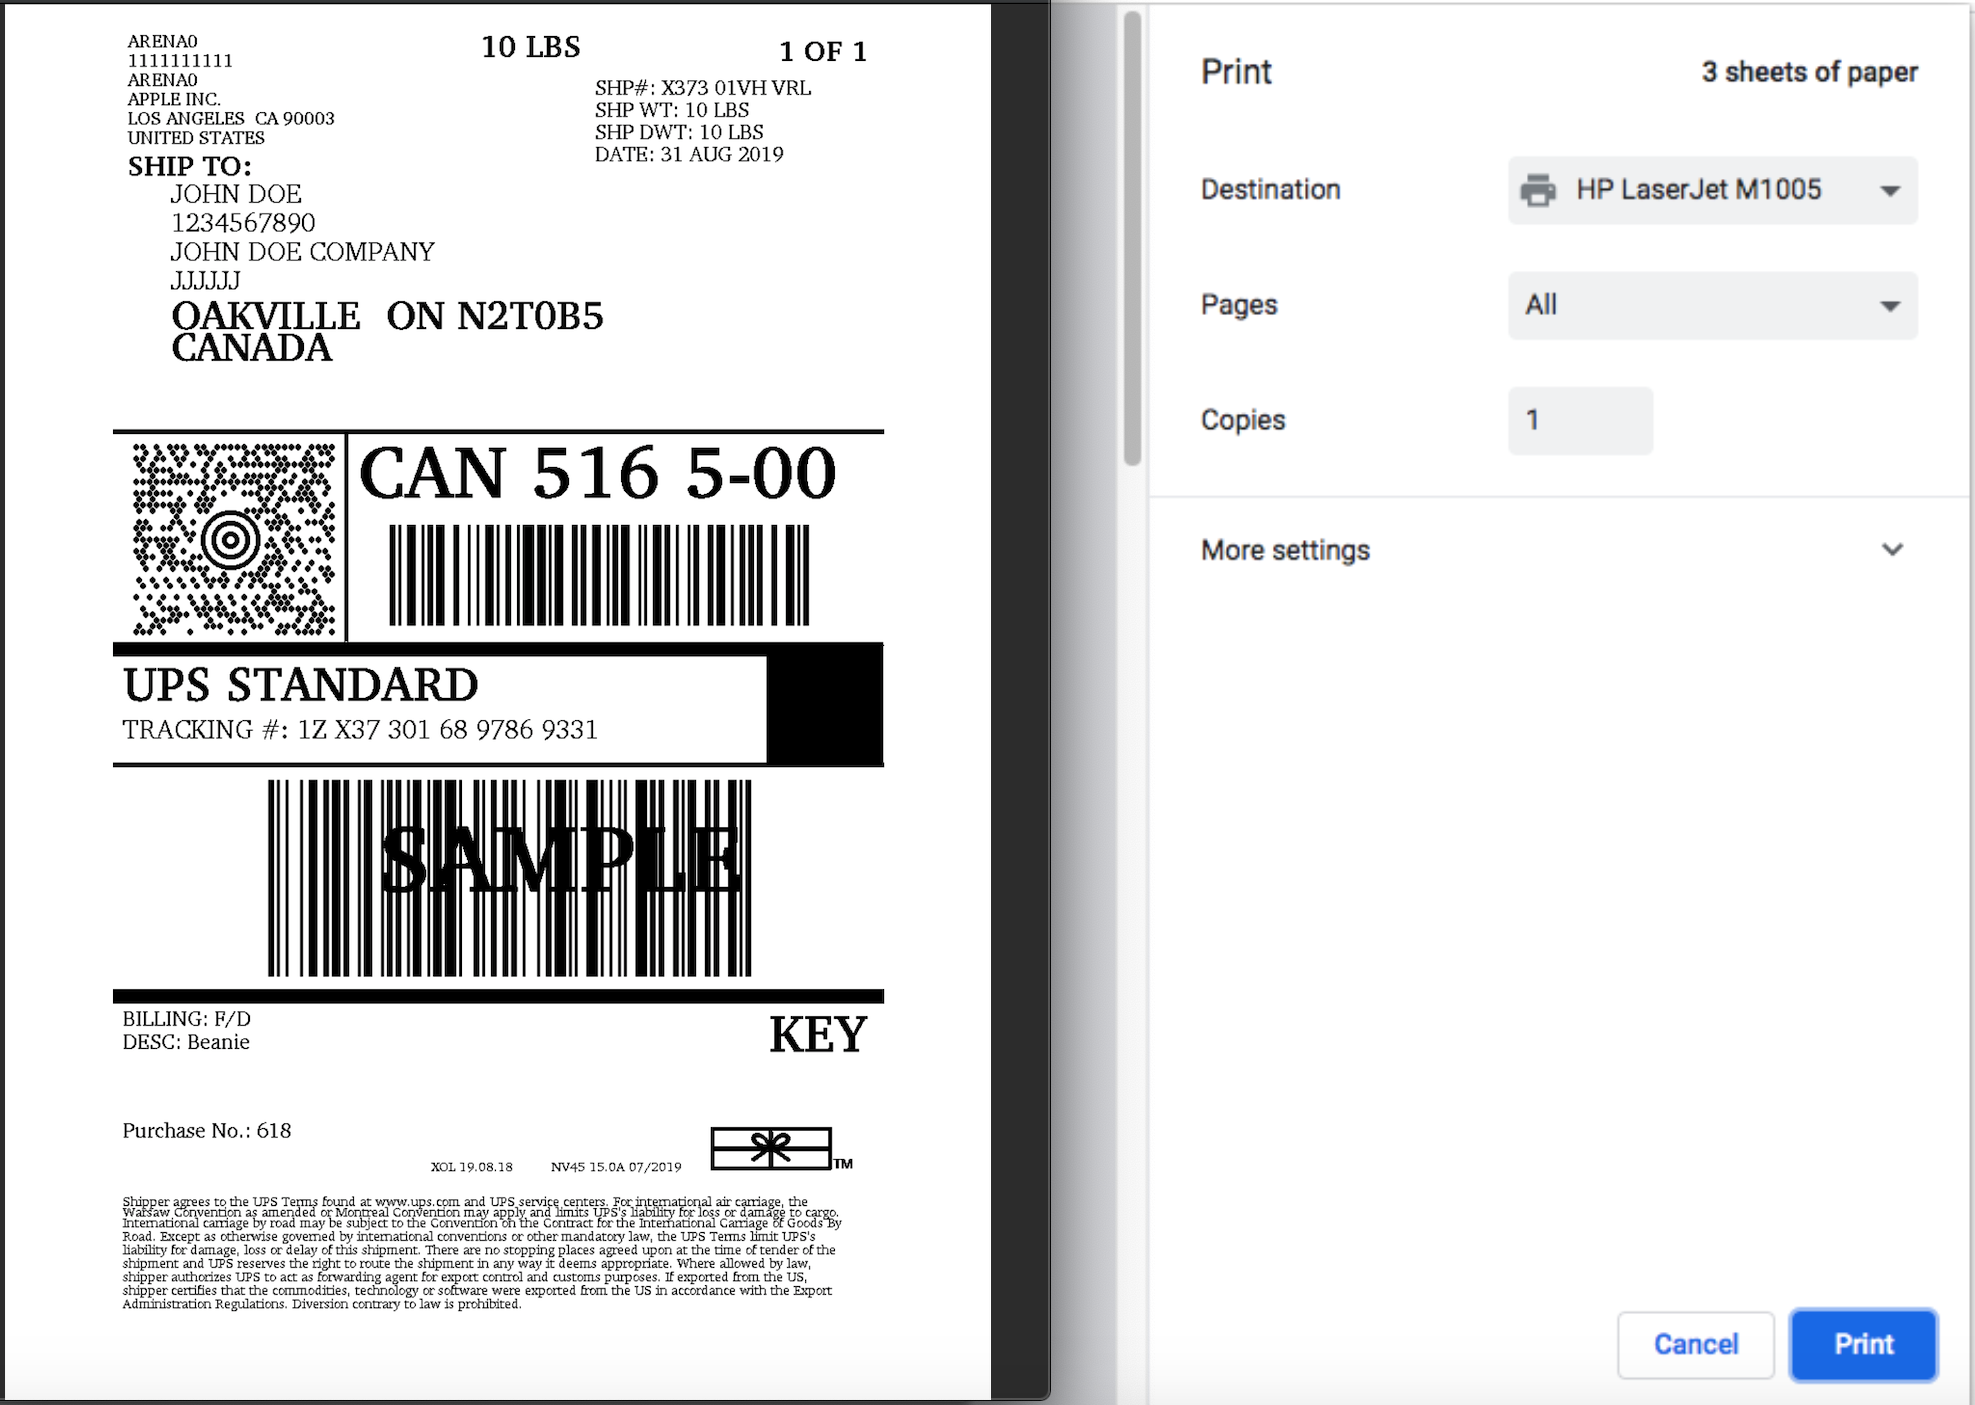
Here you can adjust the height, width, and margins with percentage values. In the above example, the Max height is set as 85 and the Max width is set as 90. Let’s have a look at the altered shipping label.
You can also try to change the paper size yourself and then alter the margins and check the shipping labels.
Summary
This article covers WooCommerce UPS Shipping Plugin and Shopify Multi Carrier Shipping Label App, and the different types of shipping label formats that they support. With the help of these solutions, you can generate the shipping label directly from your website.
If you need any help setting up UPS shipping on your WooCommerce or Shopify store then feel free to Contact PluginHive Customer Support.
Good luck!