Setting Up WooCommerce Shipment Tracking Pro Plugin
Use this quick guide to set up your WooCommerce Shipment Tracking Pro plugin by PluginHive. We’ve shown all the necessary settings, steps, and images along the way to help you configure the features available in the plugin.
Table of Content
- Plugin download, installation & license activation
- Choose the shipping carrier(s) used for order fulfillment
- Display shipment tracking details to customers on My Account > Orders page
- Send shipment tracking details to customers via WooCommerce order completion email
- Create a tracking page on your WooCommerce store
- Send email notifications to customers on every shipment tracking status update
- Customize the shipment tracking message
- Add shipment tracking details to WooCommerce orders
- Automatically update the WooCommerce order status to “Delivered”
- A quick overview of the tracking number and live tracking status in the Admin Orders page
- Third-party integrations of WooCommerce Shipment Tracking Pro
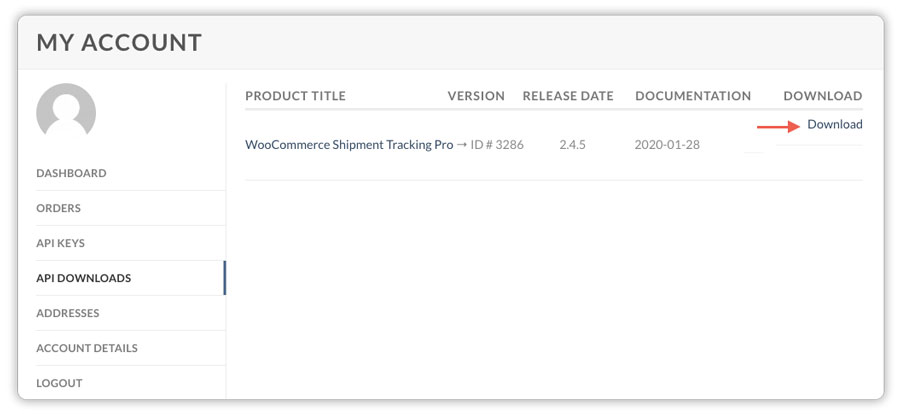
1. Plugin download, installation & license activation
After purchasing the plugin, log on to PluginHive.com and visit My Account > API Downloads and click on the Download option in front of the WooComerce Shipment Tracking Pro plugin, as shown below
Please Refer For Installation & License Activation Details – How to install and activate the license of a PluginHive WooCommerce Plugin?
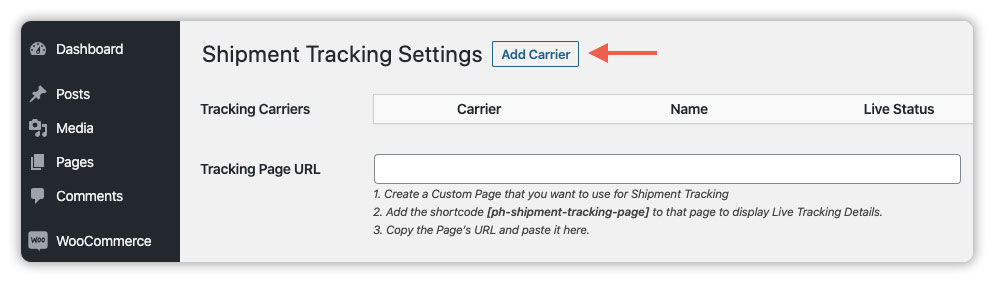
2. Choose the shipping carrier(s) used for order fulfillment
After installation, visit WooCommerce Plugins > WooCommerce Shipment Tracking Pro > Settings.
The plugin has 85+ shipping carriers in-built for easy access. You can either choose from the list of carriers or set up your own shipping carrier. On adding a shipping carrier, you will be able to use the plugin’s shipment tracking functionalities like,
- Display shipment tracking details to customers on My Account > Orders page
- Send shipment tracking IDs and the tracking link to the customers via WooCommerce Order Completion Email
You can add shipping carrier details within the plugin by clicking on Add Carrier, as shown below.
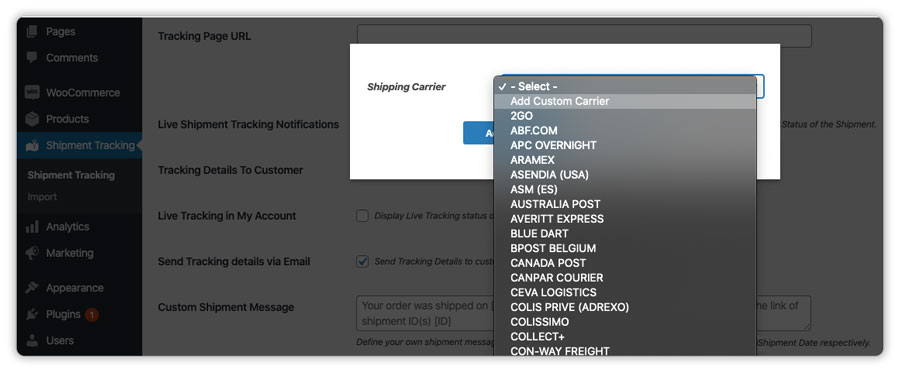
2.1 Select from built-in 85+ shipping carriers
From the list of carriers, select your preferred carrier, let’s say UPS.
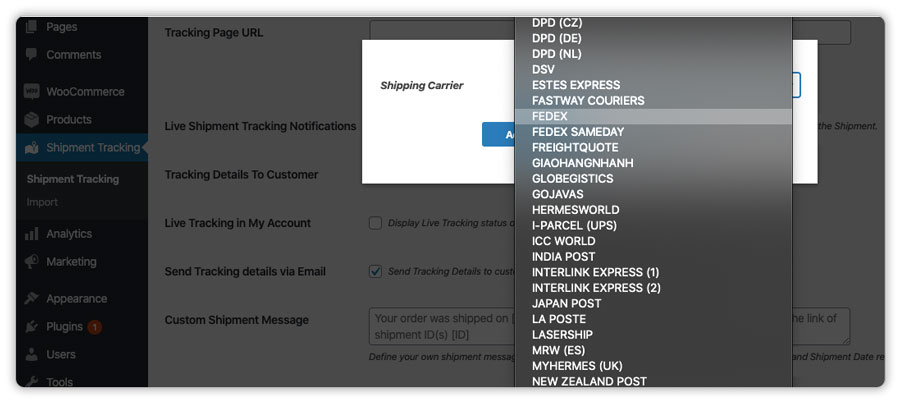
You can change the carrier display name based on your preference, by updating the Display Name field. Now, click on Add Carrier to successfully add the shipping carrier.
2.2 Add a shipping carrier that’s not in the built-in carrier list
In case, your preferred shipping carrier is not there in the default shipping carrier list, and you have the shipment tracking link for that particular shipping carrier, you can add it to the plugin.
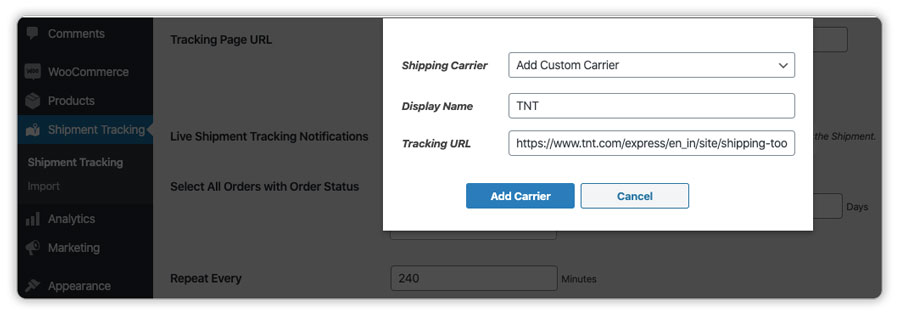
Select the Add Custom Carrier option from the drop-down list.
Enter the tracking URL of the shipping carrier in the Tracking URL field, as shown below, and click on Add Carrier to successfully add the custom shipping carrier.
Once you find the tracking URL for the carrier, you need to format the URL in such a way that,
* The tracking number is replaced with [ID]
* and similarly, if the carrier tracking URL requires a Zip Code value, you can replace it with [PIN]
For Example:
If the shipping carrier tracking URL is
‘https://www.tnt.com/express/en_in/site/shipping-tools/tracking.html?searchType=con&cons=152121130’,
where ‘152121130’ is the tracking ID, while adding the URL in the plugin, you can add the URL as
‘https://www.tnt.com/express/en_in/site/shipping-tools/tracking.html?searchType=con&cons=[ID]’
2.3 Add shipping carrier API credentials for live shipment tracking
Apart from the default shipment tracking functionality, WooCommerce Shipment Tracking Pro also supports the live tracking feature. This feature provides the shipment tracking updates from the shipping carrier in real-time.
By default, WooCommerce Shipment Tracking Pro supports Live Shipment Tracking for the following carriers only.
* UPS
* FedEx
* USPS
* DHL Express
* Delhivery
* Canada Post
* Colissimo
* Australia Post
* Blue Dart
* Aramex
* Chilexpress
* Purolator
* Sendle
* TNT Consignment
* TPC
* Yanwen
If you want us to provide WooCommerce live shipment tracking for your preferred shipping carrier as well, please contact PluginHive Support.
If you want to make use of this functionality on your WooCommerce store, make sure you have a shipping carrier account and API credentials.
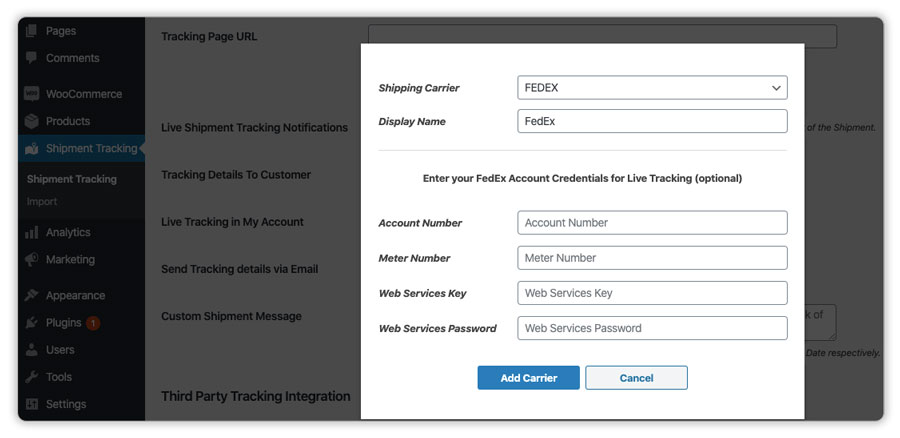
Add any supported shipping carrier to the plugin by clicking on the Add Carrier button.
Enter the carrier API credentials in the respective fields, as shown below.
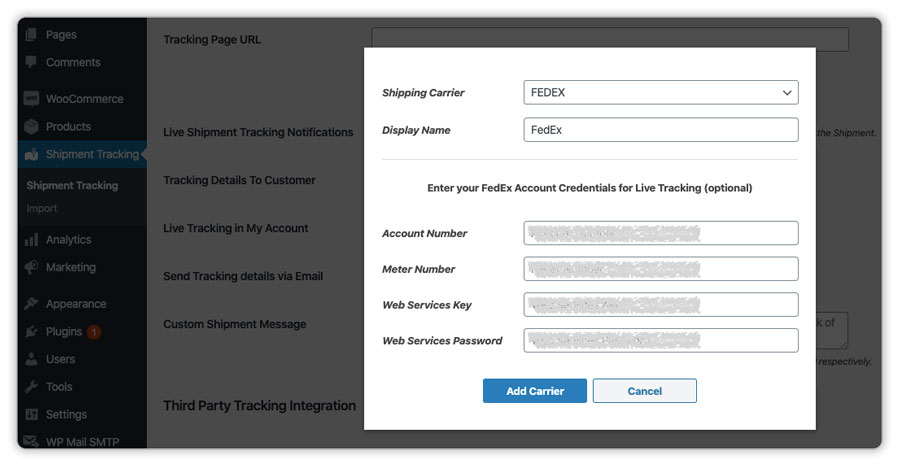
Click on Add Carrier to add the shipping carrier successfully.
3. Display shipment tracking details to customers on My Account > Orders page
WooCommerce Shipment Tracking Pro allows you to display shipment tracking details to the customers on My Account > Orders page
Enable the Tracking Details To Customer option in the plugin settings.
The customers will now be able to view the tracking details by logging in to the My Accounts > Orders Page as shown below.
3.1 Display live shipment tracking details to customers on My Account > Orders page
Once the shipping carrier is configured along with the API credentials, you can let customers view the real-time tracking status of the shipments on their My Account page.
Enable the Live Tracking in My Account option in the plugin settings and select from the options explained below.
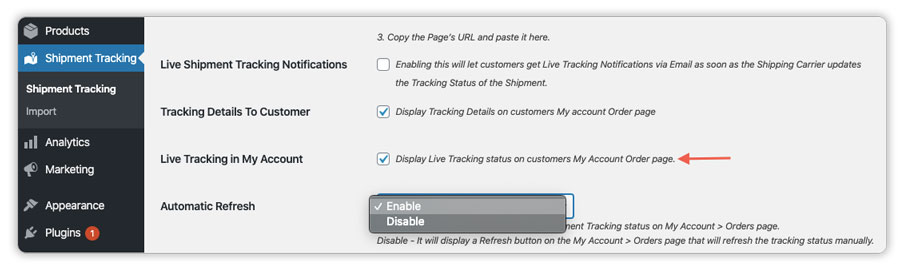
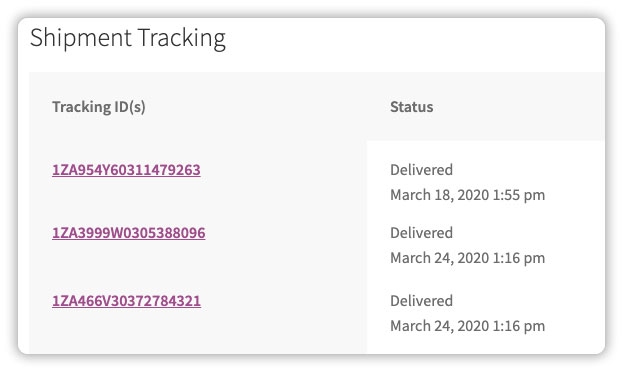
Automatic Refresh – Enable
This option will automatically refresh the shipment tracking status on My Account > Orders page, in real-time
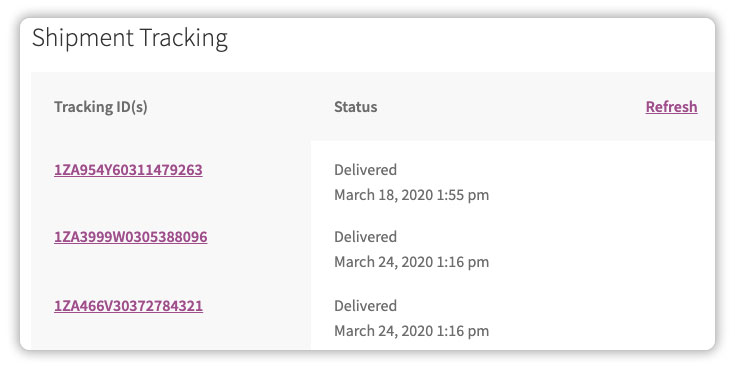
Automatic Refresh – Disable
This option will display a Refresh button on the My Account > Orders page that will refresh the tracking status manually
4. Send shipment tracking details to customers in WooCommerce order completion email
Another way the plugin gives you an option to send the tracking details to the customers is through the WooCommerce Order Completion Email.
Enable the Send Tracking details via Email option in the plugin settings and the plugin will send the tracking ID along with the shipping carrier name, date of shipment, and order notes (if any) along with in the email.
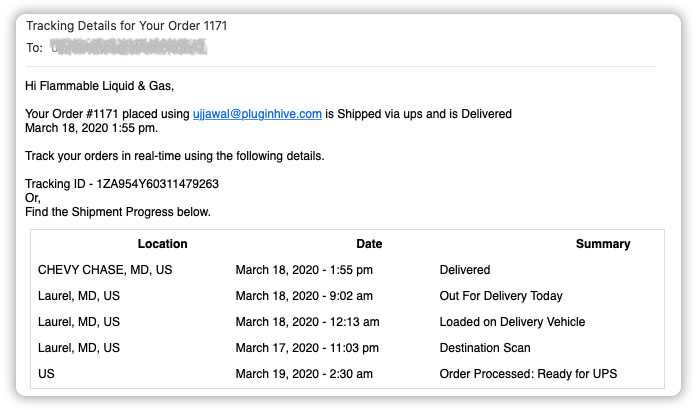
After enabling, once the orders are marked completed, the plugin will attach the shipment tracking details in the WooCommerce Order Completion Email, as shown below.
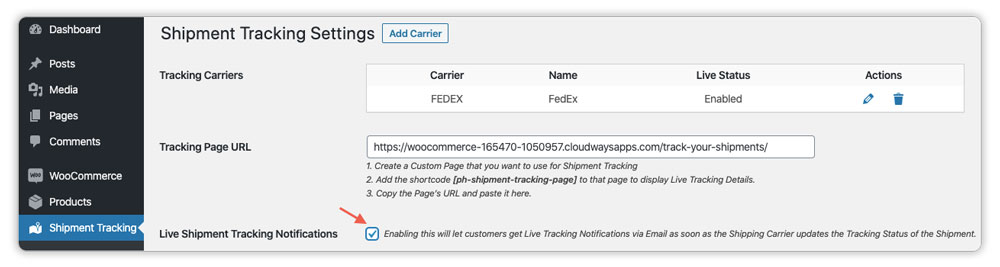
5. Create a tracking page on your WooCommerce store
WooCommerce Shipment Tracking Pro lets you create a custom tracking page on your WooCommerce store. You can use this page to display the tracking status to your customers as well as to increase customer engagement on your WooCommerce store.
Create a new page on your WooCommerce store and add the shortcode [ph-shipment-tracking-page] to that page, as shown below.
Once the page is published, copy the page URL and paste it in the Settings > Tracking Page URL field, as shown below.
You can link the custom tracking page to your WooCommerce store. The customers can access the page, enter the order details and email ID to get the shipment tracking status.
6. Notify customers on every shipment tracking status update via emails
Enable the Live Shipment Tracking Notifications option in the plugin settings. This will enable your customers to get live tracking updates as soon as the shipping carrier updates the tracking status of the shipment.
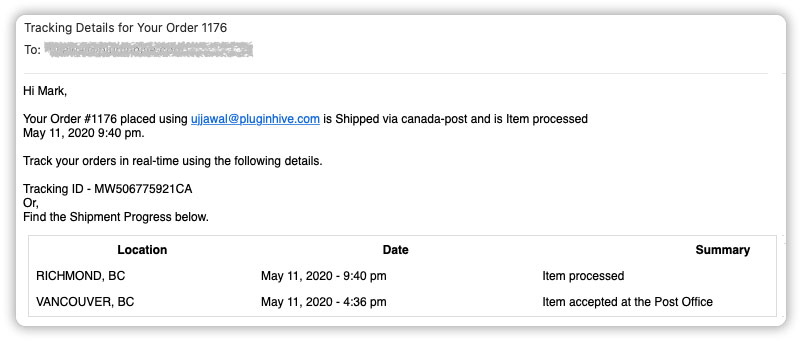
Here are the sample emails sent to the customers on the tracking status update from the shipping carrier.
When the tracking status is changed to ‘Delivered’ by the shipping carrier
When the tracking status is changed to ‘Item Processed’ by the shipping carrier
You can also define a custom tracking email template that will be sent to your customers, by following the steps below.
- Fill in the Sender Email Details, i.e. Name and Email ID, that will be used in the email sent to the customers
- Enter the email subject in the Tracking Email Subject field as per your preference
- Create your personalized tracking email under Tracking Email Template field

Use the following Tags to customize your Email Template.
* [CUSTOMER_NAME] – will enter customer’ name in the email
* [EMAIL_ID] – will enter customer’ email Id in the email
* [ORDER_NUM] – will enter the order number in the email
* [CARRIER_NAME] – will enter the carrier name in the email
* [TRACKING_ID] – will enter the tracking Id in the email
* [TRACKING_STATUS] – will enter the current tracking status in the email
* [SHIPMENT_PROGRESS] – will display the tracking history in Table Format in the email
6.1 Choose the WooCommerce order statuses for which the live tracking emails will be sent to the customers
WooCommerce Shipment Tracking Pro allows you to send tracking status notifications to the customers based on your business requirements. You can easily choose the order statuses for which the plugin will send the email notifications for every tracking status update.
By default, the plugin will check for the tracking status updates for the following orders,
- Completed
- Processing
- Pending Payment
However, if your business requires, you can visit the plugin settings and select your preferred orders under the Select All Orders with Order Status, as shown below.
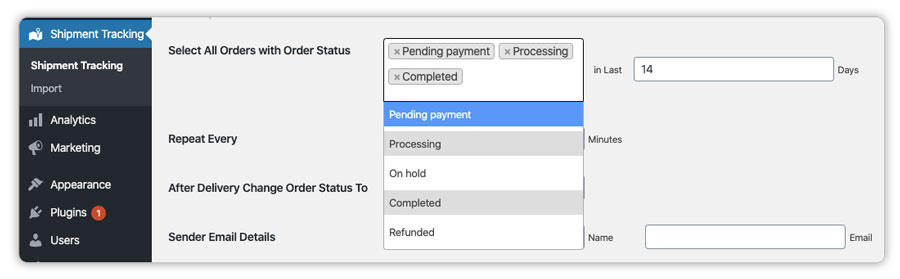
Also, to minimize the load and provide additional flexibility, you can prioritize the orders selected in the last couple of days by entering a value in the In Last ___ Days field.
For Example, if all your orders delivered in 1-3 days, you can enter 3in this field and the plugin will check the shipment status of all the orders marked as Processing, Completed or Pending Payment, in the last 3 days.
If the shipment status is changed by the shipping carrier, the plugin will also send the email notifications to the customers.
6.2 Choose the frequency of checking the live tracking status
WooCommerce Shipment Tracking Pro also allows you to choose the frequency for checking the tracking status and sending the email notifications to the customers.
Visit the plugin settings and enter a value in In Every ___ Minutes field.
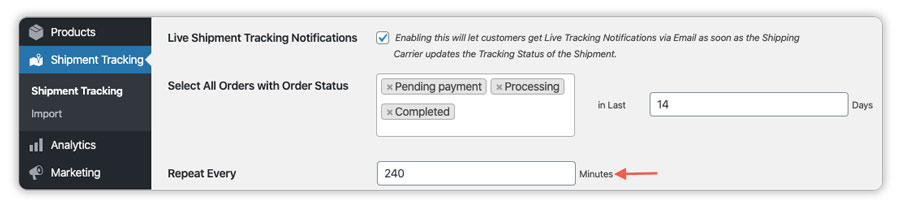
Based on this value, the plugin will keep on checking the tracking status with the shipping carrier, and if the status is updated by the carrier, the plugin will automatically notify the customers via email.
7. Customize the shipment tracking message
WooCommerce Shipment Tracking Pro allows you to create a custom shipment tracking message that will be displayed to the customers.
This tracking message will be displayed at the following places if you have enabled these options the plugin settings,
* WooCommerce Order Completion Email
* Customer’s My Account > Orders page
In the plugin settings, visit the Custom Shipment Message option and create your personalized tracking message, as shown below.
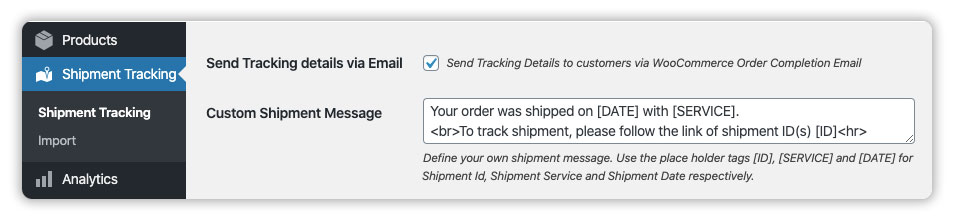
To define your own shipment message you can use the following tags,
* [ID] to display the carrier tracking ID
* [SERVICE] to display the shipping carrier
* [DATE] to display the date of shipment
8. Add shipment tracking details to WooCommerce orders
WooCommerce Shipment Tracking Pro allows you to add tracking details to WooCommerce orders in the following ways.
8.1 Manually add shipment tracking details to individual orders
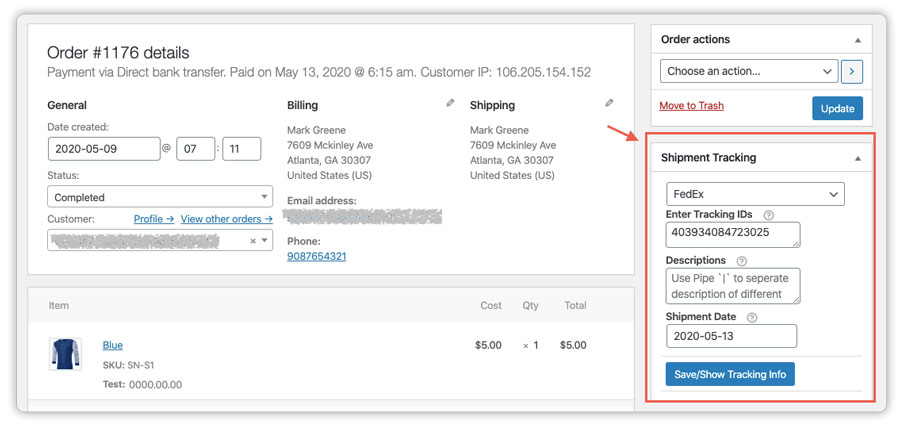
If your order volume is very low and you tend to update the tracking details to your orders manually, WooCommerce Shipment Tracking Pro allows you to add the shipment tracking details in each order along with the carrier and date of shipment.
To add shipment tracking details to individual orders, visit the WooCommerce orders page and select the order.
In the Order Edit page, select your preferred shipping carrier under the Shipment Tracking Drop-down, and add the tracking details like the Shipment Tracking ID, Custom Description, and the Date of Shipment, as shown below.
8.2 Add shipment tracking details to multiple orders via CSV import
In case you require a more convenient and less time-consuming method to add shipment tracking details to your WooCommerce orders in one go, we recommend you opt for this method.
Create a CSV file containing the following fields,
- Order ID
- Shipping Carrier Name
- Shipment Tracking Number
- Date of Shipment
- Custom Description
- Order Status after adding the Tracking Details
* The columns in the CSV file are required to be in the specific order as shown above. Please make sure to mantain the order to avoid import failure.
* A sample CSV is included inside the plugin ZIP file or you can visit the Shipment Tracking > Import > Manual Import and download the sample CSV file.
* The desired encoding of CSV is UTF-8 ( Which most of the text editors will default ). In the Windows environment you can use Notepad++, using which you can check and even convert the CSV text encoding formats.
The sample CSV file format is displayed in the image below.
Once you create the CSV properly, visit the Shipment Tracking > Import > Manual Import section, click on Choose File and upload the CSV file.
Click on Upload File and Import to complete the import process.
For more details, please refer – How to Import WooCommerce Shipment Tracking Details via CSV Bulk Import?
8.3 Add shipment tracking details to multiple orders manually via FTP/SFTP import
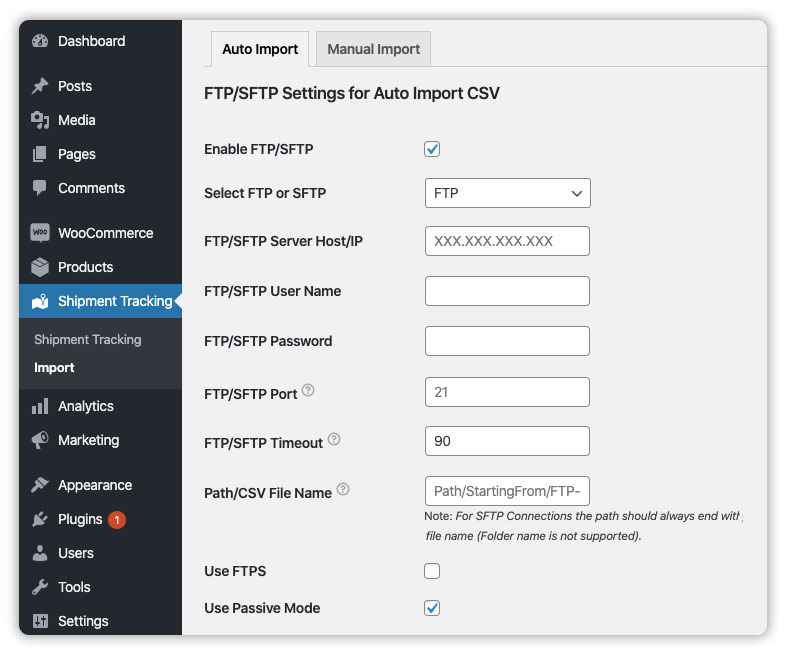
One of the more secure methods to add tracking details to WooCommerce orders supported by the plugin is via FTP or SFTP.
Visit Shipment Tracking > Import > Manual Import and fill in your FTP or SFTP details in the fields below,
- Enable FTP/SFTP Import – Check this option to enable FTP or SFTP settings for WooCommerce Shipment Tracking Pro
- Select FTP/SFTP – choose whether you want to use FTP or SFTP for import
- FTP/SFTP Server Host/IP – Enter your FTP or SFTP Server hostname
- FTP/SFTP User Name – Enter your FTP or SFTP username
- FTP/SFTP Password – Enter your FTP or SFTP password
- FTP/SFTP Port – Enter your FTP or SFTP port number
- FTP/SFTP Timeout – Enter the timeout period for loading
- Path/CsvFileName –Enter CSV file path for importing
- Use FTPS – Check this option to use FTPS. FTPS (File Transfer Protocol Secure) is a secured extension of FTP (File Transfer Protocol)
- Use Passive Mode – enable this option if you want to use a more secure FTP import
For more details, please refer – How to Import WooCommerce Shipment Tracking Details via FTP or SFTP?
8.4 Automatically add shipment tracking details to multiple orders via FTP/SFTP Scheduling
When it comes to importing tracking details to WooCommerce orders via FTP or SFTP, WooCommerce Shipment Tracking Pro also allows you to schedule the import automatically.
Visit Shipment Tracking > Import > Auto Import, and enter your FTP or SFTP details in the fields below.
Now enable the automatic import by setting the Automatically Import CSV to Enabled.
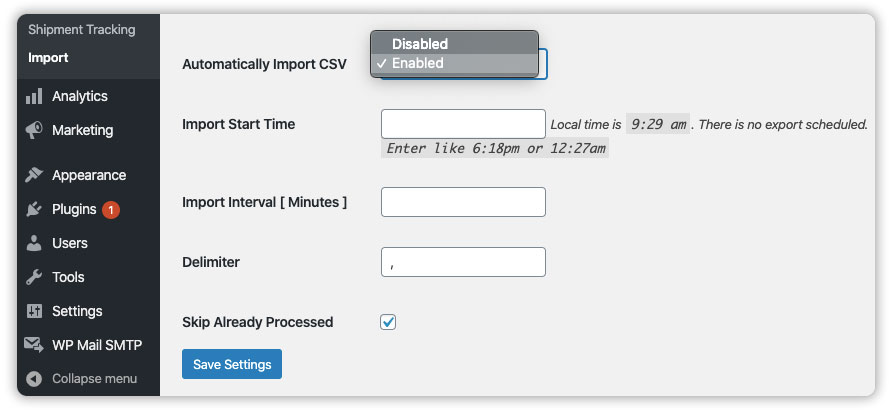
Enter the following details to successfully configure the import schedule.
- Import Start Time – Enter the start time for import. You can enter a time value like 10:10 AM.
- Import Interval [Minutes] – Enter the time interval after which you want to automatically re-run the shipment tracking import
- Skip Already Processed – Check this option to skip importing the tracking details of the order which are already imported
Please enter the Import Start Time carefully as the plugin shows the current server time, hence, you need to enter the import start time based on the server.
* For example, if the current time shown on the plugin page is 8.21 pm, and you want to start the import half an hour after the current time, enter at 8.51 pm as the import start time.
Once all settings are configured, click the Save Settings button.
For more details, please refer – How to Automatically Import WooCommerce Shipment Tracking Details via FTP or SFTP using Scheduling?
9. Automatically update WooCommerce order status to ‘Delivered’
WooCommerce Shipment Tracking Pro makes it convenient to check the live tracking status of your shipments and once the shipments are delivered, automatically mark the orders to Delivered.
‘Delivered’ is a custom WooCommerce Order Status which you can use to easily distinguish between the delivered orders. Visit the plugin settings page and select Delivered (custom) under the After Delivery Change the Order Status To field.
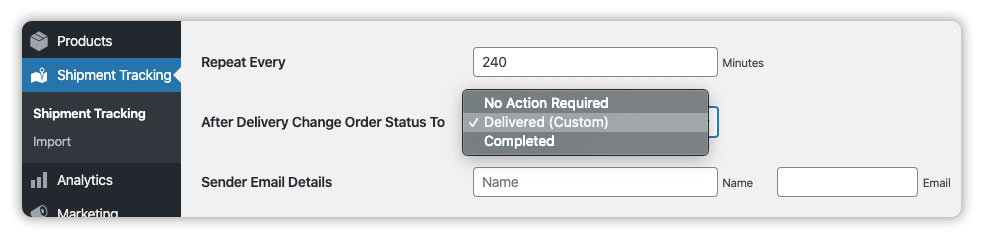
However, you can also use the conventional ‘Completed’ order status and select it within the same field.
10. A quick overview of the shipment tracking number and live tracking status for WooCommerce Admin
This complete feature works parallel to the Live Shipment Tracking feature and is only available if the live tracking is configured for the supported shiping carrier(s).
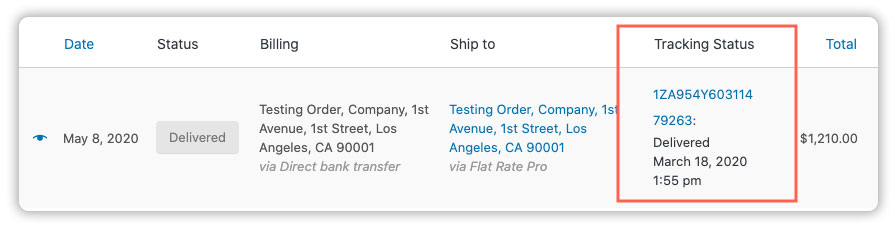
WooCommerce Shipment Tracking Pro provides easy access to the shipment tracking details for the store owner, as well. WooCommerce store owners can visit the WooCommerce Orders page and view the following details for every WooCommerce order.
- Shipment Tracking ID(s) of every WooCommerce order
- Live Shipment Tracking Status updated by the shipping carrier
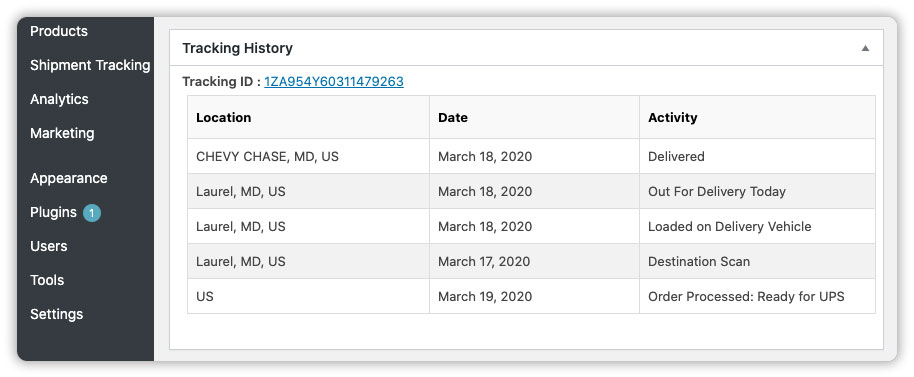
10.1 Complete WooCommerce order tracking history available for the Admin
Apart from the WooCommerce Orders page, the store owners can also view the detailed shipment tracking history for each order.
Visit the WooCommerce Orders page and click on the order you want to view. Under the Tracking History tab, you can view the complete tracking history of all the packages within that particular order, as shown below.
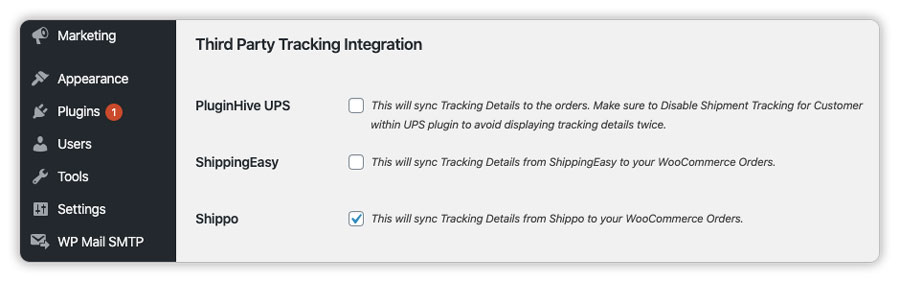
11. Third-Party integrations of WooCommerce Shipment Tracking Pro
Apart from being the most versatile shipment tracking solution for WooCommerce, the WooCommerce Shipment Tracking Pro combines with the following top shipping solutions and imports tracking details to your WooCommerce orders.
11.1 WooCommerce Shipment Tracking Pro & WooCommerce UPS Shipping Plugin with Print Label
WooCommerce UPS Shipping Plugin with Print Label is the leading UPS shipping plugin for WooCommerce. The plugin displays real-time UPS shipping rates on the WooCommerce cart & the checkout page. It also generates UPS shipping labels and tracking details within the WooCommerce orders page.
Once the UPS shipping plugin generates the tracking IDs, WooCommerce Shipment Tracking Pro automatically imports them to the WooCommerce orders and sends it to the customers as soon as the orders are marked Completed via WooCommerce Order Completion Email.
All you need to do is visit Shipment Tracking > Settings and enable the PluginHive UPS option under Third-party Integration, as shown below.
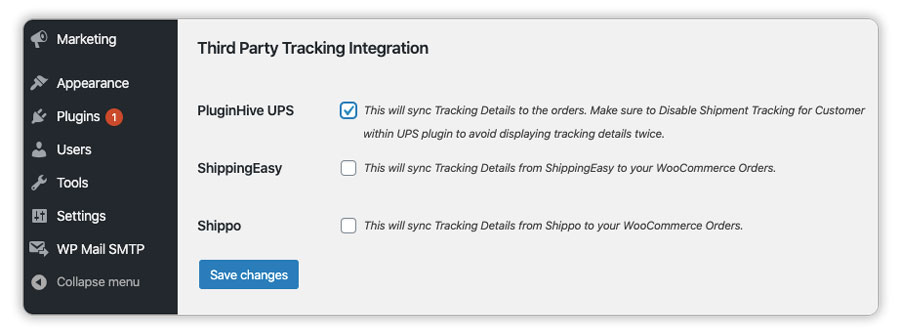
In order to use this functionality, make sure to disable the Shipment Tracking for Customer within WooCommerce UPS Shipping plugin to avoid displaying tracking details twice.
11.2 WooCommerce Shipment Tracking Pro & ShippingEasy
WooCommerce Shipment Tracking Pro works with the ShippingEasy and adds the shipment tracking details from ShippingEasy automatically to your WooCommerce orders and sends it to the customers.
For more details on how the two solutions work together, please refer – How WooCommerce Shipment Tracking Pro & ShippingEasy work together?
11.3 WooCommerce Shipment Tracking Pro & Shippo
Similar to the ShippingEasy integration, WooCommerce Shipment Tracking Pro works with the Shippo and imports the shipment tracking details from Shippo to your WooCommerce orders and sends it to the customers.
In the plugin settings page, enable the Shippo option under the Third Party Integrations, and you are good to go.