The Payment Gateway Plugin for PayPal WooCommerce empowers online store owners using WooCommerce to integrate secure payment processing into their websites effortlessly. This guide will walk you through the entire setup and configuration of Payment Gateway Plugin for PayPal WooCommerce in your WooCommerce site.
Features offered
- Checkout through PayPal Smart Buttons or Express Buttons.
- Wide range of customization for PayPal Smart Payment Buttons.
- Auto-detects customer’s country and displays available payment.
- Swiftly checkout with the PayPal Express Button, utilizing stored shipping and funding info from the user’s PayPal account.
Getting started
Once the plugin is installed and activated:
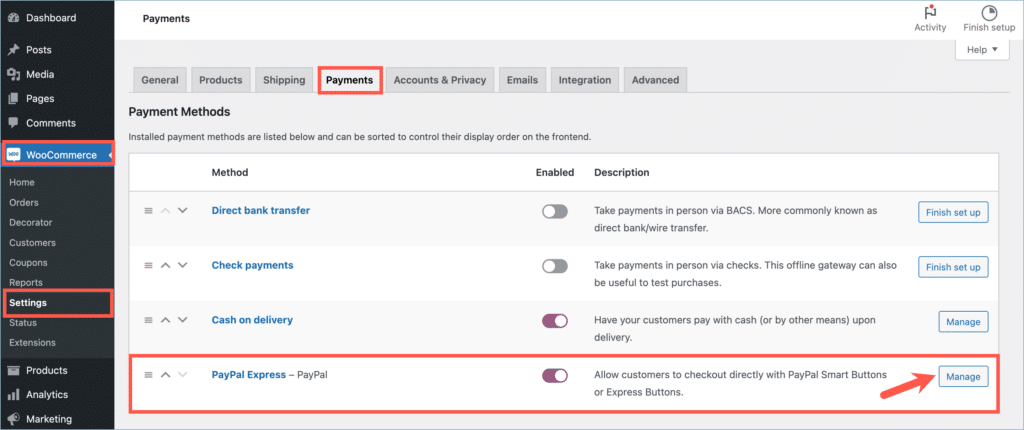
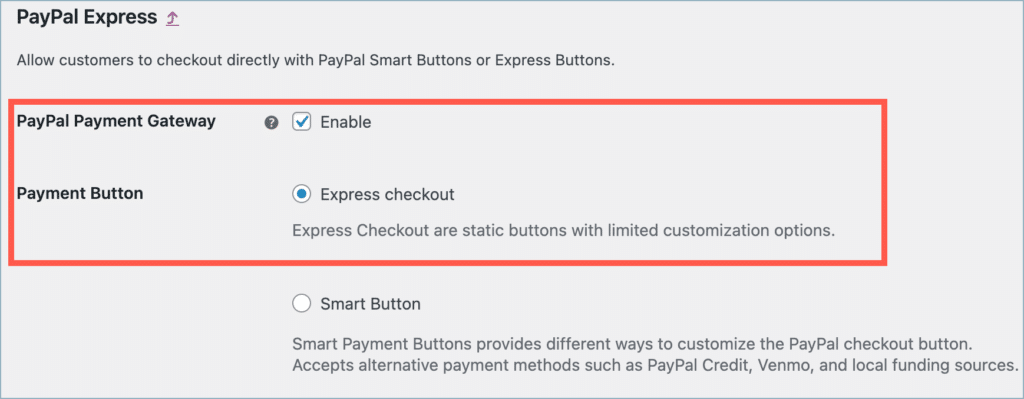
- From the WordPress dashboard, navigate to WooCommerce > Settings > Payments > PayPal Express.
- Click on the Manage button.
- Alternatively, from the WordPress dashboard, navigate to Plugins > Installed Plugins > Payment Gateway Plugin for PayPal WooCommerce > Settings.

Choose the PayPal payment method
With the plugin, you can accept PayPal payments in two ways:
| Payment types | Steps to set up |
|---|---|
| PayPal Smart Buttons |
|
| PayPal Express Buttons |
|
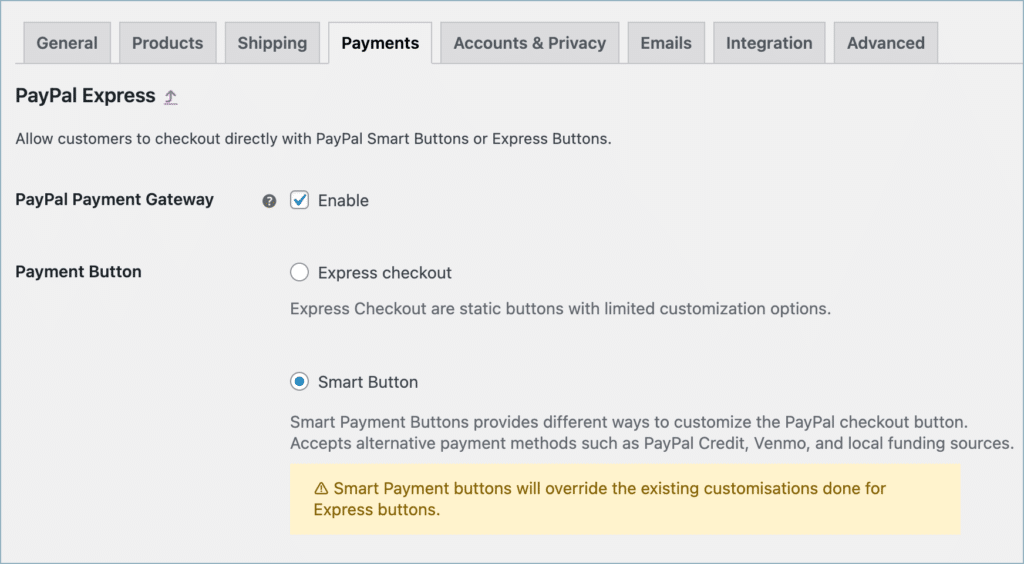
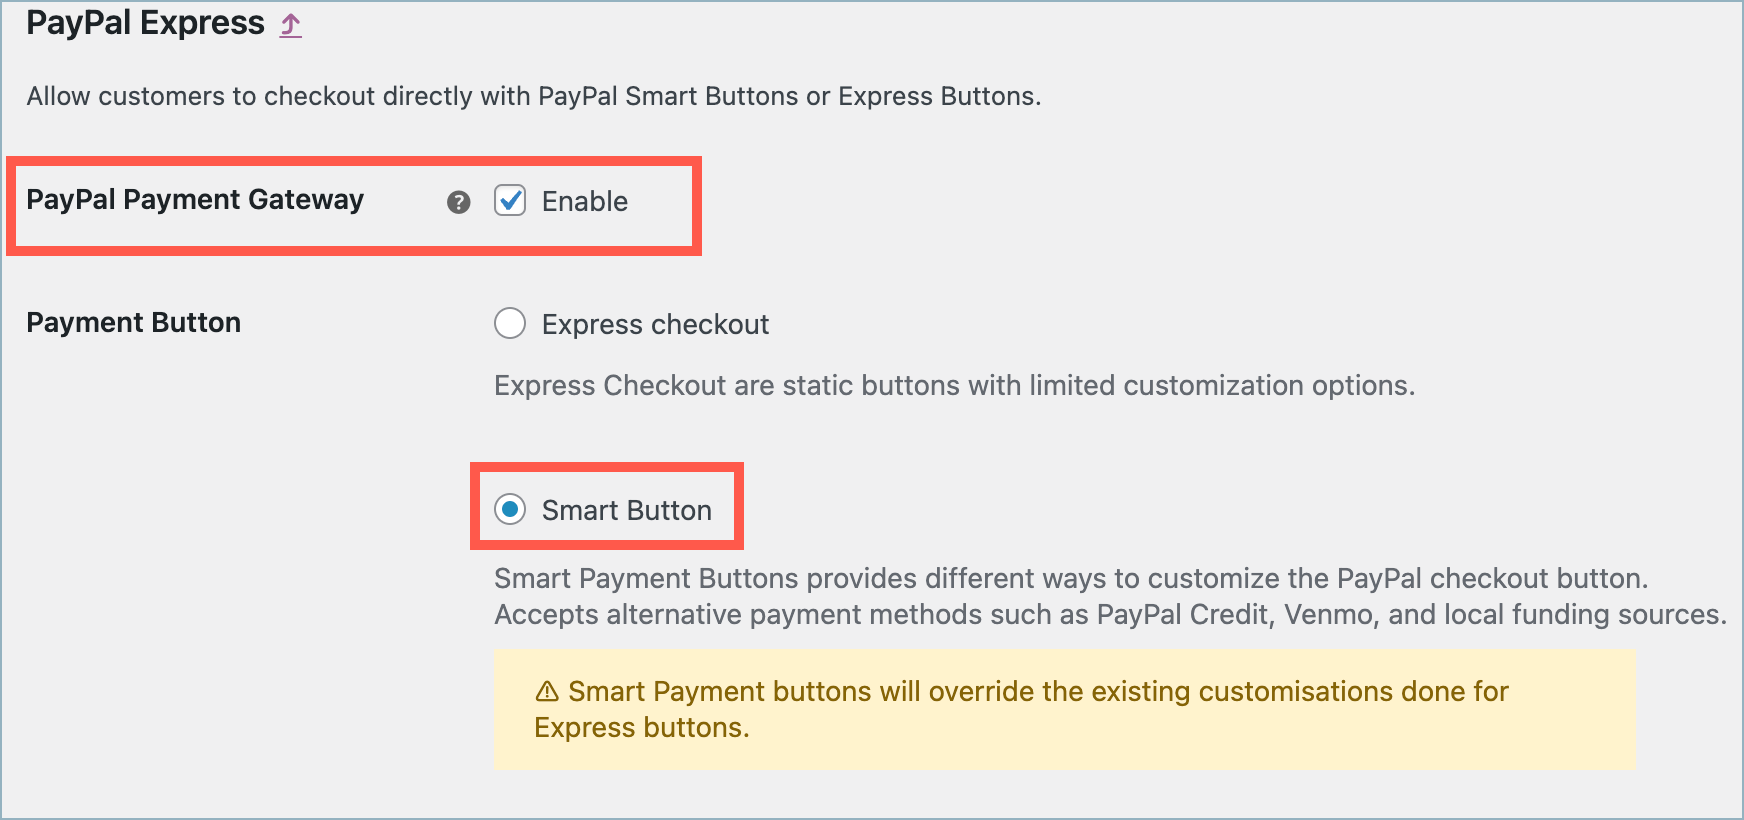
PayPal Smart Button
PayPal Smart Payment Buttons are rendered using the PayPal API. It allows customizing the smart buttons in different ways. The alternative payment methods accept payments by using local funding sources based on the country.
- Smart Payment buttons will not support Subscriptions.
- Also, it will override the existing customisations done for Express buttons.
Using PayPal’s Smart Button, you can accept payment from customers using multiple Alternative Payment Methods (APM). With Alternative payment methods, customers can pay with their bank accounts, wallets, and other local payment methods based on country or device such as:
Paypal Credentials
To use the WooCommerce PayPal Smart Payment Button, it is required to have a PayPal business account. You can open Live or Sandbox accounts free of cost.
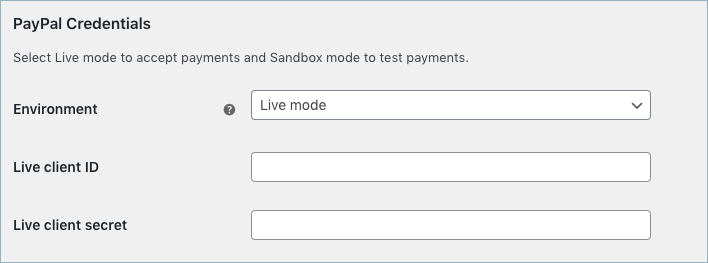
Get Client ID and Secret from your PayPal account.
PayPal Webhook Credentials
Here you get the credentials to register your site’s webhook with PayPal and receive WooCommerce order status updates.
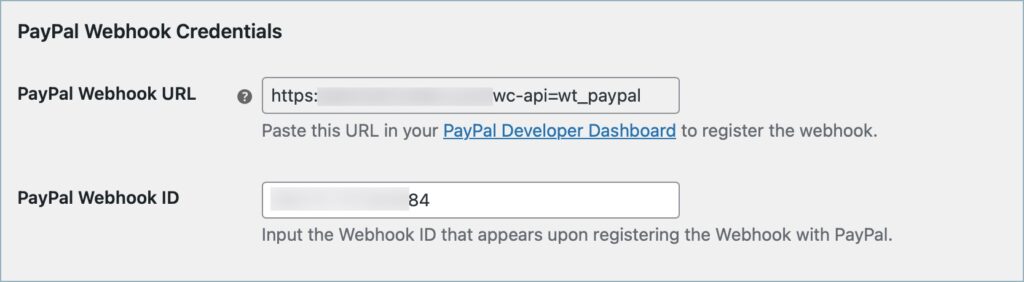
PayPal Webhook URL: This section displays the webhook URL of your site. Use this URL to register your site’s webhook with PayPal. To register a site’s webhook with PayPal, navigate to PayPal Developer Dashboard > Apps & Credentials > Preferred App > Live/Sandbox Webhooks > Add webhook. Here input the PayPal webhook URL and select the event types. To get a detailed idea, refer to this article.
PayPal Webhook ID: Upon registering the site’s webhook with PayPal, you’ll get a webhook ID. Input the PayPal webhook ID here.
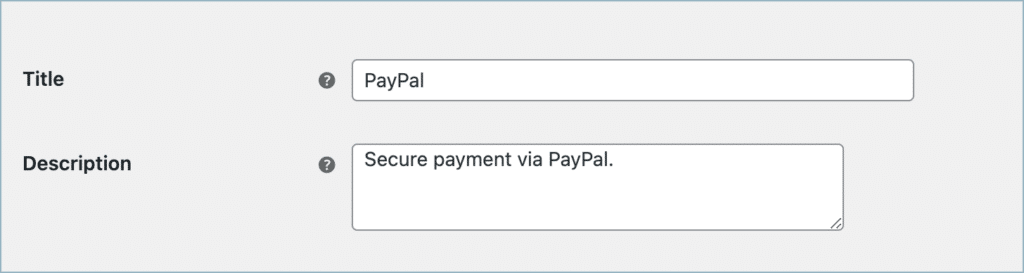
- Title – Title for the payment gateway displayed at the checkout.
- Description – Description of the payment gateway displayed at the checkout.
Smart Buttons – Customization
The following are the available customization options:
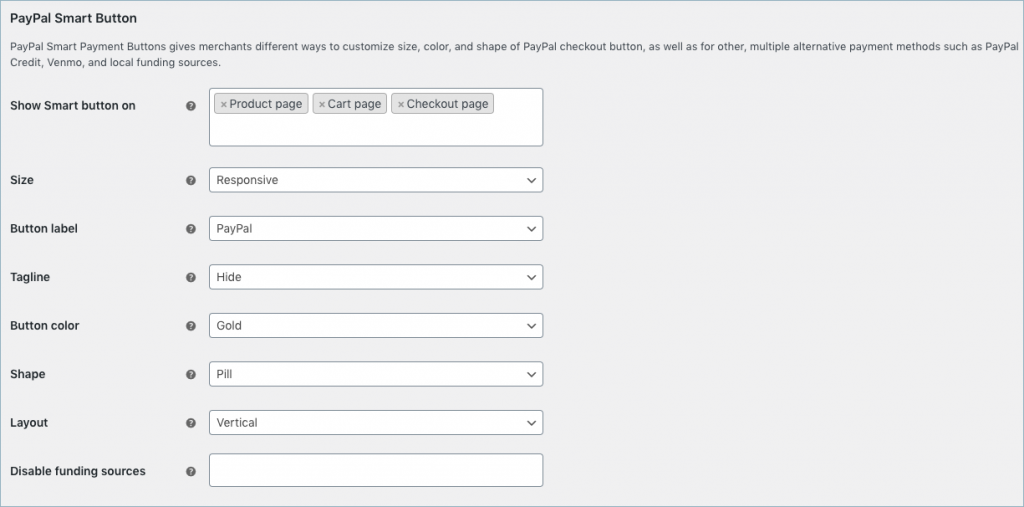
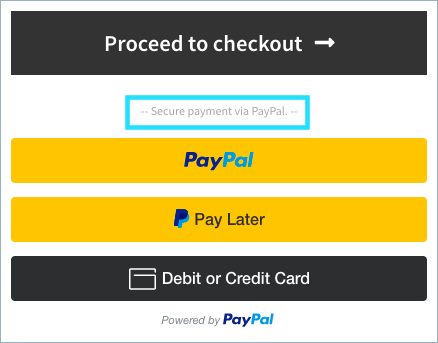
- Show Smart button on – List available pages where you can display the smart button. The available options are:
- Crat page
- Checkout page
- Description – Text displayed above the Smart button.
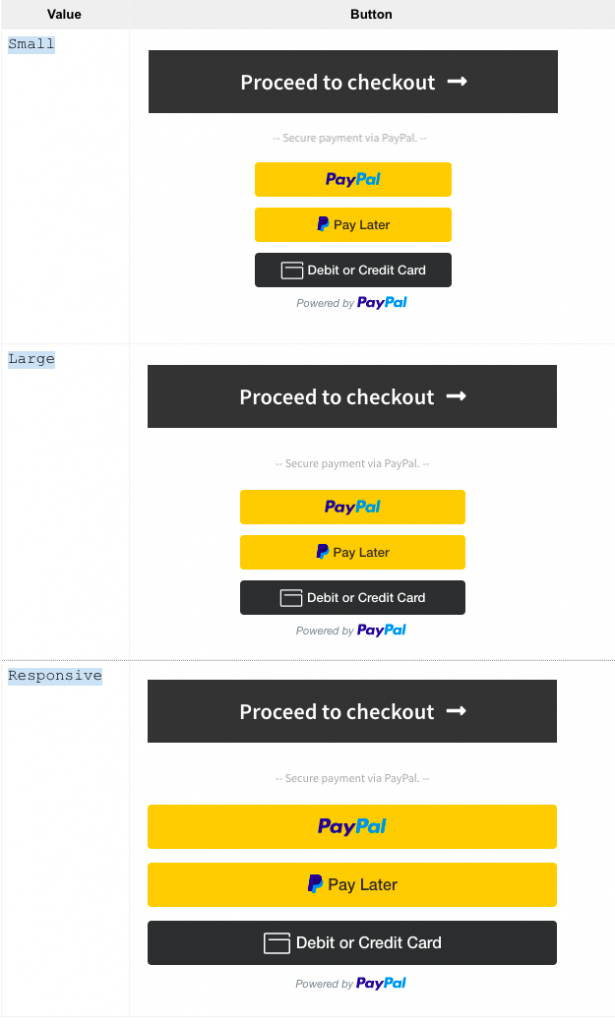
- Size – Lists the available button size for the Smart button. Available options are:
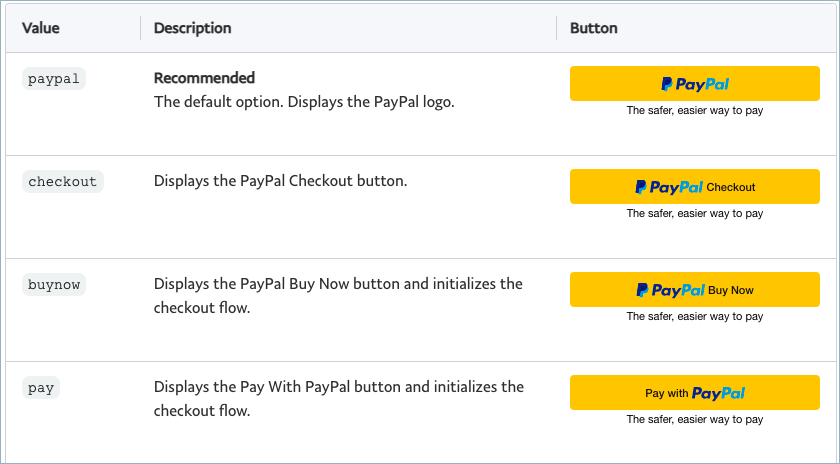
- Button labels – list of predefined labels from PayPal to appear as Button labels. The available options are PayPal, Buy Now, Pay, and Checkout.
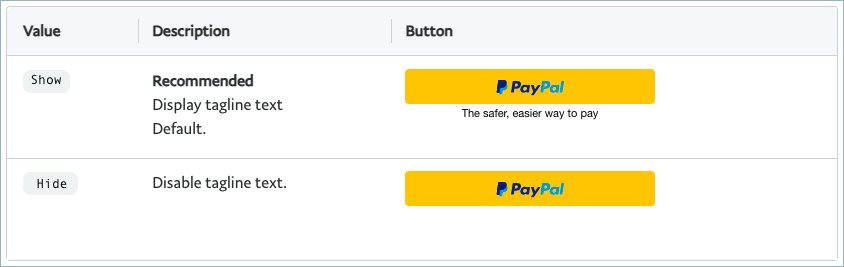
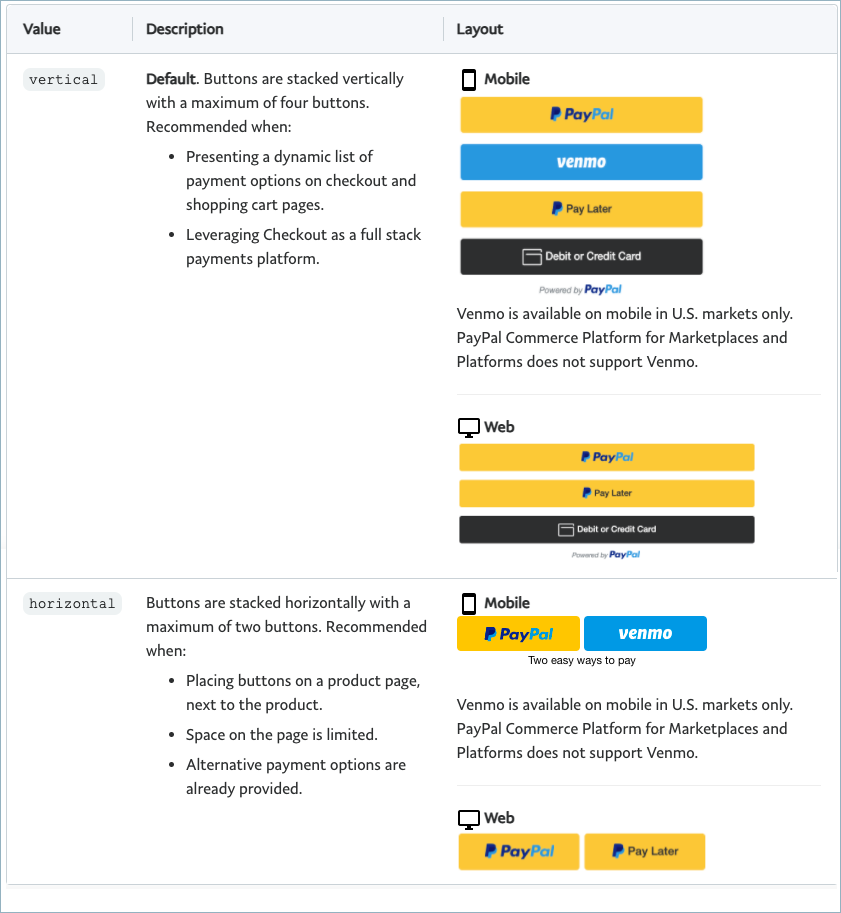
- Tagline – Choose to show or hide the tagline. Note: The Tagline will be hidden for the Vertical layout.
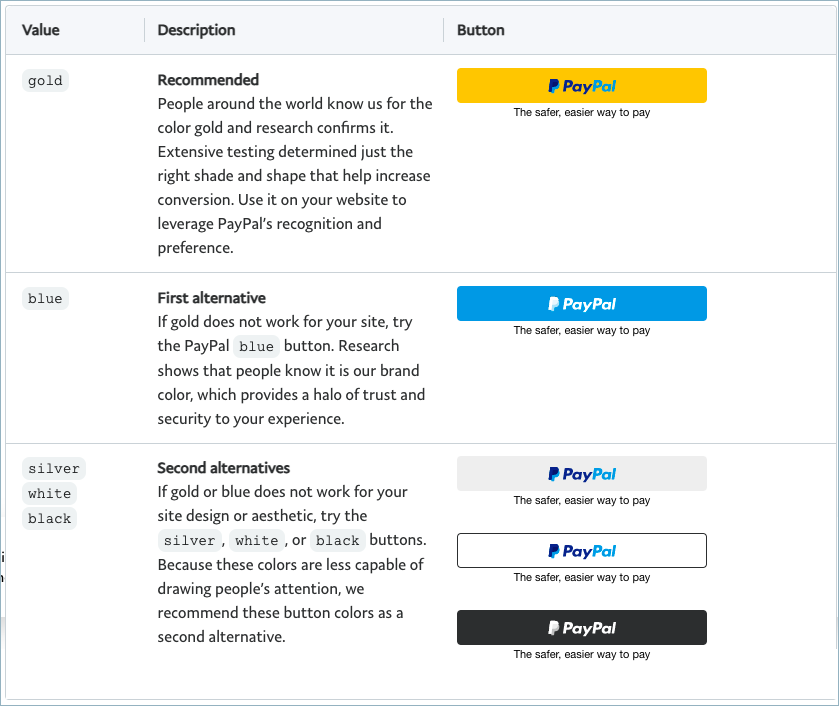
- Button color – Lists available color options for the Smart button. Available options are Gold, Blue, Silver, White, and Black.
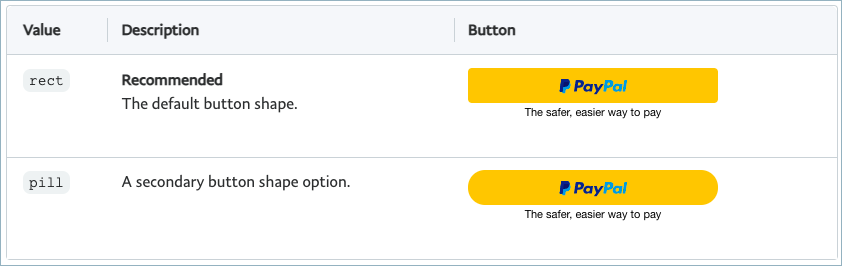
- Shape – Lists available shape options for the Smart button. Avaialble options are Pill or Rect.
- Layout – List available layout options for the Smart button.
- Disable a funding source – List available payment options in your PayPal account. The selected payment option will be disabled. Note: The funding sources are shown on the checkout based on country or device type.
PayPal Express Checkout Button
Enable the PayPal Payment Gateway and Express Button
When you integrate the PayPal Express Checkout Button, your buyers can quickly checkout using the shipping information and funding source already stored in their PayPal accounts. They don’t have to re-type any information— saving them time and reducing shopping cart abandonment.
PayPal credentials
To use the WooCommerce PayPal Express Checkout Button, it is required to have a PayPal business account. You can open Live or Sandbox accounts free of cost.
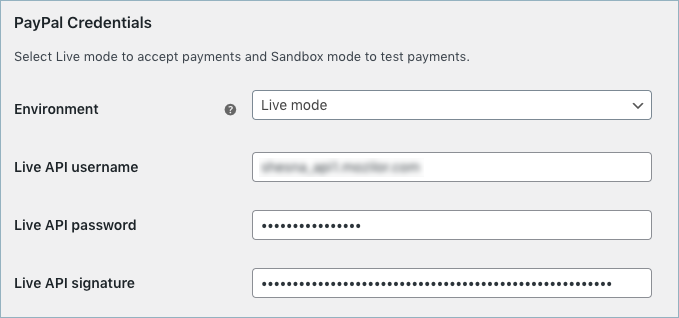
Get API Username, API Password, and API Signature from your PayPal Business Account.
Paypal Express Checkout Buttons – Customization
Following are the customization options:
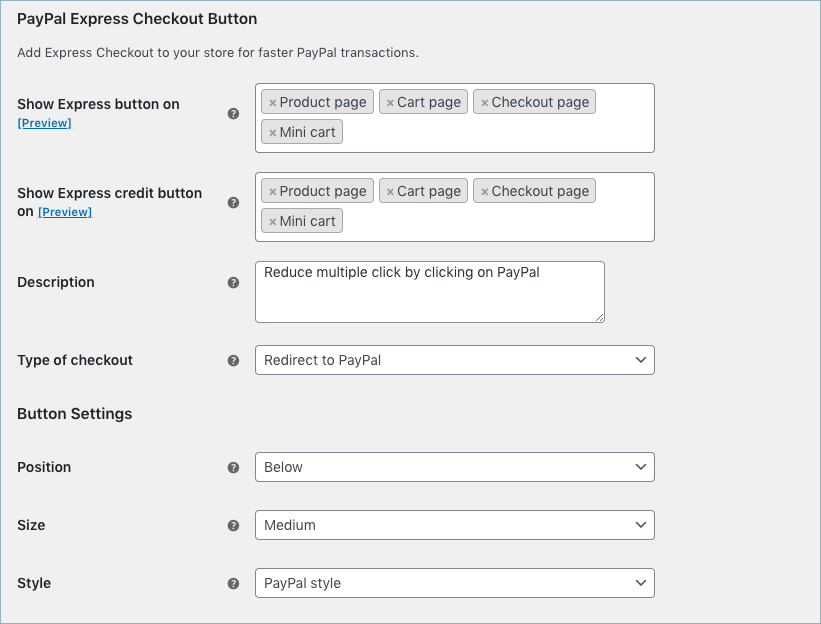
- Show Express button on – List of pages where you can display the PayPal Express button.
- Show Express Credit button on – Displays a PayPal Express Credit button on selected pages. By using PayPal Credit, store owners will receive the payment upfront but customers can opt for financing and pay over time.
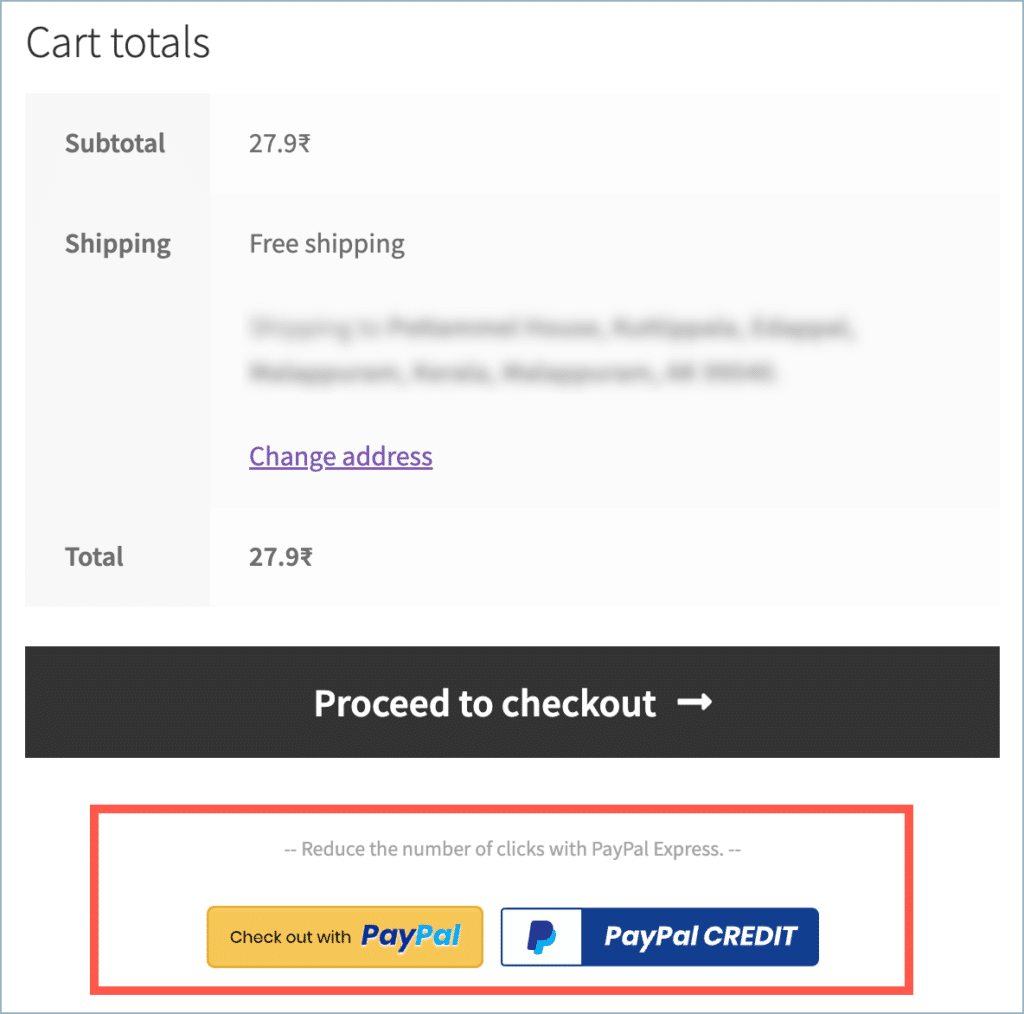
The express button on the cart page will appear as shown below:
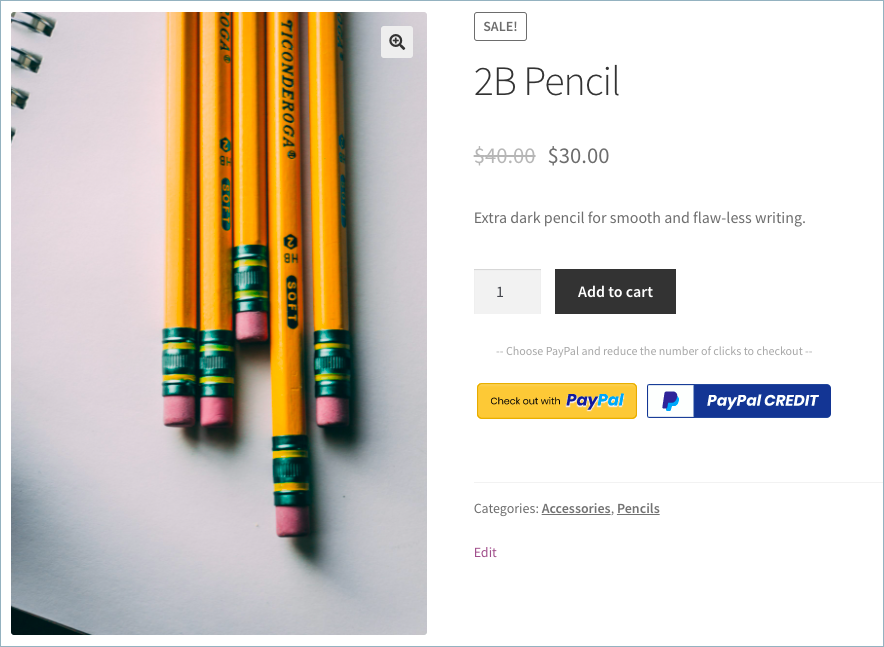
The express button on the product page will appear as shown below. The buyer can checkout directly from the product page. Clicking the Checkout with the PayPal button/ PayPal Credit will redirect the buyer to the PayPal site.
- Description – The text displayed above the PayPal Express button.
- Type of Checkout – Select the type of PayPal checkout type. The available options are as given below:
- Redirect to PayPal – Choose ‘Redirect to PayPal’ to open PayPal in the same window from the cart or checkout page.
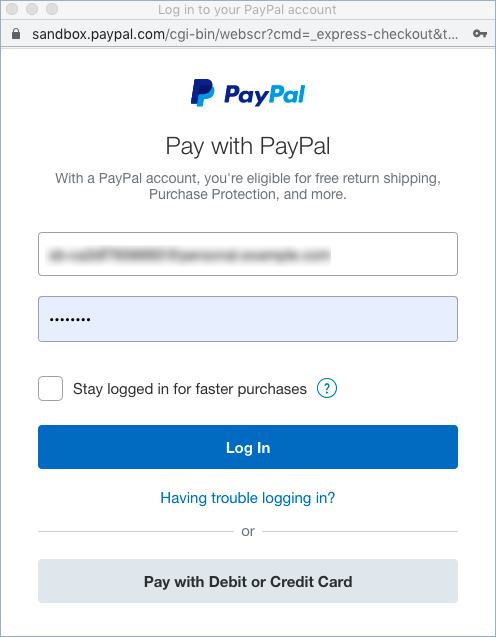
- In-Context Flow PayPal – Choose ‘in-context flow’ to open PayPal in a new window from the cart or checkout page. In a in-Context flow.
- Once the customer click the Checkout with PayPal button.
- The PayPal popup window appears as shown below.
- The customer will have to enter the PayPal login credentials and pay the order amount.
- Button Settings:
- Position – List available positions of PayPal Express/Credit Card checkout buttons. The available options are:
- Above – Displays PayPal Express/Credit Card checkout buttons above Add to Cart (Product page checkout) or Proceed to Checkout (Cart page checkout).
- Below – Displays PayPal Express/Credit Card checkout buttons below Add to Cart (Product page checkout) or Proceed to Checkout (Cart page checkout).
- Size -Button size for PayPal Express/Credit Card Button according to your choice. The available options are as given below:
- Small
- Medium
- Large
- Position – List available positions of PayPal Express/Credit Card checkout buttons. The available options are:
- Style – Style of PayPal Express/Credit ard checkout buttons from the dropdown list. The available options are as given below:
- PayPal Style – Displays PayPal Express/Credit Card checkout buttons in PayPal style.
- WooCommerce Style – Displays PayPal Express/Credit Card checkout buttons in WooCommerce style i.e. same style as Add to Cart / Proceed to Checkout.


Finally, Save the settings.
Common settings
Branding
Set your brand identity at the PayPal end by giving a brand name, logo, banner etc. It will be visible for customers on the PayPal site on choosing to pay via PayPal.
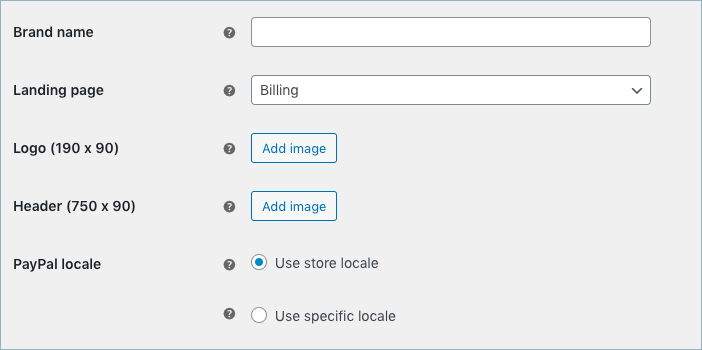
The settings are as shown below:
- Brand name – Store name to display at the PayPal end.
- Landing page: Redirects customers to the chosen page. By default, redirected to the billing page.
- Logo(190×90): Upload a company logo that will appear on the PayPal end. Image requires an SSL host.
- Header(750×90): Upload a header image that will appear on the PayPal end. Image requires an SSL host.
- PayPal locale:
- Use Store Locale: Choose to set the PayPal locale the same as the store locale.
- Use Specific Locale: Choose to set a different locale other than store locale for the PayPal locale. (Drop down lists down the languages supported by PayPal)
The logo will appear at the PayPal end as shown below:
Advanced Settings

- Instant payment – Disable to allow buyers to use funding sources that take additional time to complete (e.g. eChecks). Keep the option in the enabled state, to accept payments via instant transfer, credit/debit card, or PayPal Credit.
- Payment action –
- Sale – captures funds immediately.
- Authorize – verifies the availability of funds, and captures the payment later. The shop owner can capture payment from the individual WooCommerce order page. From the PayPal Express Action box, the shop owner/admin can capture the payment.
- Authorize or Capture payment from the order page – You can place a hold on a card to reserve funds now but only capture them after your business completes the service. For example, a hotel may want to authorize payment in full prior to a guest’s arrival, then move the money when the guest checks out.
When a payment is authorized, the funds are guaranteed by the card issuer and the amount is held on the customer’s card for up to seven days. If the payment is not captured within this time, the PaymentIntent and authorization are both canceled and funds are released.
The store admin can capture the payment from WooCommerce > Orders > Individual Order. The Order page appears as shown below:
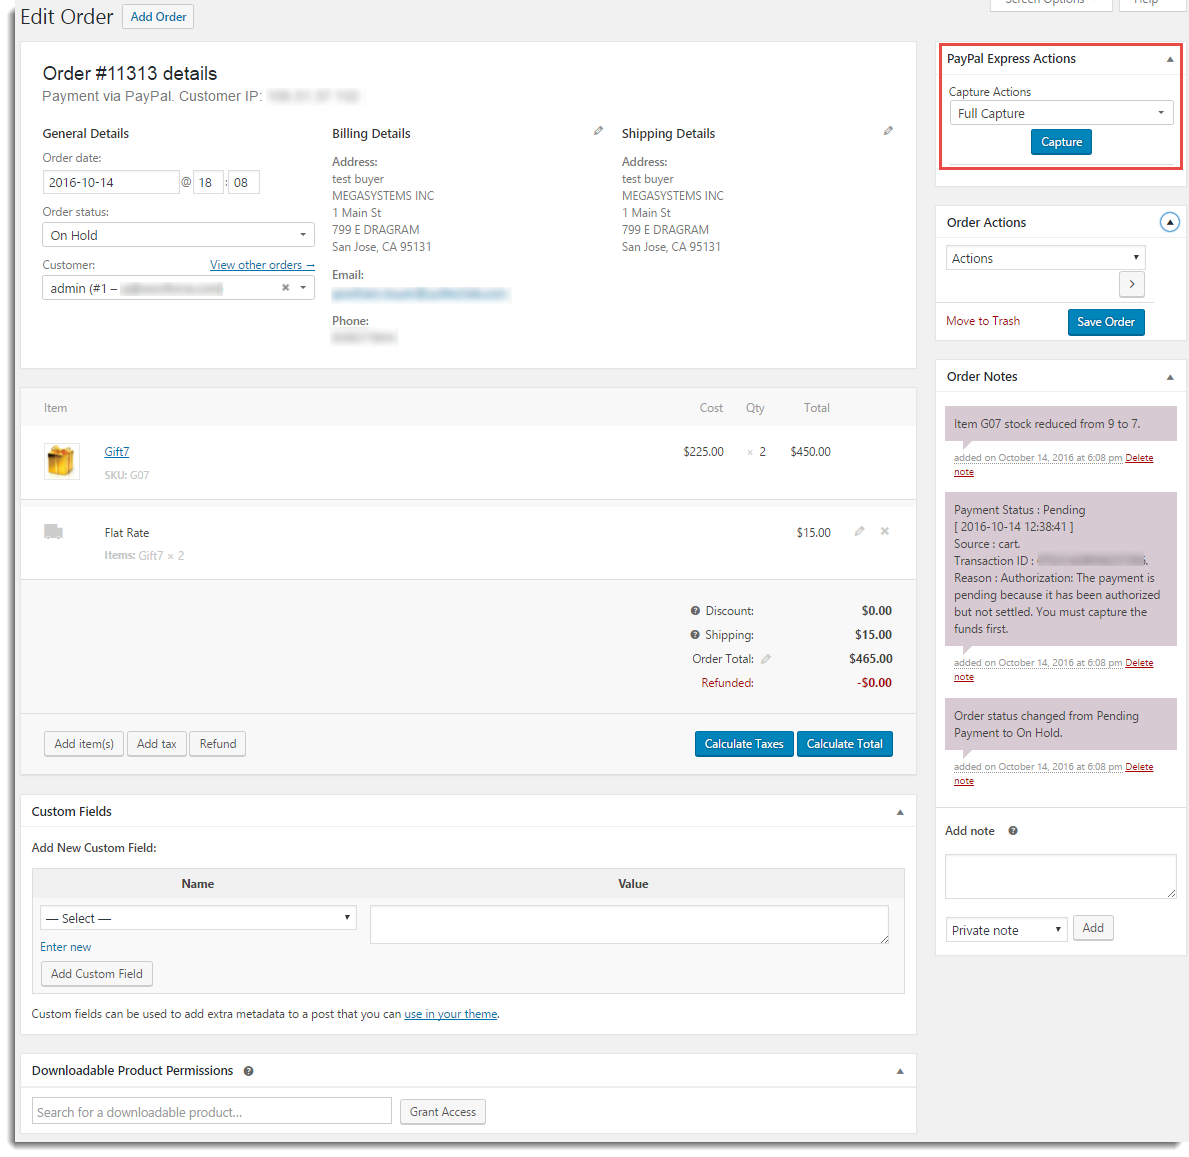
Under the PayPal Express Action box, Click Capture to get the order payment. On capture, the payment for the order will be received successfully.
- Invoice Prefix – Enter an invoice prefix to identify transactions from your site. Suppose, you have added Extensionhawk_ in this field, then the Invoice Number will be Extensionhawk_12098.
- Address override – Enabling will prevent the checkout address from being changed at the PayPal end. It will affect express checkout and PayPal will strictly verify the address.
- Shipping details – Enable to send shipping details to PayPal instead of billing. PayPal allows us to send only one among shipping/billing addresses. We advise you to validate PayPal Seller protection to send shipping details to PayPal.
- On payment cancel – Canceling express payment will redirect customers to the chosen page.
- Back to Proceeding Page: Directs the customer to the page from where the customer navigated to PayPal.
- Redirect to Custom Page: Directs the customer to customize the page from PayPal. Enter the URL of the customized page in the Cancel Redirect Page URL field.
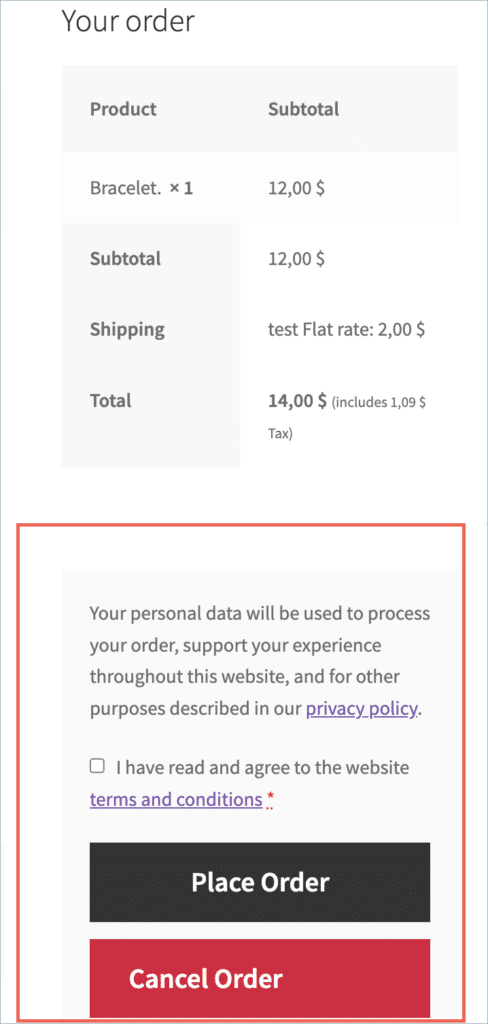
- Skip review page – Enable to skip the review page and move to the site directly. The plugin provides you an option to review the order before completion of the order. On the review page, the customer gets the option to place or cancel the order. The setting is as shown below:
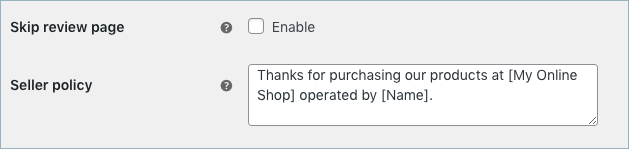
- Seller Policy: This field appears if you do not skip the Review page. Enter Seller Policy or any customized text which you want to display on the Review page for the customer.
- On placing an order, the buyer is directed to Review Page of Order ( if not skipped in Admin settings) as shown below.
- The buyer can Place / Cancel the order by clicking the respective buttons.
Debug Logs
Records PayPal payment transactions into WooCommerce status log
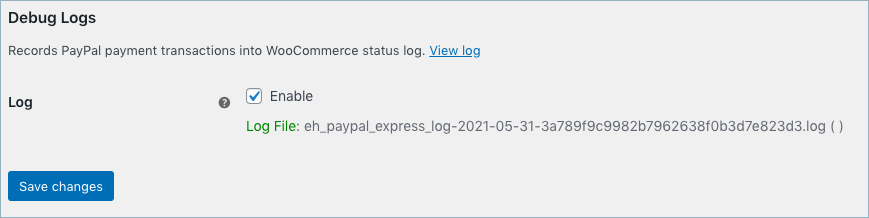
- Log: Enable to record PayPal payment transactions in a log file.
Finally, click Save changes to save/update the plugin settings.
This way the customer can place the order by paying through PayPal securely. For more details on the plugin, check out our PayPal Express Checkout Payment Gateway for WooCommerce.
Fresh
January 26, 2024
Plugin Is Good But I Am Facing 2 Problems
– Didn’t Get Customers Billing Address After They Place an Order
– Didn’t Receive Any Mail Like Thanks For Your Order Has Been Received
I Am Facing Both Errors So Please Help Me To Solve It Its So Important For Me Thank You I Hope This Massage Was Find You Well..!!
Arjun
January 29, 2024
Hi Fresh,
Thank you for reaching out. Seems like you need some technical assistance. Kindly reach out to our support team for further assistance.
htun kyawl
September 14, 2022
thanks
Kathleen
August 28, 2021
My customers keep getting the error : “No shipping method has been selected” and “Can’t proceed to pay via credit card as NO SHIPPING ADDRESS APPEARS” for a downloadable product. Product has been set up as Downloadable and Virtual – no shipping is required.
Mark
September 6, 2021
Hi Kathleen,
Kindly submit a ticket here with the site URL.
Anthony
August 8, 2021
Each time a customer tries to complete an order via Paypal Express Chekout, they get returned to the cart page with an error, “No Shipping method selected”. All shipping methods are correctly setup works with other payment plugin
Anthony
August 8, 2021
This problem is not coming from your plugin. It seems to be coming from a conflict your plugin has with “Multiple Packages for WooCommerce” and I don’t know why. Any ideas on how to resolve the conflict as I would like to be able to use both plugins together.
Mark
August 12, 2021
Hi Anthony,
As we haven’t yet tested the plugin with Multiple Packages for Woocommerce plugin we cannot confirm the compatibility. Can you please test the same with Wooocommerce PayPal Standard and ensure that it is working correctly?
pKO Antony
August 7, 2021
Keep getting the error : No shipping method has been selected.
Anthony
August 23, 2021
I found this was being cause by Multiple package plugin. Plugin disabled. Now the new error after multiple checks and test is “nonce verification failed” Could this be related to your plugin? It only happens during checkout and when your plugin payment method is active
Midselo
July 17, 2021
Thank you