What can we help you with?
How to set up ELEX Amazon Pay WooCommerce Payment Gateway? (with Video)
This article intends to provide detailed, step-by-step instructions that’ll help you set up ELEX Amazon Pay WooCommerce Plugin. Refer to the product page to know more about other various features of the plugin.
Amazon Pay is one of the most convenient, and the trusted way used for payments. From large enterprises to the newest startups, Amazon Pay can help you grow customer relationships and build your business. With ELEX Amazon payment gateway, your customers can Checkout on your website with payment and shipping information, already stored in their Amazon account. When you add the Amazon payment method, anyone who has an Amazon account is ready to buy on your site!
To understand ELEX Amazon Payments-WooCommerce integration, read this article.
Overview
Some of the major highlights of the plugin include:
- Skipping the traditional WooCommerce checkout process: With our WooCommerce Amazon Payment Gateway plugin, you can add the Amazon Pay checkout button on the cart page itself. This will reduce clicks, and checkout time, hence giving your customers easy & quick checkout experience.
- Full and Partial Refunds: You can perform full or partial refunds from the individual order admin page.
- Capture Later: Enable this option in settings and do a payment capture of the payments later, when the stock is available and you are ready to ship. You can capture payments in full or in partial.
- Customization: The plugin provides options to add the desired logo or banner, button position, size, color, text, seller policy among other things for customizing the ELEX Amazon Pay checkout experience.
- Dedicated Overview Page: A consolidated overview of ELEX Amazon Payments, where you can do one-click capture and refund.
Getting started with ELEX Amazon Pay WooCommerce Payment Gateway
Read an article to know how to complete the checkout process on ELEX. You can also read how to download, install, activate ELEX plugins.
Once the plugin is installed and activated, you can navigate to plugin settings as follows:
- Dashboard > Plugins > Installed Plugins > Amazon Payments Gateway for WooCommerce > Settings OR
- Dashboard > WooCommerce > Settings > Payments > Enable Amazon Payments > Manage.
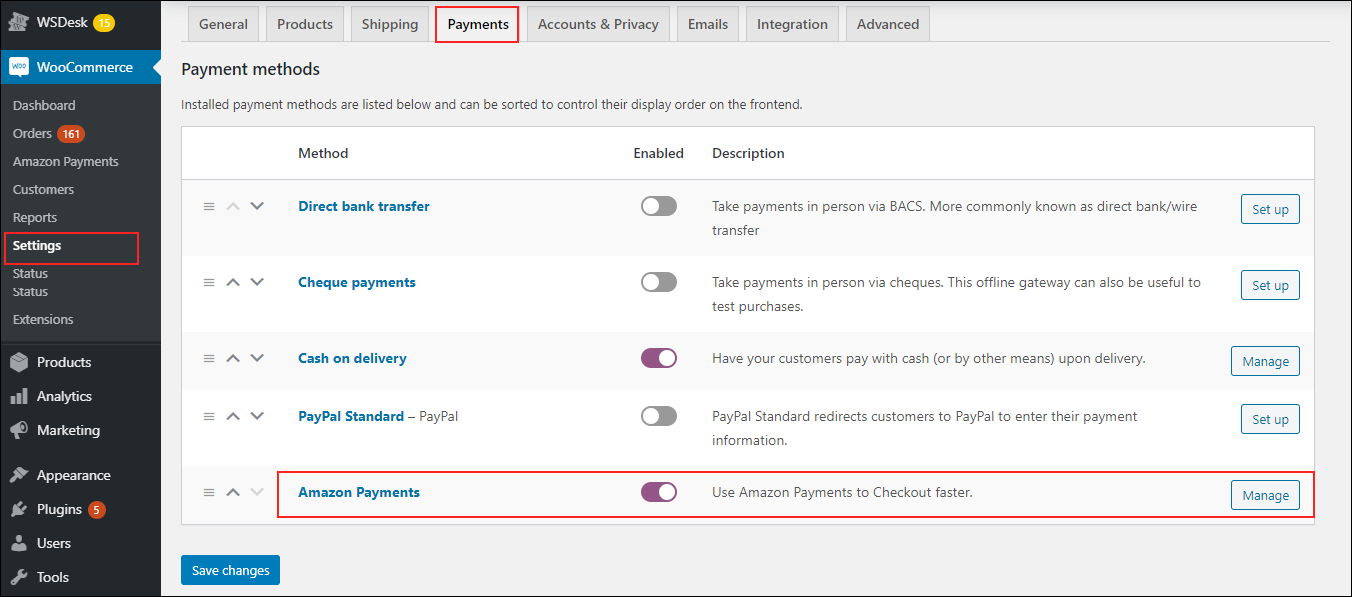
- For the Amazon Overview page, go to Dashboard > WooCommerce > Amazon Payments.
Now that we have explored the features of the plugin, and have installed it, let’s get down to configure the plugin.
General Settings
This section contains settings to enable/disable Amazon Payments, Amazon Overview Page, setting custom title and description, and selecting SSL mode.
The settings are as shown in the screenshot below.
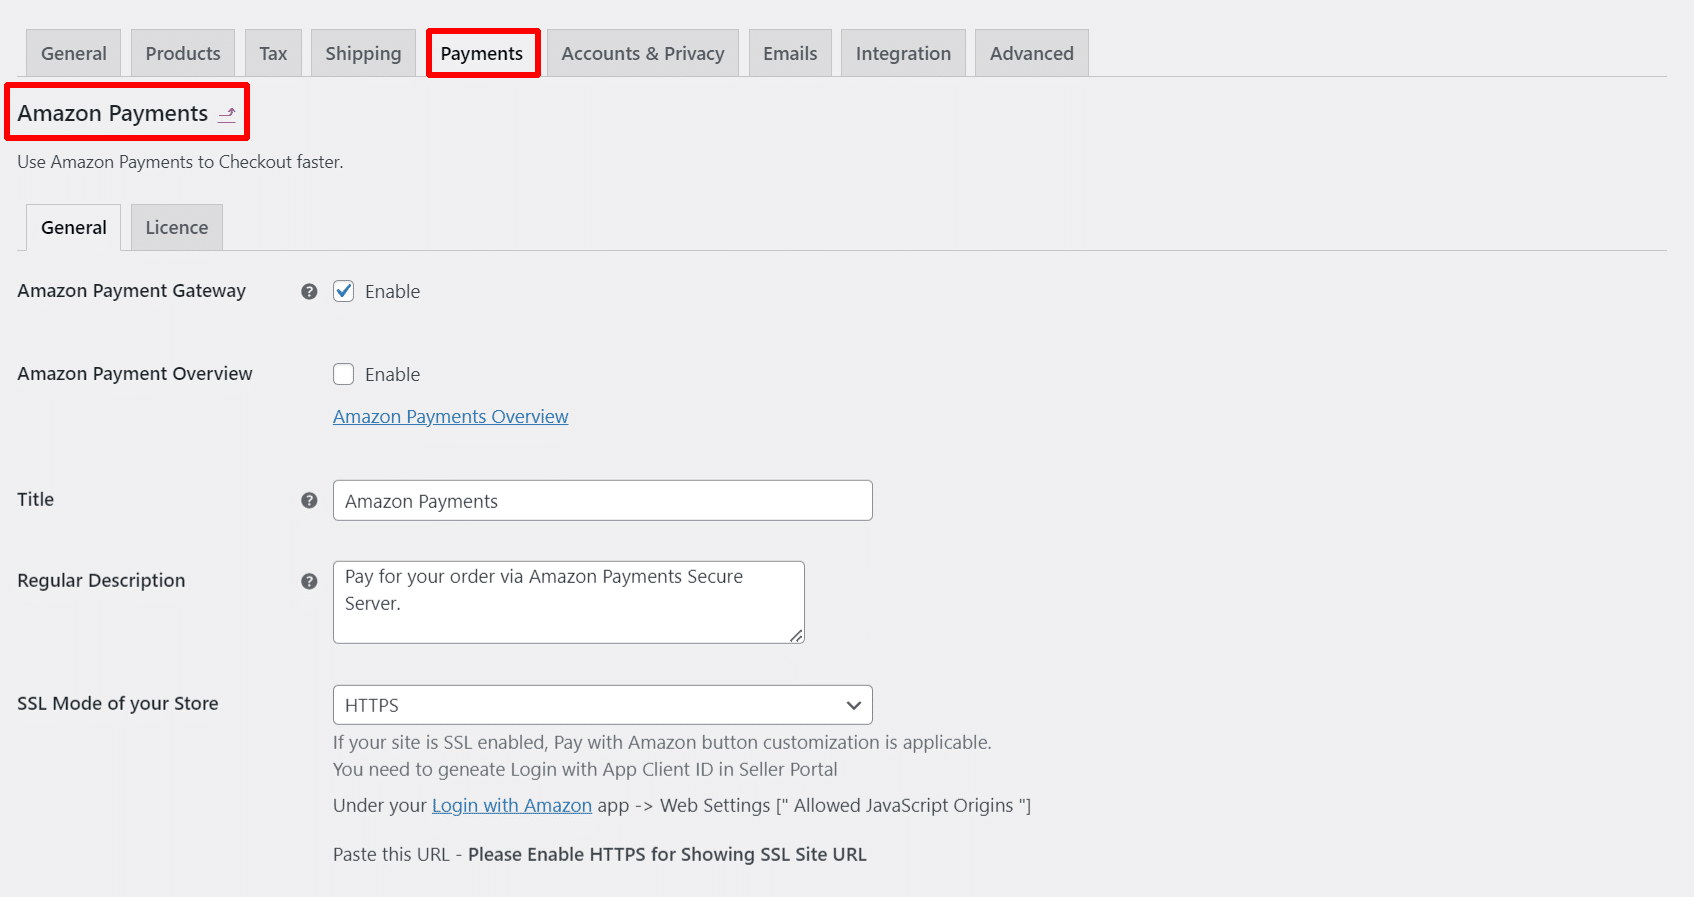
- Amazon Payment Gateway: Tick this checkbox to enable Amazon Payment Gateway.
- Amazon Payment Overview: Tick this checkbox to enable Amazon Payment Overview.
On this page, you can capture or refund the payment in a click. The refund can be partial or full as per requirement. You can also see all the order/transaction details. This page also shows you a graphical representation of an overview of the Amazon payment for a selected date range. You can also see captured, uncaptured, and refunded amount. - Title: Enter a custom payment title in this textbox option. This title will be visible on the checkout page under the payment modes.
- Regular Description: Specify the required description in this text box. Customers can see this description on the checkout page under the ELEX Amazon payment title.
- SSL Mode of your Store: SSL (secure socket layer) is used to encrypt communications between the browser and the server, thus protecting sensitive data being transferred from your customers’ system. You will recognize SSL mode by seeing the familiar https:// in the URL of your browser’s address bar. This should always also be accompanied by a secure padlock symbol in your browser, often in the status bar at the bottom of the browser window, or in the address bar.
The available options are as given below:- HTTPS: With secure mode, you can customize the size, color, and text of the payment button as well as store language. You need to generate Login with App Client ID in Seller Portal. Under your Login with Amazon app -> Web Settings [” Allowed JavaScript Origins “], paste the URL of the secured site.
- HTTP: With this option, the above customization cannot be done.
Amazon Payment Credentials
To use the Amazon payment gateway service, you should have an Amazon account. You can open a live account, or a sandbox account, free of cost.
Refer to our article to know how to obtain your Amazon Payments credentials.
Once you receive your Amazon credentials, enter them in the following fields.
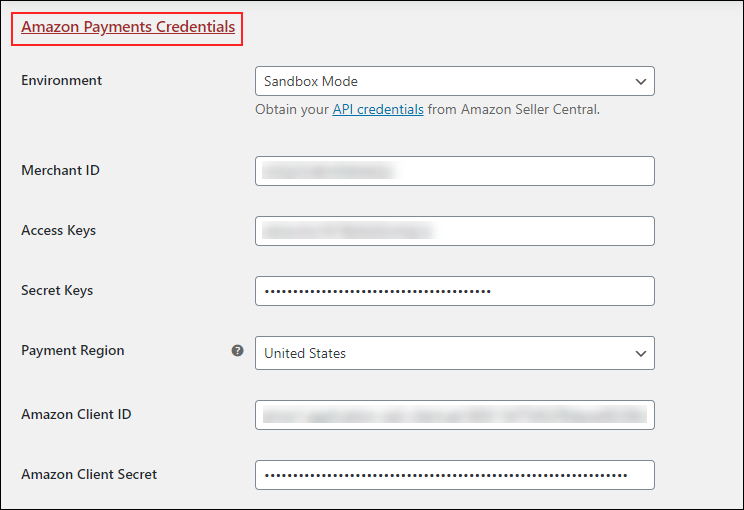
- Environment: Select the required API mode for the payment gateway.
The available options are as given below:- Sandbox Mode: It is used to do test purchasing by using Amazon API. There is no real money transaction involved in this mode. Remember, this mode is used only for development purpose and customers should not have access to this mode.
- Live: Live mode is used for the actual purchase.
- Merchant ID: Enter the Merchant ID provided by Amazon.
- Access Keys: Enter your Access Key provided by Amazon, in this field.
- Secret Keys: Enter the Secret Key provided by Amazon.
- Payment Region: Choose the payment region of your store such as the Euro Region(for the countries that use EUR as currency), United States, United Kingdom, or Japan.
- Amazon Client ID & Amazon Client Secret: Enter respective client ID and client secret in these text fields.
Pay with Amazon Abilities
The settings are as shown below.

- Pay with Amazon (for Cart page): Tick this checkbox to allow customers to directly Checkout from cart page using Amazon payment option. This option will add an ELEX amazon pay button on the cart page.
- Pay with Amazon (for Checkout page): This option will add an ELEX amazon pay button on the checkout page, using which customers can make their payment.
- Payment Action: In this setting, you can select how the payments should be captured.
Available options are:- Capture: Allows the shop owner to get paid as soon as the order is placed.
- Authorize: With this option, the shop owner needs to authorize charges, and then capture the payment.
To capture payments, the shop owner needs to navigate to the individual order or Amazon overview page. Please refer, How to Capture Authorized payment from Order Page?
Pay with Amazon Customization
In this section, you can customize the ELEX Amazon Pay button size, text, color, and position on the cart & checkout pages. In addition to this, you can set the custom button description and seller policy.
The settings are shown in the below screenshot.

- Use Amazon Address Widget: You can directly fetch billing and shipping address from your Amazon account. This address(es) will be displayed as a widget on the checkout page, replacing the default WooCommerce billing and shipping address fields.
Available options are:- Billing & Shipping Address
- Billing Address
- Shipping Address
- None (To use default WooCommerce billing and shipping address fields)
- Button Size: Select the desired size for the Amazon checkout button.
Available sizes are:- Small
- Medium
- Large
- X-Large
- Button Color: Select the desired color for the checkout button.
Available colors are as given below:- Gold
- Light Grey
- Dark Grey
- Button Text: Select the text for the checkout button.
The available text choices are:- Pay with Amazon
- Pay
- Amazon Logo
- Amazon Language: Tick this checkbox to set your store language as Amazon payment language.
- Custom Language: Untick the above Store Locale option to set custom language. Select the desired language from the available choices:
- English (UK)
- German (Germany)
- French (France)
- Italian (Italy)
- Spanish (Spain)
- Position of Button – Cart: Select either of the following options.
- Above: Amazon checkout button appears above WooCommerce checkout button on the cart page.
- Below: Appears below WooCommerce checkout button on the cart page.
- Position of Button – Checkout: Select either of the following options.
- Above: Amazon checkout button appears above WooCommerce checkout button.
- Above Order Review: Appears above order review.
- Above Order Payment: Appears above other payment methods.
- Below: Appears below WooCommerce checkout button.
- Amazon Display Banners: Banners on your homepage and throughout the shopping experience drive awareness of the benefits of completing a purchase using Amazon Payment.
The available options for the banner are as given below:- No Amazon Banners
- Dark: Basic Checkout Banners
- Light: Basic Checkout Banners
- Dark: Logo & Checkout Banners
- Light: Logo & Checkout Banners
- Dark: Description & Button Banners
- Light: Description & Button Banners
- Dark: Logo & Description Banners
- Light: Logo & Description Banners
- Pay with Amazon Description: Enter custom text which will be visible during the Amazon payment.
- Seller Policy: Enter a description of your seller policy which will be visible on the order review page.
Developer Settings
If you are not getting the payment option, then you enable Debug option to find an error(s). By enabling logging, you can trace the issue using log.
The debugging setting is shown in the screenshot below.

Logging: Tick the checkbox to troubleshoot issues with the plugin.
Finally, click Save changes to save the plugin settings.
Checkout with ELEX WooCommerce Amazon Payments Gateway Plugin
Amazon checkout from WooCommerce Cart page
Once the product(s) is added to the cart, the cart page looks as shown in the below screenshot.

Click on the Amazon pay button to proceed with payment. A new window will open where your customers need to login to their Amazon account, as shown in the screenshot below.

Once customers have logged in to their account, they can make the payment. Once the payment is done, they are directed to the review page of the order.
A sample order review page is shown in the screenshot below.

Finally, customers need to click on the Place Order button to place the order.
Amazon checkout from WooCommerce Checkout page
The following screenshot shows how the Amazon checkout button displays on the checkout page.

The Amazon Payments Overview Page
From the Amazon Payments Overview page, you can capture or refund the payment in a click. Capture and Refund can be partial or full as per the requirement. You can also see all the order/transaction details.
Go to Dashboard > WooCommerce > Amazon Payments.

In the Overview, you can see the Captured, Uncaptured and the Refunded amount by the Amazon Payment Gateway.
The plugin provides you the option to show the required number of rows under order details by using the Table Row option. You can also search the required order by using the search option.
You can also see all Order and Transaction details (under Order Notes) from Edit Order Page. To do this, go to Dashboard > WooCommerce > Orders > the desired order.
A screenshot of a sample order is shown below.

How to Capture Authorized payment from Order Page?
If the order is authorized to capture the payment, then the Capture option gets visible in Order Details Page. To capture the payment, Admin needs to navigate to Dashboard > WooCommerce > Orders > Individual Order. The Order page appears as shown below:

Under Amazon Payments Action box for Capture Actions, click either Full Capture for full amount capture or select Partial Capture for capturing partial amount.
Once you select Partial Capture, you are provided with a text-box to enter the desired amount, as shown in the screenshot below.

The maximum amount that you can refund to a buyer is 15% more than the previously charged amount (captured), or a maximum of $75 more than the previously charged amount, whichever is smaller. Read this article for more information on Issuing refunds.
The following screenshot shows how partial and full refunds will be shown in the admin edit order page.

Therefore, in this way, you can accept Amazon payments with our WooCommerce Amazon Payments Gateway plugin. If you still have doubts regarding choosing this payment, read Why you should choose ELEX WooCommerce Amazon Payments Gateway for WooCommerce plugin for your WooCommerce store.
To explore more details about the plugin, go check out ELEX Amazon Payments Gateway for WooCommerce.
check out the product documentation section for more related articles.
You can also check out other WooCommerce and WordPress plugins in ELEX.