Stripe Payment Gateway Plugin for WooCommerce accepts Alipay payment from your WooCommerce store. It supports the following currencies:
- Australian Dollar (AUD)
- Canadian Dollar (CAD)
- Euro (EUR)
- British Pound (GBP)
- Hong Kong Dollar (HKD)
- Japanese Yen (JPY)
- New Zealand Dollar (NZD)
- Singapore Dollar (SGD)
- United States Dollars (USD).
Pre-requisite: Ensure that the Stripe API keys are saved in the stripe credential fields.
All right, now let’s get down to configure the plugin.
Alipay Settings
- As a first step, install and activate the Stripe payment gateway for the WooCommerce plugin.
- Go to plugin settings or from the WordPress dashboard, go to WebToffee Stripe > General Settings > Local Gateways.
- Head on to the Alipay.
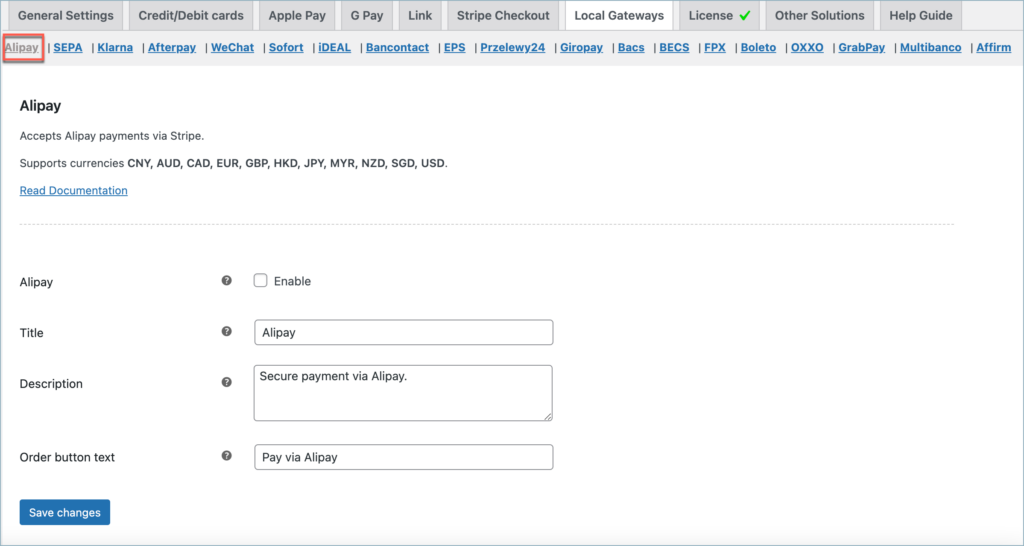
- Alipay: Enable to accept Alipay payments through Stripe.
- Title: Input title for the payment gateway displayed at the checkout.
- Description: Input texts for the payment gateway displayed at the checkout.
- Order Button Text: Input a text that will appear on the order button to place order at the checkout.
Finally, click on Save changes to update the settings.
Please note that Alipay does not support Subscriptions.
Pay via Alipay
When you have configured all the above settings, move to the checkout page to pay via Alipay.
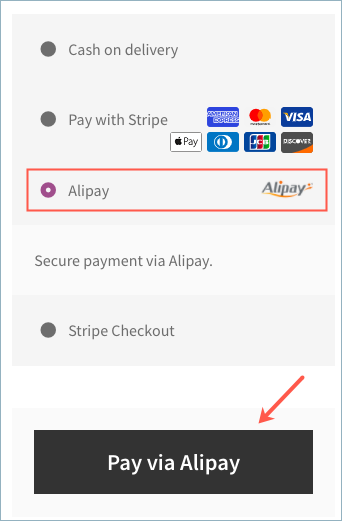
Finally, lets see the steps involved in customer-facing web-flow:
- Select Alipay at checkout.
- Redirects to Alipay. Input the credentials in the respective fields.
- Get notified that payment is complete.
- Lastly, redirected back to the business’s site for payment confirmation.
To know more about the product, check out Stripe Payment Gateway Plugin for WooCommerce.
For understanding each feature of the plugin, refer to the product setting up article.
Or check out the documentation section for more related articles.
Alex
February 8, 2022
Hello, I think alipay do support subscription in stripe. Could you add this feature? Thanks
Alan
February 17, 2022
Hi,
In order to add the Alipay option for subscriptions, you need to review the stripe account. Please contact support to request access to the feature.
Graeme
July 16, 2021
How to override the default CNY currency? I tested this with Stripe, our site is using HKD but the client got charged in RMB. There is no setting in the plugin to determine the default currency to revert to. Is this the expected outcome? We want pour customer to be charged in HKD
Mark
July 25, 2021
Hi Graeme,
Please try setting the site default currency and Stripe account primary currency as HKD.
Peter Cole
March 3, 2020
How do you use alipay with Chinese Yuan?
Mark
March 3, 2020
These are the currencies supported by Streipe Alipay.
aud, cad, eur, gbp, hkd, jpy, nzd, sgd, or usdRefer: https://stripe.com/docs/sources/alipay
maria
January 16, 2019
Hello,
how do I set 6 hours authentication?
Mark
January 16, 2019
Hi Maria,
You may please contact your Stripe support to help set it up in your Stripe account settings.
saori
November 8, 2017
Hello Admin,
I have some question.
1.Can Alipay be used only with the premium version?
2.When doing Alipay payment on Live, does Alipay Information Form pop up?
(For example, like stripe checkout )
Sorry for my poor english.
Mark
November 8, 2017
Hi Saori,
1. Alipay will work with both basic and premium – For better and quick support you can go with premium version.
2. Alipay in live mode will not show Popup, it will redirect to Alipay merchant and redirect back to your checkout page after Payment authorization.
doccb
October 10, 2017
Hello Admin,
I tried and have the same problem. I have checked the checkbox of “Enable Alipay” inside Admin > Woocommerce > Setting > Stripe Payment. I have also type in all the credentials. But when I checkout an item from my shop, I can see the normal Stripe payment pop-up, but it does not even have an Alipay tab.
Lorenzo
October 11, 2017
Hi doccb,
Please make sure you have installed the latest version of Stripe plugin, If you’re not getting the Ali Pay button please disable all options in the plugin settings and save them, and refresh the checkout page, and try enable the options you need and save the settings again and see if you’re able to find Ali Pay,
adm
September 23, 2017
Hello,
I have followed the instruction to set up Alipay at Stripe Payment.
After click at the button of Pay via Alipay, it has no response.
How to fix it?
Anindo
September 26, 2017
Hi Adm,
We apologise for the late response.
Can you please share a screenshot of the problem you are facing with our support team so that they can look into the problem?
You can raise a ticket from here