XAdapter provides you the options to purchase the license for a Single site, up to 5 sites, or up to 25 sites. The installation process consists of 4 simple steps.
- Step 1: Go to My Account -> “API Downloads” tab and download the plugin.
- Note: If you have Basic/Free version already installed, please Deactivate and Delete the Basic Version before installing Premium Version to avoid any conflict. Your plugin settings will be retained intact.
- Step 2: Install the downloaded plugin into your WordPress / WooCommerce Site.
- Step 3: You will get Activation Key and Activation Email at My Account -> “API Keys”.
- Step 4: Go to your site admin and the Settings page of the plugin and activate it using email and key.
Detailed instructions are given in following sections.
Section 1 of this article will guides you through the step-by-step instructions to Download, Install and Activate the Premium Plugin after purchase.
Section 2 of this article will guides you through the step-by-step instructions to Download and Install the Free/Basic version of Plugin.
FAQ section of this article will help you to resolve some of the issues customers face during the insallation process.
SECTION 1: PREMIUM PLUGIN.
Steps to Download the Premium Plugin from XAdapter.
- After purchasing the plugin, Go to My Account section of XAdapter site.
- Login with your credentials which are used to purchase the plugin. It is as shown below:

Account Login Page - After Logging in, navigate to API Downloads as shown below:
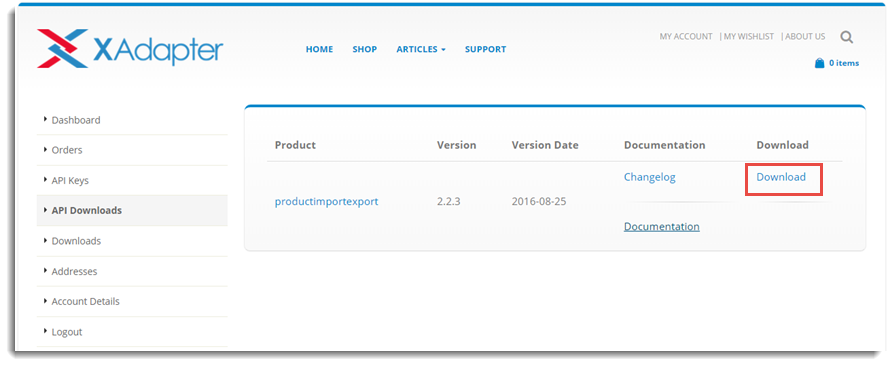
API Download - Click Download to download the plugin package ZIP file. It gets downloaded as shown below:
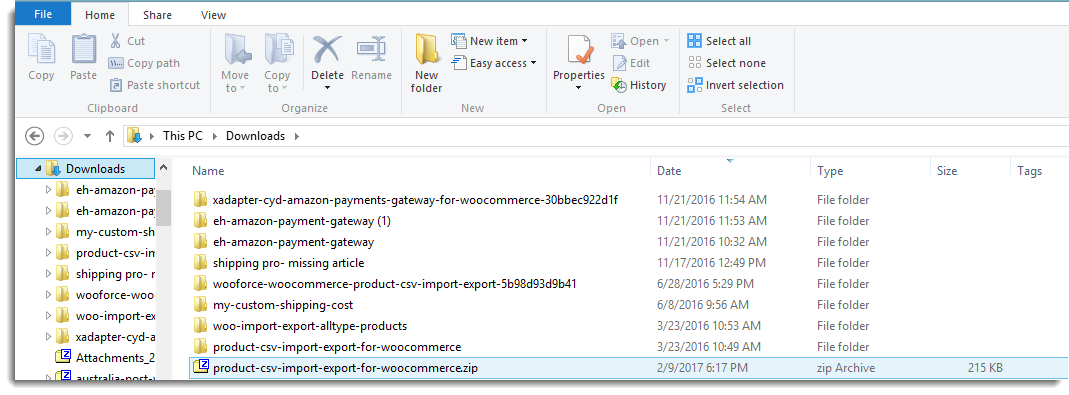
ZIP file in folder
Note: If you are using Mac OS Safari Browser to download the plugin and facing issues, please refer Q3 from FAQ section down below.
Steps to Install the Plugin
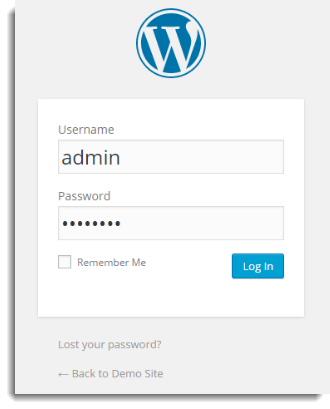
After downloading the ZIP file, you need to install it into your website in order to use the plugin.
- Login to your WordPress site admin using your admin credentials as shown below:
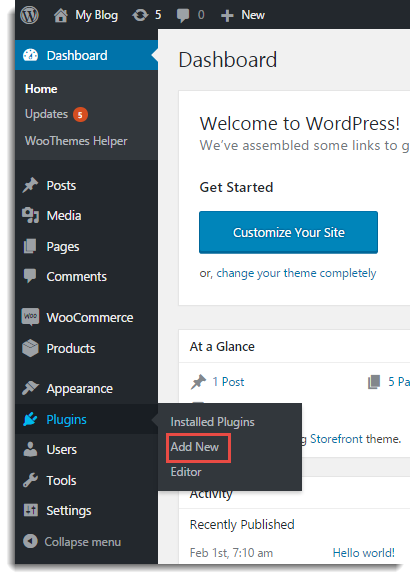
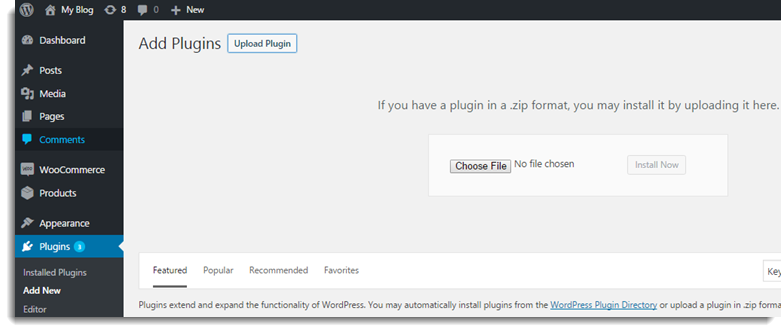
WordPress Login - Navigate to Dashboard > Plugins > Add New as shown below:
Side Menu - Click on Upload Plugin as shown below:

Upload Plugin - The window appears as shown below:
Choose the file - Click on Choose File to browse the plugin ZIP file. It is as shown below:
Choose the file - Select the Zip file and click open. The window appears as shown below:
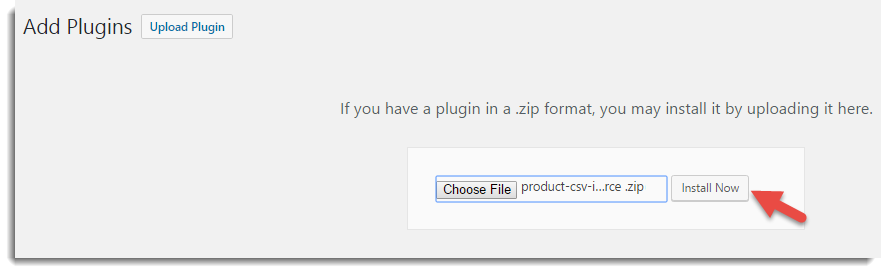
Install Now - Click Install Now, the window appears as shown below:
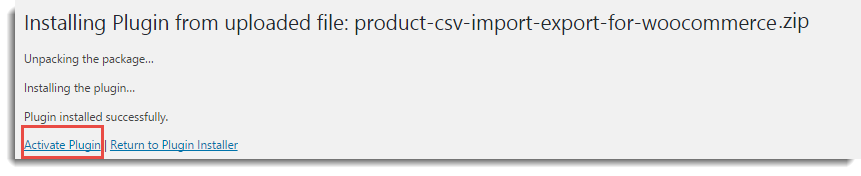
Activate Plugin - Click Activate Plugin, the Plugins Page appear as shown below:

Plugins Page - Click Import Export/Settings link (according to the plugin you using) to go to Admin settings of the plugin.
Steps to Activate the License of Premium Plugin
Once the plugin is installed, you can activate it by using the API Key provided by XAdapter in My Account to get the timely update notification.
- To get API Licence Key and Email, go to My Account of XAdapter. And navigate to API Key as shown below:
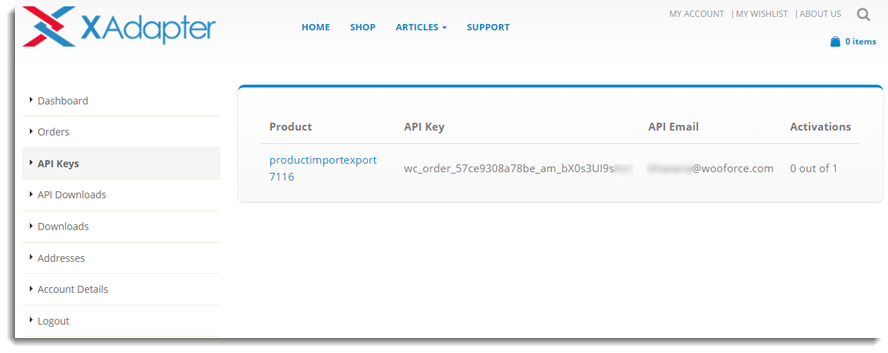
API Key - Navigate to Plugin Admin Settings Page. Use this API Key and Email then enter these details under Licence Activation Section of Plugin Settings. It appears as shown below:
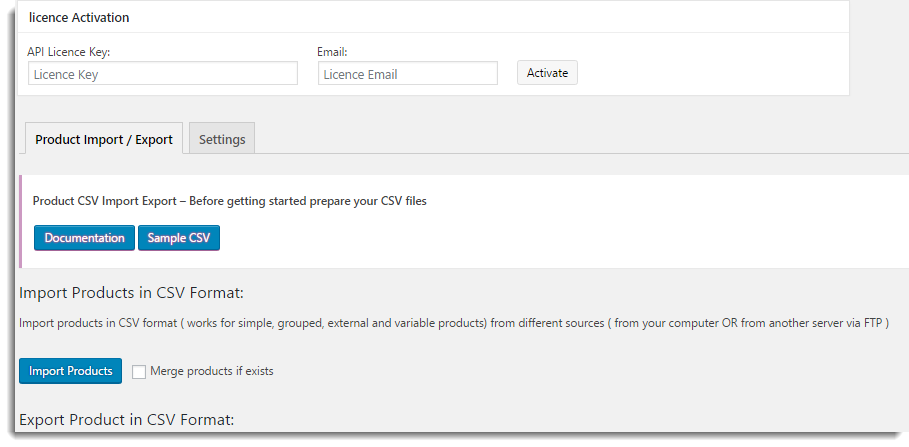
Admin Plugin Settings - Click on Activate. That’s it!
Steps to Update the Premium Plugin to the Latest Version
Once the plugin update is available, you get the notification on Plugins page as shown below:
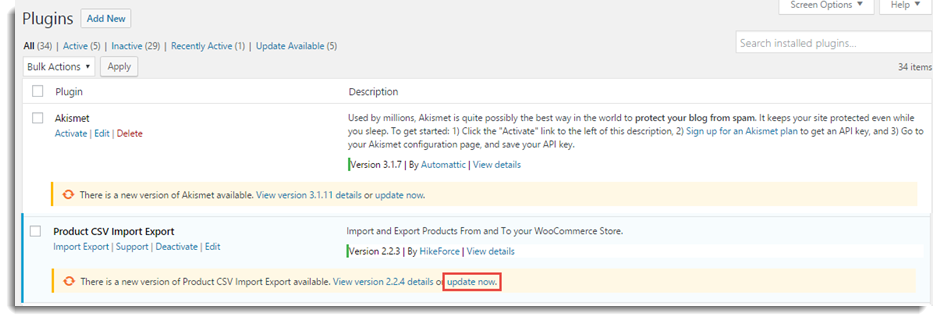
Click update now to update the plugin to the latest version.
Note: Your existing settings of the plugin remains intact after updating the plugin.
SECTION 2: BASIC / FREE PLUGIN.
Steps to Download and Install the Free/Basic Plugin.
You can install the basic version of the plugin from the WORDPRESS.ORG.
Note: If you have installed ‘Basic’ version of the WordPress, then please deactivate it first before installing the Premium version.
To download the free plugin, click on the required plugin after navigating to the required free plugin page. The window appears as shown below:
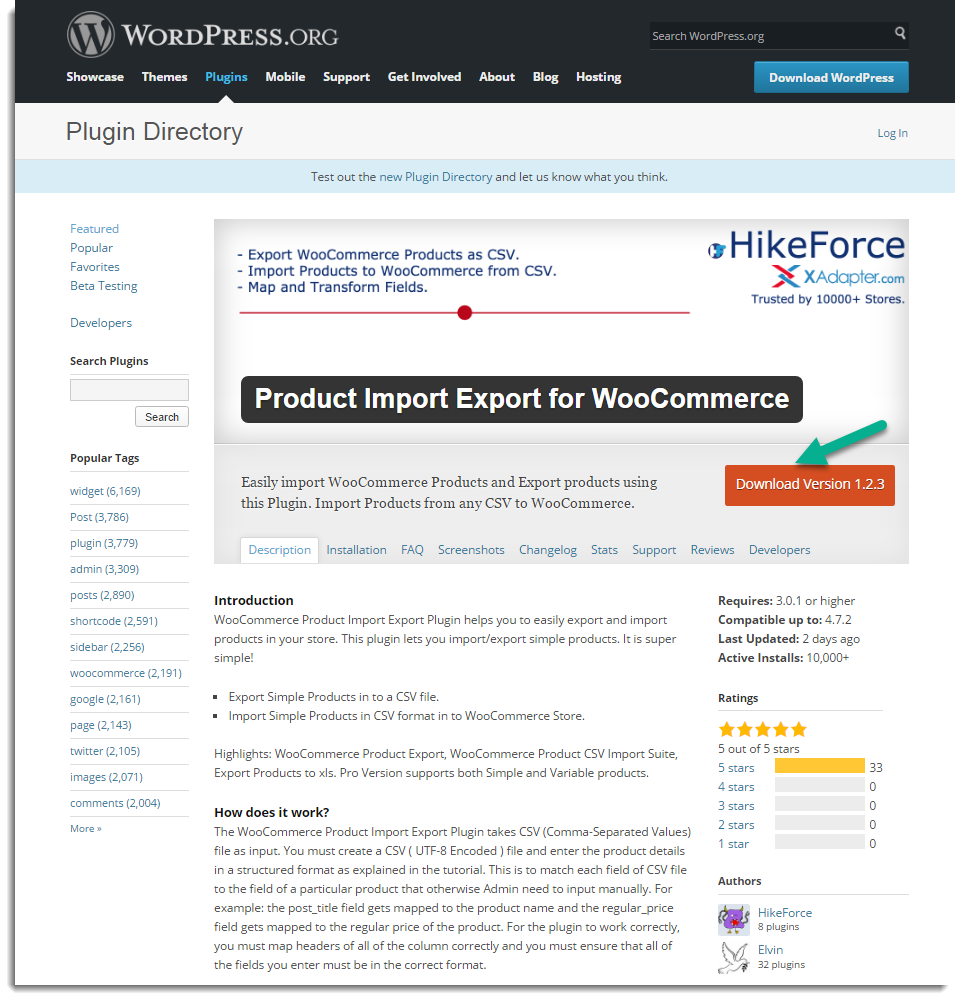
Click Download Version.
After downloading the ZIP file, you need to install it into your website in order to use the plugin. For detailed information, see the topic Steps to Install the Plugin.
Steps to Update the Free/Basic Plugin to the Latest Version.
Remove existing installed version of the plugin from your WordPress site before uploading the latest version. You need to deactivate and delete the plugin. Otherwise, you will end up getting ‘Destination folder already exists‘ error.
- Deactivate the plugin by clicking Deactivate as shown below:
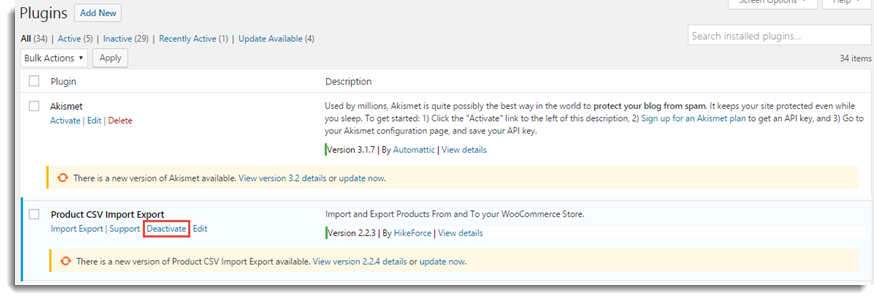
Deactivate - Once you have Deactivated the plugin, you get Delete option as shown below:
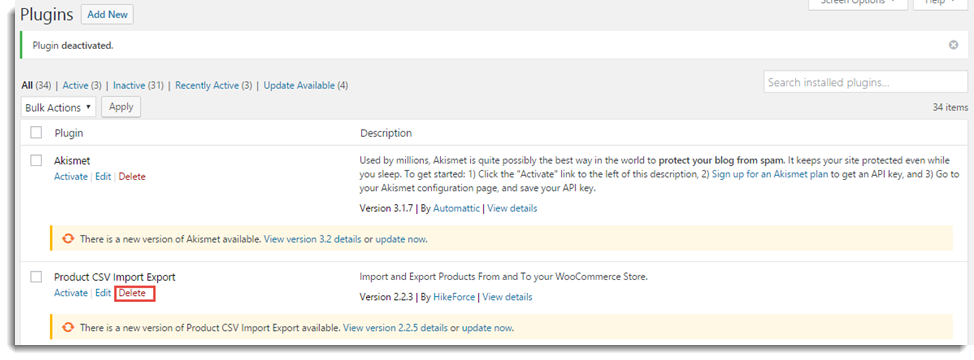
Delete - For next procedure, please continue from Step 2 of How to install WordPress/WooCommerce plugin to your WordPress website?
Note: Your existing settings of the plugin remains intact while updating the plugin.
FAQ
Q1: How to download Premium WordPress/WooCommerce plugin from XAdapter?
Please refer the article section, Steps to Download the Premium Plugin from XAdapter.
Q2: How to install Free WordPress/WooCommerce plugin?
Please refer the article section, Steps to Download and Install the Free/Basic Plugin.
Q3: I see a bunch of files instead of plugin zip after download.
Invalid plugin message during install.
Solution: If you are using Safari browser in Mac, sometimes plugin zip will be automatically extracted by Safari while downloading. To solve this, please follow below steps before downloading plugin:
– Open Safari.
– Click Preferences.
– Under the General tab, uncheck the option Open “safe” files after downloading.
– Download the plugin zip again.
Q4: Do your WooCommerce plugins work on WordPress multisite?
Yes. You have to Install the WooCommerce plugin & Our plugin at the network level (DONT Activate).
And Activate WooCommerce & Our plugin and the individual site level.
Q5: I still face issues with plugin even after following this document.
Please mail to support@xdapter.com. We will get back to you and resolve any issues asap.
Check out these high-quality WooCommerce plugins available at our Marketplace.
i bought the DHL plugin last year for 5 sites.
i installed on one site, but when i log in my account and klick on api keys or downlaods, i can’t see any link.
it’s all empty. Order #52492
I just installed the Multi-Carrier Shipping program successfully.
Now how do I get the program to see my products?
They’re already listed with weights and dimensions in WooCommerce.
Shipping options not showing on the checkout page. Any help?
Also, any directions and details on how to set up the “Rules?”
I have specific products that need to ship ground only.
It’s not an entire group of products, just some listed under the main group heading.
Thanks!
Hi Tracie,
-Firstly, you would need to create your the areas for shipping in the ‘Shipping Area Management’ section. Once done, you can create the shipping rules based on Shipping class/Product category of your products and then select the carrier and respective shipping method. Here is a simple article that explains the setting-up: https://www.xadapter.com/setting-multi-carrier-shipping-plugin-woocommerce/
– You can create a ‘Shipping class’ (say class-a), and then assign this shipping class to the Ground shipping products. And select carrier and service.
– The respective shipping carrier’s API, will automatically recognize the address as ‘Residential or Commercial’. So the customers need not have to explicitly specify this.
Regards,
I had version 3.9.9 of Xadapter. I just upgraded to the latest version and downloaded. How do I update the plugin? In the settings tab I entered the API key but I still do not see any button to update…I thought once I entered the new API key it might recognize I have an old version but it did not. Am I supposed to delete the plugin and then reupload? If I do this will I lose all my UPS settings?
thanks
Hi Barry,
Under Installed plugins folder, you will see the new update notification of the latest version. You can click on update there.
If you want to manually update, just deactivate and delete the old plugin and then install the latest version from “Add New” section under “Plugins”. Do not worry. Your previous settings will remain intact even if you delete the old plugin.
Hello,
I do not have the Generic API Settings part of the WooCommerce->Settings->Shipping->EasyPost menu. It’s just missing. This video provided in earlier comments https://www.youtube.com/watch?v=GfNkqLykFto&feature=youtu.be suggests that I need to fill out that section to get the shipping to work. Are these settings no longer there? I can’t find where to link my USPS, UPS, FedEx accounts to EasyPost in WooCommerce.
Thanks
Hi John,
Hope you have received our reply via the ticket #21410
Thanks
Were you able to get an answer to your question from XAdapter?
I see that they posted a ticket #21410 in response to your question, but I have the same issue as you and need to know the answer. Thank you.
Hi Bonnie,
You’re not able to find the shipping options in the Cart or Checkout page?
1. Please make sure you have opened Easy post account, and added the carrier accounts you’ll be using, enter the live or test carrier credentials in Easy post Dashboard under the Carrier Accounts.
2. Make sure you use the Correct API key from Easy Post,
3. The products in your shop need to have weight and dimension in them.
If you still face issues please do raise an online support ticket.
Regards,
Lorenzo
Hello,
I just purchased and installed the premium version, but it does not show up as a shipping method and UPS is not an option in my shopping cart.
Hi Shannon,
No worries.
Here is a video to solve your problems : https://www.youtube.com/watch?v=GfNkqLykFto&feature=youtu.be
Also, if you still face any problems,just approach our support team here.
Hi there,
i had baught the plugin from your site and it was working fine. but its the older version of the plugin, so now i have purchased the new version.
do i need to deactivate the old plugin and install the new one?
After install when I have uploaded your sample variations files then getting AJAX error. How to solve this?
Hi Pushpendra,
Apologies for the problem.
Kindly raise a ticket via support.xadapter.com
Our guys will help you out.
Don’t get any response from support ticket. Can you help me?
Hi. I deactivated and deleted the Basic version and attempted to install the Premium but get this error:
Installing Plugin from uploaded file: UPS-ShippingLabel-Label-5076-1Z1A43A80396824353.png
Unpacking the package…
The package could not be installed. PCLZIP_ERR_BAD_FORMAT (-10) : Unable to find End of Central Dir Record signature
Hi Teresa,
That is a strange error. Our team has sent you a mail with an attached zip. Can you try installing that?
Also, if the issue persists, you can immediately report this to our support team
Warning: file_get_contents(Ibtisama Cosmetics): failed to open stream: No such file or directory in /home4/ibtisama/public_html/wp-content/plugins/dhl-woocommerce-shipping/dhl_express/includes/class-wf-dhl-woocommerce-shipping-admin-helper.php on line 729
Warning: Cannot modify header information – headers already sent by (output started at /home4/ibtisama/public_html/wp-content/plugins/dhl-woocommerce-shipping/dhl_express/includes/class-wf-dhl-woocommerce-shipping-admin-helper.php:729) in /home4/ibtisama/public_html/wp-includes/pluggable.php on line 1210
Hello Simina,
We regret the inconvenience caused.
It seems you have saved the BASIC version or the older version plugin in the same name.
Please try deactivating and deleting the BASIC version if you have installed and also delete all previous versions if you have. If the problem persists, Please raise a request to https://support.xadapter.com/hc/en-us our team will help you in fixing your issues quickly.
Regards,
Veeresh
Having difficulty installing the Premium. Dir exists. Have deactivated, and deleted the basic version. Please help.
Installing Plugin from uploaded file: ups-woocommerce-shipping.zip
Unpacking the package…
Installing the plugin…
Destination folder already exists. /home/…/wp-content/plugins/ups-woocommerce-shipping/
Plugin install failed.
Hello Anders,
“Destination folder already exists” Message comes only when there is a duplicate file or a folder with the same name exist. Please Deactivate and delete the BASIC version before downloading the premium version of the plugin.
OR, Login through the FTP and delete the folder. It will work fine.
If you still face the same issue, Please raise a request to https://support.xadapter.com/hc/en-us We will help you in installing your plugin.
Regards,
Veeresh
get an install error, Destination folder already exists
Hello Steve,
It seems you have an older version of the plugin or the BASIC version of the plugin in the same name.
Please ensure you have deactivated and deleted the old version of the plugin before installing the new one.
If still problem persist, Please raise a request to : https://support.xadapter.com/hc/en-us
We will help you to understand better.
Hello,
I’ve set a few rules with the FREE version of the plugin. I’ve bought the PRO version and read that it would keep the rules. BUT now that I have installed as said on the instructions the PRO version, all the rules are gone. Can you help me with that please?
Thank you in advance
Hello Dimitrios,
We are using same keys for both BASIC version and the PRO version.
Ideally, all settings should remain same. Please raise a request to analyze the issue.
Link to request : https://support.xadapter.com/hc/en-us
Regards.
Veeresh
Hello, I’ve also just renewed my license. Anindo replied to the same question with, “If you have got a new key, just put the details in WooCommerce –> Settings –> Plugin settings and you are ”
I do not have a “plug-in settings” under WooCommerce >> settings. Can you provide clarification? Thank you.
Shipping options not showing on the checkout page. Any help?
Hi Alfred,
Just enable the debug mode in plugin settings and place an order from the cart page.
You will get DHL response. Just see the response for the error message and let us know.
Our team will guide you.
I renewed my license. Do I need to apply a new key somewhere?
Please advise,
Hi Anthony,
If you have got a new key, just put the details in WooCommerce –> Settings –> Plugin settings and you are done!
I click download and it’s not a zip file.
Hello Jeffrey,
If you are using Safari browser in Mac, sometimes plugin zip will be automatically extracted by Safari while downloading. To solve this, please follow below steps before downloading plugin:
– Open Safari.
– Click Preferences.
– Under the General tab, uncheck the option Open “safe” files after downloading.
– Download the plugin zip again.
Please check this section.
https://www.xadapter.com/how-to-download-install-update-woocommerce-plugin/#faq
I keep getting this message when I try to print the Shipping Label.
You need to Add Shipping from Address to Print shipping labels
Help?
Steven
Steve@oklahomaplastic.com
Hi Steven,
The label contains the “Ship From” and “Ship to” addresses.
So in order for the plugin to display these details, you need to put in them in plugin settings page.
Hence, we request you to fill the “Ship From Address Preference” details and also all Origin Address details including city, state, postcode, etc.