What can we help you with?
How to configure Tax options based on User Roles with ELEX WooCommerce Catalog mode, Wholesale and Role-Based Pricing plugin?
This article is intended to explain the configuration process required for setting up Tax Options with our ELEX WooCommerce Catalog mode, Wholesale and Role-Based Pricing plugin.
Configure Tax options based on WooCommerce User Roles:
Contents:
- Setting up Taxes in WooCommerce
- Configuring WooCommerce Tax settings for ELEX WooCommerceCatalog mode, Wholesale and Role-Based plugin
- Configuring Tax Options in our WooCommerce Role-Based Pricing plugin
Setting up Taxes in WooCommerce
To get started with configuring tax options on this plugin, you have to first configure the core tax settings in WooCommerce.
- Head to WooCommerce -> General settings section.
- Check the Enable taxes and tax calculations option. This setting will create a separate tab for Tax in the WooCommerce settings.

The WooCommerce Tax settings consist of the following:

The first section is the Tax Options, and contains the following settings:
- Prices Entered With Tax: This option allows you to configure the product prices to be entered inclusive or exclusive of tax.
- Calculate Tax Based On: Helps in calculating taxes based on either of the following options –
- Customer shipping address
- Customer billing address
- Shop base address
- Shipping Tax Class: These tax classes are used to classify taxes based on various cases. In most of the cases, the shipping tax class is based on the items in the cart. You can also create custom tax classes. This list contains all the custom tax classes, including the default ones.
It has following options by default:- Shipping tax class based on cart items
- Standard
- Reduced Rate
- Zero Rate
- Rounding: This option helps in rounding the tax at sub-total level, instead of rounding per line.
- Additional Tax Classes: Based on your requirements, you can create additional tax classes in this setting.
In the Tax settings, a separate section is created whenever a new tax class is added.

You can configure the tax class settings in the respective sections.
Following is a screenshot of tax rules defined for Standard Rates tax class:

- Display Prices in the Shop: Allows you to configure how prices should be displayed in the shop. You can either choose to display product prices inclusive of tax or exclusive of tax in the shop page.
- Display Prices During Cart and Checkout: Allows you to configure how prices should be displayed in the cart and checkout page. You can either choose to display prices inclusive of tax or exclusive of tax in the cart and checkout page.
- Price Display Suffix: Allows you to set a default text suffix to the product prices.
Example, Inclusive of all Taxes.
- Display Tax Totals: Allows you to configure how taxes should be displayed in your store. You can display as a single total or show individually.
Configuring WooCommerce Tax settings for ELEX WooCommerce Catalog mode, Wholesale and Role-Based Pricing plugin
With the help of this plugin, you can tweak four important WooCommerce tax settings, based on User role. These settings are as follows:
- Additional Tax Classes
- Display Prices in the Shop
- Display Prices During Cart and Checkout
- Price Display Suffix
To understand these settings better, consider the following example.
- First, let us configure how the product prices will be entered.

Let us set the second option. i.e, we will enter prices exclusive of tax.
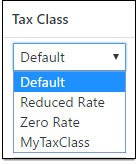
- Create a new tax class titled “MyTaxClass“. Enter the name MyTaxClass in the Additional Tax Classes text area option as shown below:

- Next, move to the Display Prices in the Shop setting. Select the first option – Including tax, which indicates that prices in the shop page should be displayed inclusive of tax.

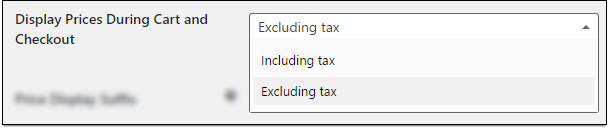
- Lastly, move to the next option Display Prices During Cart and Checkout setting. Select the second option – Excluding tax, which indicates that prices should be displayed exclusive of tax.
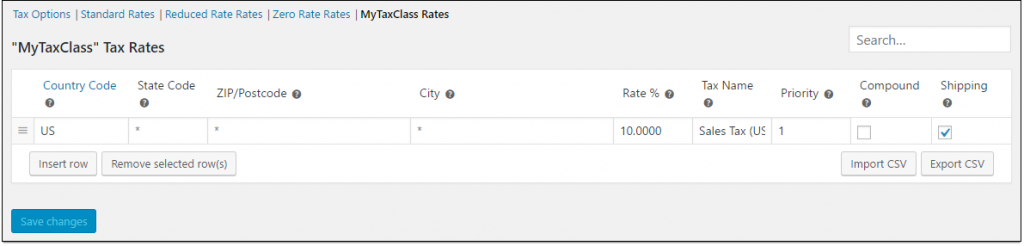
Once the settings are saved, a new section appears in the Tax settings titled MyTaxClass Rates as shown below –

- Go to MyTaxClass Rates tab to configure it.

The tax rule contains the following value fields:
- Country Code – Two-digit country code for the country where the tax should be applied. You can leave this field blank to apply to all countries.
- State Code – Two-digit state code of the respective state, where the tax should be applied. You can leave this field blank to apply to all states, or if state code does not apply to your country.
- ZIP/Postcode – Specific postcodes where the tax should be applied. You can add multiple postcodes separated with a semi-colon. You can leave the field blank to apply the tax to all areas in the state.
- City – Enter the city names of the selected states where the tax should be applied.
- Rate % – The tax rate in percentage.
- Tax Name – A custom name for the tax.
- Priority – In the case of multiple tax rules, you can set priorities of how taxes should be applied. The rule with the highest priority will be applied.
- Compound – Enable this option to apply the newly-created tax on top of other taxes.
- Shipping – Enable this option to apply a tax on shipping rates.
To create a new tax rule, click the Insert Row button.
For example, we will set a tax rate of 10% for US (United States) and name it as Sales Tax (US). The rule can be defined as shown below:
Configuring Tax Options in our WooCommerce Role-Based Pricing plugin
To configure tax settings on the plugin, navigate to WooCommerce -> Pricing and Discount tab.
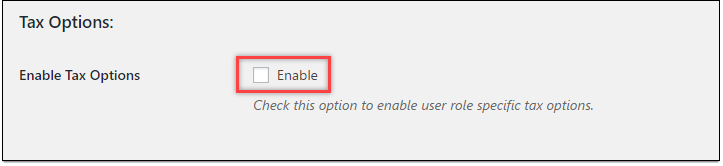
Next, scroll down to find the Tax Options settings.
- The first step is to enable the tax options. Check this option to enable further settings.
- Once enabled, the Tax Options Table is displayed as shown below.
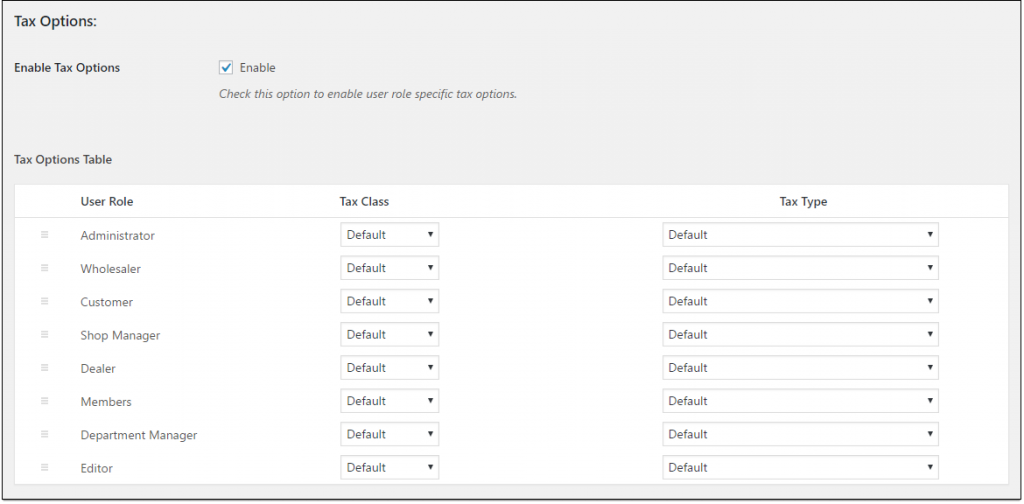
The table is structured into three columns:
- User Role: The specific role defined for the users of the website. Each user role has a different set of permissions for performing tasks. These roles are assigned by the Administrator of the website.
For example, a typical e-commerce business might have user roles like Administrator, Wholesaler, Customer, Shop Manager, Dealer, Members, Department Manager, Editor and so on as shown in the above screenshot.
You can set the priority to apply a tax for required user role by simply dragging the hamburger icon and dropping it in the appropriate position. User Role which is listed first on the list has the highest priority.
- Tax Class: It lists both custom tax classes as well as default ones defined in the WooCommerce tax settings. You can see our custom tax class MyTaxClass listed here.
- Tax Type: Allows you to configure how the prices should be displayed in the shop, cart and checkout page based on user role. The selected value in this list will override the default settings in WooCommerce. This feature is a major advantage over the default WooCommerce setting for displaying prices.
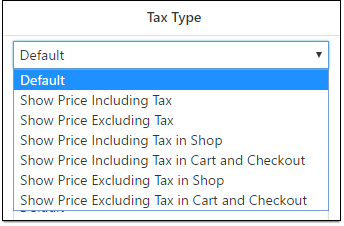
It consists of the following values:
- Default – The default WooCommerce settings configured for displaying prices on shop, cart and checkout page.
- Show Price Including Tax – Show price including tax on the shop, cart, and checkout pages.
- Show Price Excluding Tax – Show price excluding tax on the shop, cart, and checkout pages.
- Show Including Tax in Shop – Show price including tax on the shop page and use the default WooCommerce settings for cart and checkout pages.
- Show Including Tax in Cart and Checkout – Show price including tax on the cart and checkout pages and use the default WooCommerce settings for shop page.
- Show Excluding Tax in Shop – Show price excluding tax on the shop page and use the default WooCommerce settings for cart and checkout pages.
- Show Excluding Tax in Cart and Checkout – Show price excluding tax in the cart and checkout pages and use the default WooCommerce settings for shop page.
Let us consider the following example to understand how to configure this setting to be used based on user role:
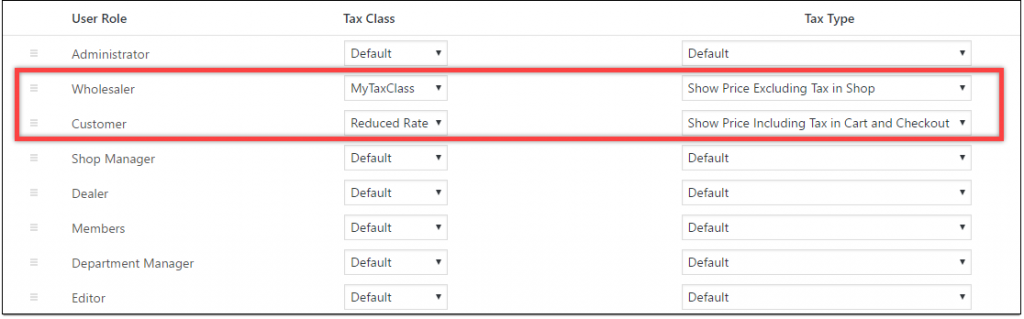
Here, let’s configure tax class and tax type for two users; Wholesaler and Customer.
- Wholesaler: Wholesalers will be taxed based on the previously defined rates in MyTaxClass.
Also, the prices will be displayed exclusive of tax on shop page and the default settings will be overridden.
For cart and checkout pages, the WooCommerce default setting will be applied (which is displaying prices exclusive of tax as defined previously in this article).
- Customer: Customers will be taxed based on tax rate defined in Reduced Rate tax class.
Also, the prices will be displayed inclusive of tax on the cart and checkout pages and the default settings will be overridden.
For shop page, the WooCommerce default setting will be applied (which is displaying prices inclusive of tax as defined previously in this article).
Similarly, you can configure these settings for other users too.
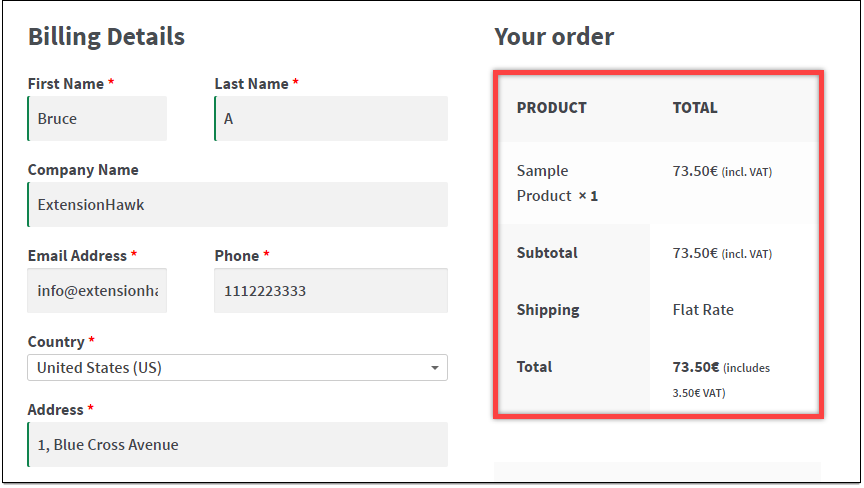
The following screenshot shows how Customers view the checkout page. The prices are displayed inclusive of tax, as configured.
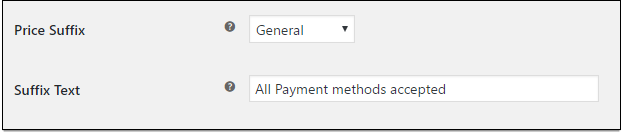
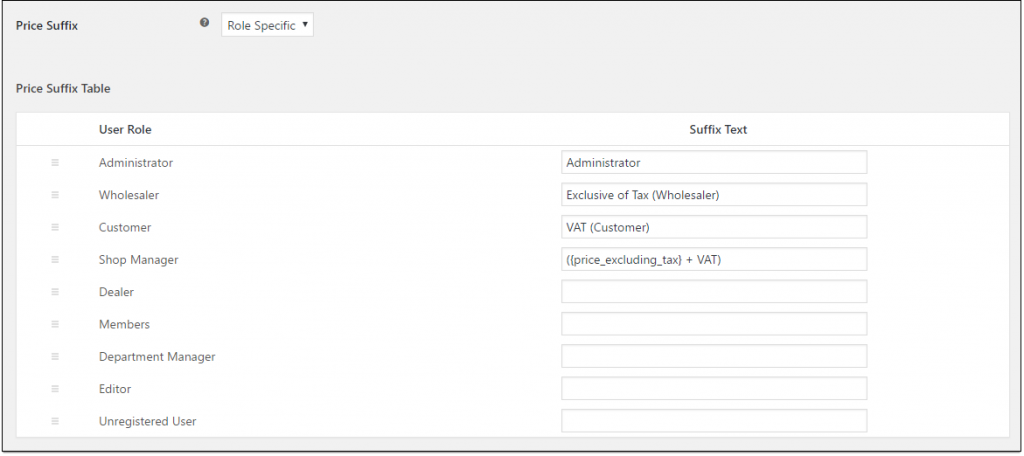
In addition to this, you can set custom suffix text for the tax rate for each user role. The Price Suffix Options setting helps you achieve this.
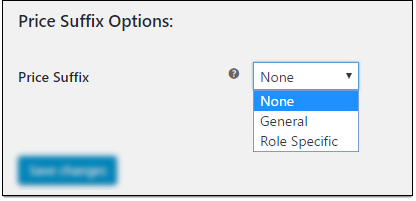
It contains the following values:
- None – No suffix text.
- General – A common suffix text for all users.
- Role Specific – Allows you to set custom text based on user role.
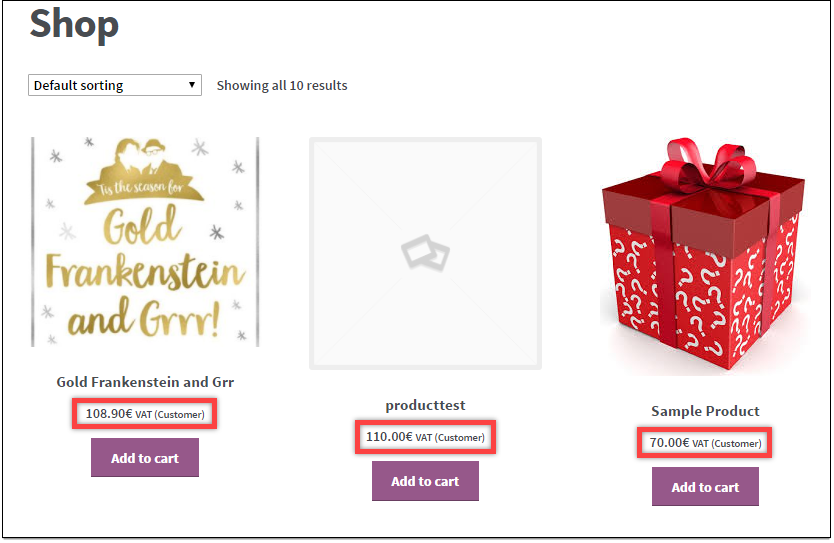
The following screenshot shows how Customers view the shop page. The custom suffix text is displayed, as configured.
Hence in this way, you can configure Tax options based on User Roles with ELEX WooCommerce Catalog mode, Wholesale and Role-Based Pricing plugin.
Related reading:
- How to turn your store into WooCommerce Product Catalog? (with Video)
- How to set up WooCommerce Wholesale Pricing?
- How to add a Suffix to WooCommerce Product Prices based on User Roles? (with Video)
To explore more details about the plugins, go check out ELEX WooCommerce Catalog Mode, Wholesale & Role Based Pricing plugin.
Read the product setting up article to understand the plugin, in detail. Or check out the product documentation section for more related articles.
You can also check out other WooCommerce and WordPress plugins in ELEX.